
Abstract
Assessment of the blood-brain barrier (BBB) may involve the localization of endothelial proteins within the context of endothelial permeability to plasma proteins. The use of antibodies conjugated to fluorescent dyes, coupled with analysis by confocal microscopy, allows for the detection of multiple proteins in components of the neurovascular unit including endothelium and astrocytes. This chapter provides a detailed protocol for detection of three proteins in fixed or frozen sections of rat brain using three fluorophores with unique excitation/emission spectra. Also included is a protocol for tyramide signal amplification, which is useful for detecting proteins of low abundance, and methods for quantitation of intracerebral vessels expressing a particular protein of interest with and without BBB breakdown to plasma proteins.
1 Introduction
Many forms of brain injury such as infarcts, trauma, inflammation, and tumors are associated with breakdown of the blood-brain barrier (BBB) to plasma proteins leading to vasogenic edema. The availability of antibodies to plasma proteins led to the detection of areas with BBB breakdown to plasma proteins in tissue sections as far back as 1984 when the unlabeled antibody peroxidase–antiperoxidase method was used (1). In a lesion area, 60–80% of vessels consisting of arterioles and corresponding-sized veins show BBB breakdown (2, 3). Therefore, to detect proteins of interest in the endothelium of vessels with BBB breakdown, serial sections of vessels were obtained and adjacent sections were used to detect plasma protein extravasation and the protein of interest (4), a technique which was very labor-intensive. In the case of the immunogold technique, gold particles of different sizes were used to study localization of an endothelial protein along with a marker of BBB breakdown (5).
The availability of fluorescent dyes, which can be conjugated directly or indirectly to antibodies has provided significant advantages to the field (6). Many different dyes are available, each with a unique excitation/emission spectrum, which when used in combination can allow for the localization of multiple proteins at the same time. The technique of multiple labeling by immunofluorescence (IF) to study colocalization of various proteins within the cell has been used extensively in the field of BBB research (2, 3, 7–9). One disadvantage of IF studies is interpretation in cases where there is overlap of signals from surrounding cells or tissues. This has been circumvented by the use of a confocal laser scanning microscope which allows for the visualization of fluorescence in only one focal plane, thus eliminating background noise (10, 11). Confocal microscopy also uses sensitive photomultipliers and narrow bandpath filters, allowing for the capture of fluorescence from only a small range of wavelengths from visible light. This minimizes cross-talk or “bleed-through” where spectra of fluorescent dyes used may overlap (12). These unique parameters make confocal microscopy essential for analysis of colocalization of proteins within cells or tissues.
Most commonly, multiple IF labeling makes use of two different primary antibodies along with their specific secondary fluorophores, in combination with a nuclear stain. Hoescht or DAPI, two common dyes that bind to DNA, emit blue light under UV excitation. The development of a wide variety of fluorophores allows for labeling of three unique proteins at once, while still allowing cells to be counterstained with a nuclear dye. Although the procedure of multiple labeling by IF is relatively simple, careful thought must be given when determining which primary and secondary antibodies and which fluorophores are to be used. The use of highly specific, affinity purified primary antibodies will decrease any background signal (13).
In this chapter, methods for multiple labeling by IF are described. The protocol is designed to make use of fluorophores from the green, red, and infrared portion of the light spectrum (see Table 1). A protocol for tyramide signal amplification (TSA) for immunofluorescent detection of antigens using very low levels of primary antibody is also included. It can be used alone, or in combination with multiple immunolabeling protocols. The final section of this chapter describes quantitative methods for determining vessel numbers in a lesion area showing expression of a protein of interest, in the context of BBB breakdown.
2 Materials
2.1 Fixation and Preparation of Paraffin-Embedded Sections
-
1.
Isoflurane (Pharmaceutical Partners of Canada Inc, Richmond Hill, ON).
-
2.
Three percent paraformaldehyde in 0.1M phosphate buffer, pH 7.4.
-
3.
Solvents: Ethanol, Xylene, Acetone.
-
4.
Colorfrost slides (Fisher Scientific, Nepean, ON), or other glass slides.
-
5.
3-aminopropyltriethoxysilane (Sigma-Aldrich, St Louis, MO).
-
6.
Paraplast Plus Tissue Embedding medium (Oxford Labware, St. Louis, MO).
-
7.
Sta-On Tissue Section Adhesive (Surgipath Medical Industries Inc, Richmond, IL).
2.2 Preparation of Frozen Sections
-
1.
Detergent solution: Sparkleen1 (Fisher Scientific).
-
2.
Thirty percent sucrose in 0.1M phosphate buffer.
-
3.
Tissue-Tek® O.C.T. Compound 4583 (Fisher Scientific).
-
4.
Subbing solution: 1% Type A Gelatin and 0.1% chromium potassium sulfate (chrome alum) in distilled water.
-
5.
Poly-L-lysine hydrobromide, MW 300,000 (Sigma-Aldrich). Make a 0.005% Poly-L-lysine hydrobromide solution in 0.1M Tris HCl, pH 8.
2.3 Antigen Retrieval
-
1.
0.01M Na Citrate buffer, pH 6.0.
-
2.
0.5% pepsin in 0.01M HCl solution.
-
3.
Microwave, hotplate, and vortexer.
2.4 Triple Labeling for Immunofluorescence Analysis
-
1.
A humid chamber (see Note 1).
-
2.
Glass or plastic staining dishes.
-
3.
Pipetors: 1–10 and 10–100 μL with tips.
-
4.
Shaker for slide washes.
-
5.
Phosphate buffered saline (PBS): Dissolve 8.0 g of NaCl, 0.2 g of KCl, 1.44 g of Na2HPO4, and 0.24 g of KH2PO4 in 800 mL of distilled water. Adjust pH to 7.4 and the volume to 1 L. Sterilize by autoclaving. This solution can be made as a 10× stock.
-
6.
Rubber Cement.
-
7.
5 mL plastic syringe with a 22gauge needle.
-
8.
Normal goat whole serum and normal donkey whole serum, 1:20 dilution in PBS (Jackson Immunoresearch Laboratories Inc, Westgrove, PA, USA).
-
9.
Primary antibodies diluted in PBS: Monoclonal mouse anticlaudin-5, 1:45 dilution (Zymed, San Francisco, CA, Cat# 35-2500); Polyclonal rabbit antihuman Fibronectin, 1:150 dilution (Sigma-Aldrich, Cat# F3648); Polyclonal rabbit antiglial fibrillary acidic protein (GFAP), 1:2000 dilution (Dako Canada Inc, Mississauga, On, Cat# Z0334), (see Note 2).
-
10.
Fluorophore-conjugated secondary antibody or fluorophore-conjugated streptavidin and secondary biotinylated link antibody (see Table 1, Note 3).
-
11.
Mowiol mounting medium (14): Add 2.4 g of Mowiol (Calbiochem, San Diego, CA) to 6 g of glycerol. Stir to mix. Add 6 mL of water and leave for several hours at room temperature. Add 15 mL of 0.2M Tris (pH 8.5) and heat to 50°C for 10 min with occasional stirring. After the mowiol dissolves, clarify by centrifugation at 5,000 × g for 15 min. For fluorescence detection, add 2.5% 1,4-diazobicyclo-(2,2,2)-octane (DABCO) to reduce fading. Place aliquots in airtight containers and store at −20°C (see Note 4).
-
12.
Cover slips.
-
13.
Zeiss LSM 510 Confocal laser scanning microscope (Carl Zeiss International, Germany) with appropriate lasers and filter sets (see Table 1).
2.5 Tyramide Signal Amplification Technique
-
1.
Methanol.
-
2.
Thirty percent Hydrogen peroxide (H2O2).
-
3.
TSA™ Detection Kit (Molecular Probes, Burlington, On): Contains Streptavidin-HRP, blocking reagent, amplification buffer, dimethyl sulfoxide (DMSO), H2O2 and tyramide-Alexa Green488.
-
4.
Tyramide stock solution: Dissolve tyramide in 150 μL DMSO. Mix well and store small aliquots at 4°C protected from light.
-
5.
Prepare 1% blocking solution in PBS.
-
6.
Streptavidin-HRP 1:650 (Jackson Immunoresearch Laboratories Inc) or use the streptavidin-HRP which comes with the kit.
-
7.
Amplification buffer with 0.0015% H2O2: Add 1 μL of 30% H2O2 to 200 μL amplification buffer. Add 1 μL of this solution to 100 μL amplification buffer. Prepare only as needed, making up 100 μL per slide.
2.6 Quantitation of Intracerebral Vessels
-
1.
Anti-Factor VIII antibody 1:200 dilution (Dako Canada Inc).
-
2.
Antiglucose transporter antibody 1:300 dilution (Calbiochem).
-
3.
Adobe Creative Suite 3 Software (Adobe Systems Inc, San Jose, CA).
-
4.
NIH Image J Software: http://www.rsb.nih.gov/ij, 1997–2004.
3 Methods
3.1 Fixation
-
1.
Rats are anesthetized using 3% Isoflurane for induction and 1–2% for maintenance.
-
2.
Rats are fixed by vascular perfusion of 350–500 mL of 3% paraformaldehyde via a cannula in the ascending aorta at a pressure of 120 mmHg (see Note 5).
-
3.
The brain is removed and immersed in the same fixative solution at room temperature.
-
4.
After a few hours, the brain is cut into coronal slabs having a thickness of 2 mm to allow better penetration of fixative.
-
5.
These slabs are placed in the same fixative solution overnight at room temperature and are processed for paraffin embedding the next day.
3.2 Preparation of Paraffin-Embedded Sections
3.2.1 Tissue Processing
-
1.
An automatic processor is recommended since processing is done under vacuum and this reduces processing time.
-
2.
The shortest processing schedule for coronal slabs of rat brain are:
-
(a)
Eighty percent ethanol for 30 min
-
(b)
Two changes of 95% ethanol for 30 min each
-
(c)
Three changes of ethanol for 40 min each
-
(d)
Two changes of xylene for 50 min each
-
(e)
Two changes of wax (Paraplast®) at 60°C for 30 min each.
-
(f)
The brain should be embedded in Paraplast® within 30 min of the completion of the processing cycle to prevent the tissue from becoming brittle and difficult to cut.
3.2.2 Slide Coating for Paraffin-Embedded Sections
-
1.
Fisher Colorfrost slides are slightly more expensive than the regular grade slides, but their advantage is that they do not require coating.
-
2.
All other slides should be coated with 2%, 3-aminopropyltriethoxysilane in acetone as follows:
-
(a)
Open a fresh box of slides and place in a metal rack.
-
(b)
Dip slides in 2% aminoalkylsilane for 5 min. The same solution can be reused to coat up to 500 slides.
-
(c)
Rinse by dipping 3 times in three changes of distilled water.
-
(d)
Dry slides for 2 h or overnight at 37°C.
-
(e)
Store slides in a dust-free container at 4°C. These slides can be used up to 2–3 weeks when stored at either room temperature or 4°C.
-
(a)
3.2.3 Paraffin-Embedded Sectioning and Deparaffinization
-
1.
Section thickness is usually 10 μm for confocal microscopy (see Note 6).
-
2.
Sta-0n Tissue section adhesive (1%) is added to the water bath used for floating the sections during cutting to ensure that sections adhere to both Color Frost and silanized slides.
-
3.
Allow slides to dry at room temperature for 2 h and then place in an oven at 55°C overnight.
-
4.
Sections are deparaffinized in the specified solutions for the stated time:
-
(a)
Xylene 2 changes, 5 min each
-
(b)
Absolute ethanol two changes, 3 min each
-
(c)
Ninety percent ethanol one change for 3 min
-
(d)
Seventy percent ethanol one change for 2 min
-
(e)
Fifty percent ethanol one change for 2 min
-
(a)
-
5.
Place slides in water and leave container in a 37°C water bath and proceed to Subheading 3.4.
3.3 Preparation of Frozen Sections
3.3.1 Fixation
-
1.
If frozen sections are required, follow steps 1–4 described in Subheading 3.1.
-
2.
Brains slabs are placed in 30% sucrose in 0.1M phosphate buffer at 4°C up to 3 days or until the brain sinks to the bottom of the container.
-
3.
Brains slabs are then placed in a puddle of Tissue-Tek® and frozen in a cryostat at −25°C.
-
4.
The brain slabs are wrapped in aluminum foil and placed in a labeled jar and stored at −80°C.
3.3.2 Coating Slides for Frozen Sections
To prevent sections of fixed frozen brain from washing off during immunostaining, it is recommended to first sub slides followed by a poly-L-lysine coating (15). These steps are essential if in situ hybridization precedes the immunostaining.
-
1.
Slides are placed in racks and soaked in detergent solution for 30 min or overnight.
-
2.
Rinse for 30 min in hot running tap water and then in three changes of distilled water over a period of 30 min.
-
3.
Drain excess water from slides by placing the slide rack on a paper towel.
-
4.
Dip in 100% ethanol and then air dry.
-
5.
Immerse rack for 10 min in the subbing solution at 37°C and drain slides on a paper towel.
-
6.
Dry slides overnight at 37°–50°C and store in boxes for up to 2 months.
-
7.
Before use, subbed slides are placed in a rack and coated with the 0.005% poly-L-lysine hydrobromide solution for 30 min.
-
8.
Drain excess solution and dry at least 30 min in a fume hood and store in dust-free boxes.
-
9.
Treated slides are placed in a dessicator overnight prior to cutting frozen sections.
-
10.
Frozen section thickness can range from 15 to 20 μm.
-
11.
Sections can be stored at −20°C or −70°C for months without loss of antigenicity.
-
12.
Hydrate sections by placing in PBS and proceed to Subheading 3.4.
3.4 Antigen Retrieval
The mechanism of antigen retrieval, either by enzyme action or heat, is based on cleaving cross-linkages and extending polypeptides to more closely resemble the 3D structure of native proteins for better recognition by its antibody (16, 17). Enzymes such as pepsin, trypsin, pronase, and Proteinase K may be used. Heat-induced epitope retrieval may be followed by enzyme-induced epitope retrieval or either method may be used alone.
3.4.1 Enzyme-Induced Epitope Retrieval
-
1.
In our laboratory 0.5% pepsin alone for 30 min at 37°C is used for 10 μm paraffin-embedded or frozen sections (see Note 7).
-
2.
Heat 0.01M HCl in a microwave at full power for 10 s in a coplin jar and then add the required amount of pepsin and stir.
-
3.
When the temperature of the pepsin is 39°C, add the slides to the container and place in a 37°C water bath for 30 min.
-
4.
Wash slides with three changes of distilled water for 3 min followed by two changes of PBS for 3 min each.
3.4.2 Heat-Induced Epitope Retrieval (see Note 8)
Tight complexing of calcium ions or other divalent metal cations with proteins during formaldehyde fixation is suggested to be responsible for the masking of certain antigens (18). During heat-induced epitope retrieval, the citrate buffer in which the sections are immersed removes calcium from the tissues.
-
1.
A plastic rack containing the slides is immersed in a beaker containing 500 mL of the NaCitrate buffer. The beaker is covered with loosely fitting aluminum foil.
-
2.
Place beaker on a hot plate and boil for 10 min, then place the beaker on the counter and cool for 20 min.
-
3.
Place sections in cool 0.1M PBS.
3.5 Triple Labeling for Analysis by Immunofluorescence
Best results are obtained when primary antibodies raised in different species are used for multiple labeling (19) (Fig. 1). The methods to detect claudin-5 in brain endothelium, fibronectin as a marker of BBB breakdown, and GFAP in astrocytes in the same brain section from a lesion site are described and illustrated (Fig. 2a–d). Two primary antibodies raised in the same species can be used if monovalent Fab fragments are used as secondary antibodies for detection of the first antigen. These fragments contain only one binding site, thereby reducing the possibility of cross-reactivity (10, 20, 21) in most but not all cases (see Fig. 2e, f).

Confocal images of the cerebral cortex of cold-injured (a–d) and control rats (e–h). (a) Red and green channels of a day 2 cold-lesion shows vessels with BBB breakdown to fibronectin (red) have reduced claudin-5 signal (arrowheads). The nonpermeable microvessels show claudin-5 (green). (b) The merged confocal image shows astrocytic processes in the surrounding neuropil which is pseudocolored in blue (arrowheads). (c) Red and green channels of a day 4 cold-lesion show a vein with BBB breakdown to fibronectin (arrowheads). There is restoration of claudin-5 at endothelial tight junctions (green). (d) The merged image shows astrocytic processes in the surrounding neuropil (blue). (e, f) This example shows the pitfalls of dual labeling using two primary antibodies from the same species despite the use of a monovalent Fab fragment of a secondary antibody conjugated with Cy3. In this case glucose transporter-1 (green) and fibronectin (red) colocalize in endothelium (e). This should not occur since normal microvessels should not show endothelial fibronectin immunostaining (f). (g) Results of tyramide enhancement detection have to be evaluated with caution. The green channel shows diffuse circumferential immunoreactivity for JAM-A with tyramide enhancement which is nonspecific. Specific localization of JAM-A at tight junctions is shown in (h). (a–h) Scale bars = 20 μm.
3.5.1 Detection of the First Antigen
-
1.
Dispense rubber cement in a syringe through a 22gauge needle to circle the tissue section. Place slides in a humid chamber.
-
2.
Shake off excess buffer and apply normal goat serum to sections for 15 min at room temperature. Use an appropriate volume of solution to ensure full coverage of the section including at least 2 mm around the section to avoid “edge effect.”
-
3.
Shake off normal serum and apply monoclonal mouse anticlaudin-5 antibody to the section. Incubate slides for 4°C overnight (approximately 16 h). The dilution of the primary antibody and the incubation time should be determined empirically (see Notes 9 and 10).
- 4.
-
5.
Wash slides 3 times with PBS for 5 min each (see Notes 13–14).
-
6.
Shake off excess buffer and apply biotinylated goat-anti mouse to sections for 30 min at room temperature. Again, the dilution of the secondary antibody should be determined empirically.
-
7.
Repeat step 5, shake off excess buffer and apply Streptavidin-Alexa488 and incubate at room temperature for 20 min in the dark (see Note 15).
-
8.
Repeat step 5.
3.5.2 Detection of the Second Antigen
-
1.
Shake off excess buffer and apply normal goat serum for 15 min at room temperature.
-
2.
Shake off normal serum and apply rabbit antihuman fibronectin antibody for 1.5 h at room temperature.
-
3.
Wash slides 3 times with PBS for 5 min each.
-
4.
Shake off excess buffer and apply goat antirabbit Cy3 antibody to sections for 20 min at room temperature.
-
5.
Repeat step 3.
3.5.3 Detection of the Third Antigen
-
1.
Shake off excess buffer and apply normal donkey serum for 15 min at room temperature.
-
2.
Shake off normal serum and apply polyclonal rabbit anti-GFAP antibody for 2 h at room temperature.
-
3.
Wash slides 3 times with PBS for 5 min each.
-
4.
Shake off excess buffer and apply goat antirabbit Cy5 antibody to sections for 15 min at room temperature.
-
5.
Remove rubber cement from around tissue and repeat step 3.
-
6.
Mount sections using mowiol mounting medium.
-
7.
Save slides in folders with covers at 4°C.
3.6 Tyramide Signal Amplification Technique
TSA can be used to improve the detection sensitivity of the immunofluorescent signal in many tissues including the brain (16, 22). The tyramide added in the procedure reacts with horseradish peroxidase (HRP) to create reactive tyramide radicals, which can then bind to tyrosine residues in the tissues in close proximity to where HRP is bound (22). The tyramide is conjugated to a fluorophore, which can then be visualized by fluorescence microscopy. TSA can also be used in multiple labeling using primary antibodies raised in the same species. With TSA, tenfold less primary antibody is used and this low concentration of antibody is not recognized by a fluorophore-conjugated secondary antibody used in the traditional IF method (22). We have obtained optimal results using tyramide enhancement to detect phosphorylated caveolin-1 and fibronectin as a marker of BBB breakdown at the cold-injury site (2).
-
1.
Prepare tissue samples as described in Subheadings 3.1–3.4.
-
2.
To quench endogenous peroxidases, place slides in 0.3% methanolic peroxide for 20–30 min depending on the number of red blood cells present in the section.
-
3.
Wash slides in distilled water for 3 min and then in two changes of PBS for 3 min each.
-
4.
Follow steps 1–5 in Subheading 3.5.1 to detect the antigen required.
-
5.
Shake off buffer and apply streptavidin-HRP for 30 min.
-
6.
Wash slides 3 times in PBS for 5 min each.
-
7.
Prepare a working solution of tyramide-Alexa488, by diluting the tyramide stock solution 1:100 in amplification buffer/0.0015% H2O2. Add the diluted tyramide-Alexa488 to slides and incubate for 4 min at room temperature.
-
8.
Repeat step 6 and continue with detection of other antigens (see Subheading 3.5.2) or proceed to mounting slides.
-
9.
When evaluating results ensure that the signal obtained is specific (see Note 16, Fig. 1g, h).
3.7 Quantitation of Intracerebral Vessels
Captured images from an area of interest can be used to quantitate the total number of intracerebral arterioles, which typically have diameters greater than 10 μm, and microvessels such as venules or capillaries, which have a diameter of ∼5 μm. These data can be used to calculate the percentage of vessels showing BBB breakdown and the percentage showing an endothelial protein of interest.
3.7.1 Quantitation of Intracerebral Arterioles with BBB Breakdown
-
1.
Horizontal sections (10 μm) of the cerebral cortex containing the lesion area are immunostained for the protein of interest as described in Subheading 3.5.1 and for fibronectin as described in Subheading 3.5.2.
-
2.
Images of at least five adjacent fields of the area of interest per section are captured at an objective magnification of 20× using a fluorescence or confocal microscope.
-
3.
Obtain images from at least three to five rats per group.
-
4.
The area of the images used for quantitation is measured using Adobe Photoshop CS3 or equivalent soft ware. This value multiplied by the number of sections gives the total lesion area assessed for each experimental group in mm2.
-
5.
Determine the following parameters in a blinded manner with no knowledge of the experimental groups:
-
(a)
The total number of vessels per section (>10 μm in diameter).
-
(b)
The number of these vessels showing extravasation of fibronectin indicating BBB breakdown and how many of these contain the protein of interest.
-
6.
Express values as percentage of vessels showing BBB breakdown and the percentage positive for the protein of interest.
-
7.
In the cold-injury model it is mainly arterioles and corresponding-sized veins that show BBB breakdown to fibronectin. In this model 66% of vessels in a 0.7 mm2 lesion area show BBB breakdown and 100% of them show endothelial phosphorylated caveolin-1 (2).
3.7.2 Quantitation of Microvessels
-
1.
Stain sections containing the region of interest with a marker of brain endothelium such as Factor VIII or Glucose transporter 1 as described in Subheading 3.5.1. Other options are CD31 (see Chap. 14) or fluorescein–lycopersicin esculentum lectin (see Chap. 22).
-
2.
Sections are then immunostained for fibronectin as given in Subheading 3.5.2.
-
3.
Follow steps 2–4 given in Subheading 3.7.1.
-
4.
Using Adobe Photoshop CS3 or equivalent soft ware determines the following parameters in a blinded manner with no knowledge of the experimental groups:
-
(a)
Number of microvessels per section (<10 μm in diameter).
-
(b)
The number of vessels showing extravasation of fibronectin indicating BBB breakdown and how many of these contain the protein of interest.
-
(a)
-
5.
Express values as percentage of vessels showing BBB breakdown and the percentage positive for the protein of interest.
4 Notes
-
1.
A humid chamber can be purchased or made by gluing glass rods to the bottom of a plastic box. Use a leveler to ensure that the rods are level to prevent antibodies from pooling in one area of the section. Strips of paper towel moistened with an excess of water are placed at the bottom of the chamber.
-
2.
Antibodies are stable indefinitely when stored concentrated in aliquots at −80°C. Once they are thawed, they should not be refrozen. Prior to use, make sure that the antibody is fully reconstituted in PBS and vortex before use.
-
3.
In our experience, Jackson Immunoresearch Laboratories Inc and Molecular Probes® provide the best quality of fluorescent-tagged secondary antibodies which can be used at low dilutions and give a high signal to noise ratio.
-
4.
An alternate approach is to purchase mounting medium from suppliers. Prolong® Antifade Kit (Molecular Probes®) reduces photobleaching with little or no quenching of the photo signal, while a range of Vectashield® mounting media is available including mounting media with DAPI or Propidium iodide for nuclear staining (Vector Laboratories Canada Inc, Burlington, On).
-
5.
Perfusion-fixed brains give the best signal and least background as compared to immersion-fixed tissue. If the antibody fails to give a signal on fixed tissue, frozen sections can be tried.
-
6.
Thicker sections can be used, but problems may arise in the interpretation of results. The endothelium and astrocytes are in close proximity in microvessels and in thick sections (> than 10 μm), overlapping of the signal in these cell types may give a false impression of colocalization of the proteins of interest. In such cases examination of multiple optical slices may help or the use of software such as ImarisColoc (Bitplane Inc, Saint Paul, MN, USA) or Colocalizer Pro (Colocalization Research Software, Tokyo, Japan) can be used to perform a quantitative colocalization analysis of fluorescence images. A free program available from NIH, called Image J (http://rsbweb.nih.gov/ij/), has a variety of plug-ins available for quantification of colocalization. Most of these programs make use of algorithms to calculate correlation coefficients of multiple fluorescent signals to determine the degree of colocalization.
-
7.
The concentration of pepsin can be varied from 0.05 to 0.5% and the period of exposure to pepsin can be varied from 15 to 30 min. Both parameters have to be established for demonstration of a specific protein. In our laboratory if 0.5% pepsin alone for 30 min at 37°C does not give an optimal result, other options are explored.
-
8.
Alternate methods for heat-induced epitope retrieval include the use of a microwave (23–25), pressure cooker (26, 27), or autoclaving (28, 29). These methods are particularly useful for antigen retrieval in human tissue fixed with 10% formalin.
-
9.
Purchased antibodies have data sheets stating the recommended working concentrations, which are usually in the range of 10–20 μg/mL. It is usual to set up serial dilutions of the antibody to determine the optimum dilution for the test tissue which gives a high signal with the least amount of nonspecific background staining. Typically, antibody concentrations are much higher for IF studies as compared to immunohistochemistry.
-
10.
The time of incubation in primary antibody varies from few hours at room temperature to overnight incubations at 4°C. Overnight incubations allow the use of higher dilutions of antibody, thus decreasing nonspecific background staining. Select the shortest time which gives maximal signal with the least amount of background staining.
-
11.
Negative control sections are set up in which apply (a) PBS in place of the primary antibody or (b) antiserum which has been preincubated with the appropriate blocking peptide for an hour.
-
12.
It is helpful to set up positive controls as well by selecting tissue in which the test antigen is known to be present.
-
13.
Thorough rinsing is essential for reducing background. Shake off the antibody and use a wash bottle to direct a jet of PBS directly above the section, so it flows down over the section washing it for 30 s. Then place the sections in a staining dish containing PBS and place on a shaker for 5 min. Remove slides and tap corners onto filter paper to remove excess solution. Decant the PBS and replace with fresh PBS for two more washes.
-
14.
If a high amount of background fluorescence becomes a problem and cannot be resolved by reducing antibody concentration, add a detergent to PBS washes. Typically, 0.05% Triton X-100 is added to PBS and used for washing after application of the secondary antibody. This detergent formula can be used for the first PBS wash only, or all three washes, depending on the level of background staining present.
-
15.
Once antibodies conjugated with fluorophores are used, antibody incubations and washes on shakers are done in the dark by covering the humid chamber or container with a cardboard box. A table lamp may be used, but overhead fluorescent lights should remain off.
-
16.
We used tyramide-Alexa Green488 to amplify the junctional adhesion molecule-A (JAM-A) signal using a polyclonal anti-JAM-A antibody (Santa Cruz Biotechnology, CA, USA). The results showed diffuse circumferential labeling of endothelial cells (Fig. 2g), which was nonspecific since JAM-A should localize only to the tight junctions. Localization of JAM-A to tight junctions only was achieved using another primary antibody to JAM-A (R&D Systems, Minneapolis, MN) without tyramide enhancement (3) (Fig. 2h).
Fig. 1. 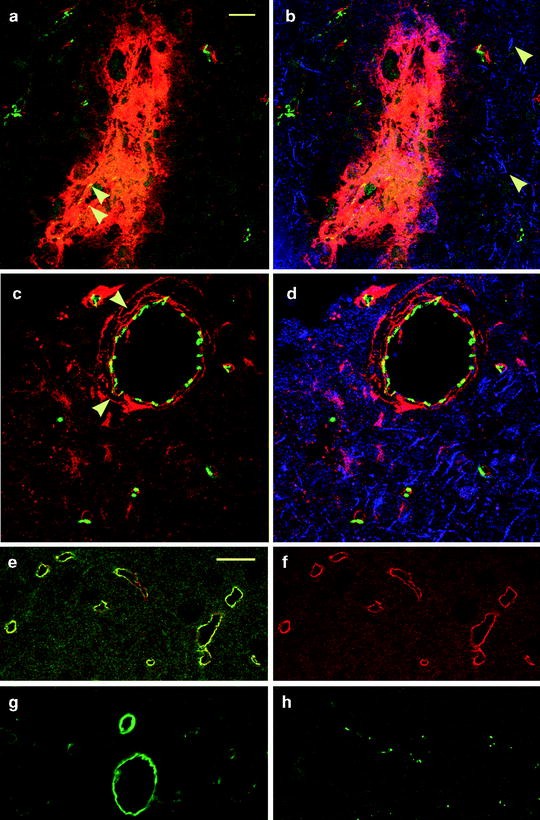
Schematic showing the primary and secondary antibodies used for triple labeling immunofluorescence.

References
Nag S (1984) Cerebral changes in chronic hypertension: combined permeability and immunohistochemical studies. Acta Neuropathol (Berl) 62:178–184
Nag S, Manias JL, Stewart DJ (2009) Expression of endothelial phosphorylated caveolin-1 is increased in brain injury. Neuropathol Appl Neurobiol 35:417–426
Yeung D, Manias JL, Stewart DJ, Nag S (2008) Decreased junctional adhesion molecule-A expression during blood-brain barrier breakdown. Acta Neuropathol 115:635–642
Nag S, Takahashi JL, Kilty DW (1997) Role of vascular endothelial growth factor in blood-brain barrier breakdown and angiogenesis in brain trauma. J Neuropathol Exp Neurol 56:912–921
Cornford EM, Hyman S, Cornford ME (2003) Immunogold detection of microvascular proteins in the compromised blood-brain barrier. Methods Mol Med 89:161–175
Mullins JM (1994) Overview of fluorophores. Methods Mol Biol 34:107–116
Adamec E, Yang F, Cole GM, Nixon RA (2001) Multiple-label immunocytochemistry for the evaluation of nature of cell death in experimental models of neurodegeneration. Brain Res Brain Res Protoc 7:193–202
Bausch SB (1998) A method for triple fluorescence labeling with Vicia villosa agglutinin, an anti-parvalbumin antibody and an anti-G-protein-coupled receptor antibody. Brain Res Brain Res Protoc 2:286–298
Nag S, Venugopalan R, Stewart DJ (2007) Increased caveolin-1 expression precedes decreased expression of occludin and claudin-5 during blood-brain barrier breakdown. Acta Neuropathol (Berl) 114:459–469
Miyashita T (2004) Confocal microscopy for intracellular co-localization of proteins. Methods Mol Biol 261:399–410
Wouterlood FG, Vinkenoog M, van den OM (2002) Tracing tools to resolve neural circuits. Network 13:327–342
Stelzer EH, Wacker I, De M, Jr. (1991) Confocal fluorescence microscopy in modern cell biology. Semin Cell Biol 2:145–152
Harvath L (1994) Overview of fluorescence analysis with the confocal microscope. Methods Mol Biol 34:337–347
Harlow E, Lane D (1998) Using antibodies. A laboratory manual. Cold Spring Harbor Laboratory Press, Cold Spring Harbor, New York
Simmons DM, Arriza JL, Swanson LW (1989) A complete protocol for in situ hybridization of messenger RNAs in brain and other tissues with radiolaveled single-stranded RNA probes. J Histotechnol 12:169–180
Werner M, von WR, Komminoth P (1996) Antigen retrieval, signal amplification and intensification in immunohistochemistry. Histochem Cell Biol 105:253–260
Yamashita S (2007) Heat-induced antigen retrieval: mechanisms and application to histochemistry. Prog Histochem Cytochem 41:141–200
Morgan JM, Navabi H, Schmid KW, Jasani B (1994) Possible role of tissue-bound calcium ions in citrate-mediated high-temperature antigen retrieval. J Pathol 174:301–307
Paddock SW (2000) Principles and practices of laser scanning confocal microscopy. Mol Biotechnol 16:127–149
Brelje TC, Wessendorf MW, Sorenson RL (1993) Multicolor laser scanning confocal immunofluorescence microscopy: practical application and limitations. Methods Cell Biol 38:97–181
Wessel GM, McClay DR (1986) Two embryonic, tissue-specific molecules identified by a double-label immunofluorescence technique for monoclonal antibodies. J Histochem Cytochem 34:703–706
Wang G, Achim CL, Hamilton RL, Wiley CA, Soontornniyomkij V (1999) Tyramide signal amplification method in multiple-label immunofluorescence confocal microscopy. Methods 18:459–464
Cattoretti G, Pileri S, Parravicini C, Becker MH, Poggi S, Bifulco C, Key G, D’Amato L, Sabattini E, Feudale E (1993) Antigen unmasking on formalin-fixed, paraffin-embedded tissue sections. J Pathol 171:83–98
Pileri SA, Roncador G, Ceccarelli C, Piccioli M, Briskomatis A, Sabattini E, Ascani S, Santini D, Piccaluga PP, Leone O, Damiani S, Ercolessi C, Sandri F, Pieri F, Leoncini L, Falini B (1997) Antigen retrieval techniques in immunohistochemistry: comparison of different methods. J Pathol 183:116–123
Shi SR, Chaiwun B, Young L, Cote RJ, Taylor CR (1993) Antigen retrieval technique utilizing citrate buffer or urea solution for immunohistochemical demonstration of androgen receptor in formalin-fixed paraffin sections. J Histochem Cytochem 41:1599–1604
Norton AJ, Jordan S, Yeomans P (1994) Brief, high-temperature heat denaturation (pressure cooking): a simple and effective method of antigen retrieval for routinely processed tissues. J Pathol 173:371–379
Miller RTEstran C (1995) Heat-induced epitope retrieval with a pressure cooker. Suggestions for optimal use. Appl Immunohistochem 3:190–193
Bankfalvi A, Navabi H, Bier B, Bocker W, Jasani B, Schmid KW (1994) Wet autoclave pretreatment for antigen retrieval in diagnostic immunohistochemistry. J Pathol 174:223–228
Shin RW, Iwaki T, Kitamoto T, Tateishi J (1991) Hydrated autoclave pretreatment enhances tau immunoreactivity in formalin-fixed normal and Alzheimer’s disease brain tissues. Lab Invest 64:693–702
Acknowledgements
This work was supported by Grants from the Heart & Stroke Foundation of Ontario #5347, #6003.
Author information
Authors and Affiliations
Editor information
Editors and Affiliations
Rights and permissions
Copyright information
© 2011 Springer Science+Business Media, LLC
About this protocol
Cite this protocol
Manias, J.L., Kapadia, A., Nag, S. (2011). Detection of Multiple Proteins in Intracerebral Vessels by Confocal Microscopy. In: Nag, S. (eds) The Blood-Brain and Other Neural Barriers. Methods in Molecular Biology, vol 686. Humana Press. https://doi.org/10.1007/978-1-60761-938-3_7
Download citation
DOI: https://doi.org/10.1007/978-1-60761-938-3_7
Published:
Publisher Name: Humana Press
Print ISBN: 978-1-60761-937-6
Online ISBN: 978-1-60761-938-3
eBook Packages: Springer Protocols