
Abstract
The importance of monospecific antisera for the experimental analysis of viral proteins is undisputed. They make it possible to identify and analyze the target protein against a background of a large number of other proteins, either in whole fixed cells or in cell lysates. This chapter describes our experience with the production of such rabbit antisera directed against proteins of coronaviruses and other nidoviruses. The use as antigens of either synthetic peptides (coupled to a carrier protein) or proteins expressed in Escherichia coli is described, and detailed protocols for immunization and preparation of test bleeds are provided.
For screening of the immune response following immunization, detailed protocols for three commonly used techniques are described, all of which are based on the use of infected cells or cells expressing the protein of interest, side by side with appropriate controls. The in situ immunodetection of the target in fixed cells by immunofluorescence microscopy is described, as are protocols for techniques that can be applied to cell lysates containing the target protein (Western blotting and immunoprecipitation). The latter techniques are performed in combination with polyacrylamide gel electrophoresis, thus allowing confirmation of the molecular weight of the target that is recognized by the antiserum.
You have full access to this open access chapter, Download protocol PDF
Key Words
- antigen
- peptide
- immunization
- rabbits
- replicase
- structural proteins
- immunofluorescence assay
- Western blotting analysis
- immunoprecipitation
- coronavirus
- nidovirus
1 Introduction
1.1 Coronavirus/Nidovirus Targets for Antibody Production
Coronaviruses, and other nidoviruses such as arteriviruses, produce one of the largest sets of viral polypeptide species among the RNA viruses. This feature is related to the polycistronic nature of their genome, which contains up to 12 open reading frames and, in particular, to the polyprotein strategy used to produce the large viral replicase/transcriptase, the complex set of nonstructural proteins that is responsible for replication and transcription of the nidovirus genome [see ( 1) and the references therein]. In coronaviruses (Fig. 16.1), the larger of the two replicase polyproteins (pp1ab) can be more than 7000 amino acids long and is processed into 15 or 16 cleavage products, now commonly referred to as nonstructural protein (nsp) 1 to 16 ( 2,3). In arteriviruses, despite their much smaller replicase size (pp1ab is “only” ∼3100 to 3900 amino acids), the complexity is not very different and replicase processing yields 13 or 14 cleavage products. The regulated autoproteolysis of nidovirus replicase pp1a and pp1ab is driven by two to four proteinases that reside in the ORF1a-encoded part of the replicase. Cleavage sites for coronavirus and arterivirus proteinases have been identified for several prototypic nidoviruses through a combination of theoretical and experimental methods and can now be confidently predicted for other members of these virus groups.

Overview of the coronavirus/nidovirus life cycle, using SARS-CoV as an example ( 1). Depicted is the cytoplasmic replication cycle, which starts with virus entry and release of the genome into the cytoplasm. Subsequently, the genome is translated to produce replicase polyproteins pp1a and pp1ab, which are cleaved to yield 16 nonstructural proteins ( 2). A complex for viral RNA synthesis is assembled on cytoplasmic double-membrane vesicles (DMVs). This complex is involved in genome replication and the synthesis of a nested set of subgenomic mRNAs, which are required to express the genes in the 3′-proximal third of the genome. Translation of the smallest subgenomic mRNA yields the viral nucleocapsid protein (N) that assembles into new nucleocapsid (NC) structures together with newly generated genome RNA. Other subgenomic mRNAs encode viral envelope proteins that are (largely co-translationally) inserted into membranes of the host cell’s exocytic pathway and migrate toward the site of virus assembly [the ER-Golgi intermediate compartment (ERGIC)]. Following budding of the NC through membranes that contain viral envelope proteins, the new virions leave the cell via the exocytic pathway. [Adapted from ( 1).]
Since an additional 4 to 12 proteins are expressed from subgenomic mRNAs produced from the 3′-end of the viral genome (Fig. 16.1), including the structural polypeptides responsible for virion formation, the proteome of the average nidovirus consists of between 20 and 30 protein species. It should be noted that intermediates of replicase polyprotein processing, which have been described for various nidoviruses, are not taken into consideration in this count and are likely to even further increase the repertoire of viral polypeptides produced in infected cells. Replicase precursors and processing intermediates in fact complicate certain types of analyses, such as those that rely on microscopy, since antibodies will usually not discriminate among precursors, intermediates, and processing end products. In the infected cell, many nidovirus proteins are targeted to specific locations (Fig. 16.2), some of them even to multiple specific locations.

Immunofluorescence microscopy images of Vero-E6 cells infected with SARS-coronavirus illustrating the expression of four important viral genes and the different subcellular localization of their products. Nonstructural protein 3 (nsp3) is one of the replicase subunits expressed from the genomic RNA, revealing the localization of the membrane-bound viral replication complex. Spike protein S localizes to different compartments of the exocytic pathway. Membrane protein M accumulates in the Golgi complex, in particular early in infection. Nucleocapsid protein N is a largely cytoplasmic protein.
Over a period of about 15 years, our laboratory has been involved in the production and characterization of polyclonal rabbit antisera directed against specific structural and, in particular, nonstructural proteins of nidoviruses ( 4–8). Our experience in this area is summarized in this chapter.
1.2 Antibodies and Their Applications
The usefulness and importance of monospecific antibodies for the experimental analysis of almost any protein in biology is undisputed. In particular, when the target protein has to be studied against a background of a large number of other proteins, either in whole fixed cells or in cell lysates, specific antibodies can provide a rapid and reliable method for discriminating signal from noise. Three commonly used antibody-based detection techniques, which are also important for screening of the immune response during antiserum production, are discussed below:
-
In situ immunodetection of the target in fixed cells, either by immunofluorescence (IF) microscopy or immunoelectron microscopy (IEM).
-
Detection of the target by Western blotting (WB), i.e., electrophoresis of a cell lysate containing the target and transfer of the (denatured) proteins to a solid carrier such as nitrocellulose or polyvinylidene fluoride (PVDF) membranes.
-
Immunoprecipitation (IP) of the target from a cell lysate, often used in combination with radioactive labeling of protein synthesis in the cells for a specific time prior to cell lysis.
Although in several techniques experimental data obtained with monoclonal antibodies can be superior, in particular because of reduced background signal, the generation and screening of hybridoma cell lines requires a considerable investment, in terms of both labor and capital. Furthermore, in the context of specific research questions, polyclonal antisera may sometimes even be preferred over monoclonal antibodies since they contain a mixture of immunoglobulin molecules, derived from different B-cell lines in the immunized animal, often recognizing multiple epitopes of the target protein. Moreover, if desired, the chances of cross-reactivity of the antiserum with related proteins, e.g., from different strains of the same virus or from closely related other virus species, are considerably better for polyclonal antisera, particularly when they have been raised using a larger and/or conserved part of the target protein.
Obviously, the primary goal during polyclonal antiserum production in laboratory animals is to obtain a reasonable volume of a high-affinity antiserum. For rabbits, if necessary, bleeds of ∼15–20 ml can be obtained at 4-week intervals, and the final bleed can yield up to 50 ml of serum from about 80 ml of whole blood. Since monoclonal antibodies are routinely produced in mice, the use of other species such as rabbits also creates the possibility of convenient in situ double-labeling experiments (see below). In such experiments, using species-specific secondary antibodies, a polyclonal rabbit antiserum against the target of choice and, for instance, a mouse monoclonal antibody recognizing a cellular protein can be used in combination to detect both proteins in the same specimen simultaneously.
2 Materials
2.1 Coupling of Synthetic Peptides to BSA
-
1.
Freeze-dried synthetic peptide.
-
2.
Phosphate-buffered saline (PBS): 10X PBS is prepared using 80.0 g/liter NaCl (1369 mM), 2.0 g/liter KCl (26.8 mM), 14.4 g/liter Na2HPO4.2H2O (80.8 mM), and 2.0 g/liter KH2PO4 (14.6 mM). The pH is 6.8, but will change to 7.4 upon dilution to 1X PBS.
-
3.
Bovine serum albumin (BSA) solution: 50 mg/ml.
-
4.
Glutaraldehyde solution 25% (w/v); note that glutaraldehyde is toxic! Prepare a 0.3% glutaraldehyde solution in PBS (120 μl of the 25% stock plus 9.9 ml of PBS).
-
5.
Glycine stock: 1 M.
-
6.
Dialysis membrane with a molecular weight cut-off value of 12–14 kDa (e.g., Slide-A-Lyzer Dialysis Cassettes, cat. no. 66330, Pierce).
2.2 Preparation for Immunization or Boosts
-
1.
Freund’s complete adjuvant (FCA).
-
2.
Freund’s incomplete adjuvant (FICA).
-
3.
Phosphate-buffered saline (PBS): See above.
-
4.
Syringe: 3-ml with luer-lock (e.g., Becton Dickinson #300910).
-
5.
Three-way stopcock with luer-lock (e.g., Codan #445852).
2.3 Immunofluorescence Assay
-
1.
Coverslips with infected cells or cells expressing the protein of interest.
-
2.
Fixative: 3% paraformaldehyde in PBS.
-
3.
PBS: see Section 2.1, step2.
-
4.
PBS with 5% fetal calf serum (FCS).
-
5.
PBS with 10 mM glycine.
-
6.
PBS with 0.1% Triton X-100.
-
7.
Bisbenzimide dye Hoechst 33258 (Sigma #14530) for nuclear DNA staining. Prepare a 100 μg/ml stock in H2O (dissolving it in PBS will give precipitates).
-
8.
Anti-rabbit IgG fluorescent conjugate (e.g., Jackson Immunoresearch; donkey-anti-rabbit IgG Cy3 conjugate).
-
9.
24-well cluster.
-
10.
Microscopy glass slides.
-
11.
Mowiol (embedding medium): Mix 2.4 g Mowiol 4-88 (e.g., Calbiochem #475904) with 6 g of glycerol and 2 ml of H2O at room temperature for 2 h; add 12 ml 0.2 M Tris-HCl (pH 8.5) and stir at 50°C until all Mowiol has dissolved. Centrifuge for 15 min at 5000 ×g. Then add 2.5% w/v Dabco (1,4-diazabicyclo(2.2.2)octane), e.g., Sigma #D2522, which improves the life span of fluorescent dyes), mix, fill out in small aliquots, and store at –20°C.
2.4 Western Blotting
-
1.
Protein lysis buffer (20 mM Tris-HCl, pH 7.6; 150 mM NaCl; 0.5% Deoxycholine; 1% Nonidet P-40; 0.1% SDS).
-
2.
0.5 M EDTA.
-
3.
Transblot SD semidry transfer cell (e.g., Biorad #170-3940).
-
4.
PVDF membrane (e.g., Amersham Biosciences, Hybond P, #RPN303F).
-
5.
Whatman paper.
-
6.
Methanol.
-
7.
10X Western blot transfer buffer (WTB): 250 mM Tris, 1.92 M glycine.
-
8.
PBS: see Section 2.1, step 2.
-
9.
PBS-T (PBS with 0.5% Tween 20).
-
10.
PBS-TM (PBS-T with 5% nonfat dry milk).
-
11.
PBS-TMB (PBS-TM with 1% BSA).
-
12.
Anti-rabbit IgG horseradish peroxidase conjugate, e.g., swine-anti-rabbit IgG HRPO (e.g., DakoCytomation #P02-17)
-
13.
Chemiluminescence kit (e.g., Amersham Biosciences, ECL plus Western blotting detection kit, # RPN2132)
2.5 Immunoprecipitation
-
1.
Protein lysis buffer, see Section 2.1, step 1.
-
2.
IP buffer (20 mM Tris-HCl, pH 7.6; 150 mM NaCl; 5 mM EDTA; 0.5% Nonidet P-40; 0.1% Deoxycholine; 0 to 1% SDS, concentration to be varied depending on the antiserum).
-
3.
Weak wash buffer A (20 mM Tris-HCl pH 7.6; 150 mM NaCl; 5 mM EDTA; 0.1% NP40).
-
4.
Weak wash buffer B (20 mM Tris-HCl pH 7.6; 0.1% NP40).
-
5.
Laemmli sample buffer (LSB): 50 mM Tris-HCl, pH 6.8; 100 mM DTT; 10% glycerol; 2% SDS; 0.03% bromo phenol blue.
-
6.
Pansorbin (heat-killed, formalin-fixed Staphylococcus aureus cells; Calbiochem #507858) or Protein A/G sepharose beads (e.g., Amersham Biosciences #17-5280-04 or #17-0618-02).
2.6 IgG Purification and Direct Coupling to Alexa Fluor-488
-
1.
PURE1A Protein A Antibody Purification Kit (Sigma #PURE1A-1KT).
-
2.
Alexa Fluor 488 Protein Labeling Kit (Invitrogen/Molecular Probes #A10235).
3 Methods
3.1 Preparation of the Antiserum
The (obvious) standard prerequisites for the production of a polyclonal rabbit antiserum are: (i) an antigen, (ii) a (pathogen-free) rabbit to be immunized, (iii) a test method to detect the response, and (iv) a permit for animal experiments. The last relates to institutional and/or governmental regulations controlling animal use, which differ from country to country and are not discussed here in detail. Important considerations are the choice of adjuvant, method and site of administration of the antigen, sedation of animals, maximum volume of test bleeds, and various safety precautions regarding animals and personnel.
3.1.1 Antigens: “Natural” Proteins versus Synthetic Peptides
Two types of antigens have been used in our studies: synthetic peptides and proteins expressed in and purified from Escherichia coli. The production of antigens in E. coli are not covered in any detail in this chapter and the reader is referred to the extensive literature on this topic published elsewhere (and in Chapter 13 in this volume). E. coli allows for the cheap production of large amounts of antigen, but clearly such antigens have to be purified prior to use for immunization. This can be facilitated, e.g., by the use of a variety of tags (such as fusion to glutathione-S-transferase, maltose-binding protein, or the commonly used hexahistidine tag) for which convenient affinity resins are available. Reasonably pure antigens (>80% pure) are required and in the case of larger tags one should consider removing the tag proteolytically to ensure that the immune response will be directed against the target rather than against its tag. If the E. coli expression product turns out to be insoluble, which will usually interfere with its straightforward affinity purification, it may still be possible to purify a reasonably pure protein sample from inclusion bodies by repeated extraction of this material with increasing concentrations of urea (or guanidium isothiocyanate). As long as small amounts of this material can be used (i.e., the protein concentration is sufficiently high), after washing of the protein pellets with PBS, such urea-containing samples can be used for mixing with the adjuvant and immunization without the need for dialysis.
Synthetic peptides offer the advantage of being pure, and with certainty they contain exclusively the amino acid sequence of the selected target. Since they normally cover only 10 to 25 residues of this target, their sequence has to be selected with care (see below).
3.1.2 Design and Synthesis of Peptides for Immunization Purposes
It is not straightforward to confidently predict antigenic peptides from an amino acid sequence. Several programs to support this activity can be found on the Internet and algorithms for this purpose are included in most DNA/protein analysis software ( 9–11). If the structure of the target is known, peptides located on its surface are to be preferred. Entirely polar and helical peptides should be avoided. In our experience, peptides located at (or close to) the N- or C-terminus of the target also have a high probability of being immunogenic. This was true in particular for peptides derived from the nidovirus replicase polyproteins, which were usually selected on the basis of known or predicted cleavage sites (although based on relatively small numbers; success rate with terminal peptides was around 75% and with internal peptides only around 25%).
The peptides to be synthesized usually are 10–25 amino acids long. Peptides that are very hydrophobic may be more difficult to handle (e.g., poor solubility prior to coupling). To protect peptides against host proteases and thus increase their stability, the C-terminal carboxyl group can be replaced with an amide group during synthesis. (This may not be advisable when using peptides that normally form the C-terminus of a protein.) To facilitate coupling to BSA used as the carrier protein (see below), one or two lysine residues can be added to one side of the peptide (to the N-terminus when targeting the C-terminus of a protein, and vice versa).
Synthetic peptides are available from a variety of commercial or in-house sources. In our institute, peptides are synthesized by solid-phase strategies on an automated multiple peptide synthesizer (SyroII, MultiSynTech, Witten, Germany). The purity of the peptides is determined by analytical reversed-phase HPLC and should be at least 80%. The identity and homogeneity of the peptides is confirmed by matrix-assisted laser desorption ionization time-of-flight mass spectrometry and analytical reversed-phase chromatography. Freeze-dried peptides, dissolved peptides, or coupled peptides in solution are best stored at –85°C.
3.1.3 Coupling of Synthetic Peptides to BSA
Synthetic peptides have to be coupled to a carrier protein to enhance their immunogenicity. Bovine serum albumin (BSA) and keyhole limpet hemocyanin (KLH) are the two most commonly used carrier proteins. We have always relied on BSA (a very soluble and stable plasma protein) and a coupling reaction using glutaraldehyde, which links the amino groups of carrier and synthetic peptide (in lysine residues and at the amino terminus of the peptide). For example, cross-linking at lysine residues can be represented as:
-
1.
In a microfuge tube, prepare a solution of ∼5 mg/ml of the peptide in PBS. (Routinely, our peptide synthesis yields about 5 mg of product, of which ∼4 mg is the peptide and the remainder consists of salts). Weigh the dry peptide on a piece of paper and carefully split it with a scalpel (wear gloves). For a solution of ∼5 mg/ml, dissolve about half of the peptide in a final volume of 0.4 ml of PBS. Solubility in PBS is usually good if the freeze-dried product looks “large and fluffy.” If it looks small and granular, it may be better to first dissolve the peptide in a small volume of DMSO and then dilute this solution in PBS. The final concentration of DMSO should be less than 5%.
-
2.
Add BSA (the carrier protein) to the peptide solution at the correct molar ratio. The aim is to couple one peptide per about 50 amino acids of carrier protein, for about 12 peptides per BSA molecule. The amount of peptide can be estimated with the following formula, which assumes an average molecular mass (Mr) of 110 Da per amino acid: (volume)∗(concentration)/(x-mer∗110), or— in a 21 mer example— (0.4 ml)∗(5 mg/ml)/(21∗110 μg/μmol) = 0.86 μmole. Calculate the required amount of BSA, which is 618 amino acids long (including 59 lysine residues) and thus weighs ∼68 mg/μmol. Mixing peptide and BSA at a molar ratio of 12:1 means that in our example using 0.86 μmol of peptide, we would use 0.86/12 = 0.072 μmol of BSA (or 4.9 mg, or 98 μl of a 50-mg/ml solution).
Note that the above calculations are based on a number of assumptions and should be considered as a rule of thumb. Clearly, since the sequence is known, the Mr of the peptide can be calculated more precisely. However, since we usually add extra lysines to the peptide there will be different ways in which it can be coupled to the carrier and a variety of complexes will be formed (BSA “trees” with a varying number of peptide “branches” scattered all over the backbone), presenting the epitope in many different ways.
-
3.
To the peptide-BSA mixture, add PBS to give a final volume of 670 μl; then (carefully, slowly, and while mixing) add 330 μl of a freshly prepared 0.3% glutaraldehyde solution (equaling approximately 10 μmol).
-
4.
Incubate the coupling reaction on a roller device at room temperature for 1 h to allow cross-linking of peptide and carrier protein.
-
5.
Add 200 μl of 1-M glycine in order to quench the remaining free glutaraldehyde and continue rolling for 1 h.
-
6.
Dialyze the coupling reaction overnight against PBS to remove small molecules such as uncoupled peptide, glycine, and glycine-glutaraldehyde. Dialyze two or three times against at least 500 volumes of PBS at 4°C. The final step can be overnight. Usually, after dialysis, the concentration of peptide-BSA complex is around 4 mg/ml and the solution is ready for direct use as an antigen in immunization.
3.1.4 Preparation of Primary and Booster Immunizations
When using synthetic peptides or proteins purified from E. coli, adjuvants containing immunostimulatory molecules are applied to enhance the immune response to the antigen. Freund’s adjuvants have been used in our studies; Freund’s complete adjuvant (FCA) for the initial immunization and Freund’s incomplete adjuvant (FICA) for subsequent booster immunizations. FCA (but not FICA) contains heat-inactivated Mycobacterium tuberculosis or Mycobacterium butyricum (or extracts thereof), which stimulate both cellular and humoral immunity. The water-in-oil emulsion that is the basis for FCA guarantees the slow release of the antigen from the site of immunization, but it should be noted that the mineral oil component is quite toxic and induces granulomatous reactions. Mix FCA/FICA with the antigen-containing solution to form a “toothpaste-like” stable emulsion. See below for details. In our standard protocol, ∼200 μg of antigen (peptide-BSA complex) is used for the primary immunization, and the same amount for subsequent booster reactions.
-
1.
Before use, mix the FCA, e.g., gently on a roller device to get the bacteria into suspension. For the primary immunization, the antigen (200–250 μg) is diluted with PBS to give a final volume of 0.8 ml PBS, which is mixed with 0.4 ml of FCA. Transfer this mixture to a 3-ml syringe (luer-lock). Use a P1000 micropipette; put the tip in the opening of the syringe, and slowly pull the plunger back. In the same manner, fill a second syringe with 0.4 ml of FCA and 0.4 ml of air (to promote the formation of the emulsion).
-
2.
Connect the two syringes with a three-way stopcock (Fig. 16.3). Mix the contents of the two syringes until a thick, white emulsion is obtained. This means that the suspension is converted into an oily mass that includes the water. This emulsion, when properly prepared, is stable and will not disperse when a droplet is put into PBS. The emulsion will ensure the slow release of the antigen into the animal.
Fig. 3. 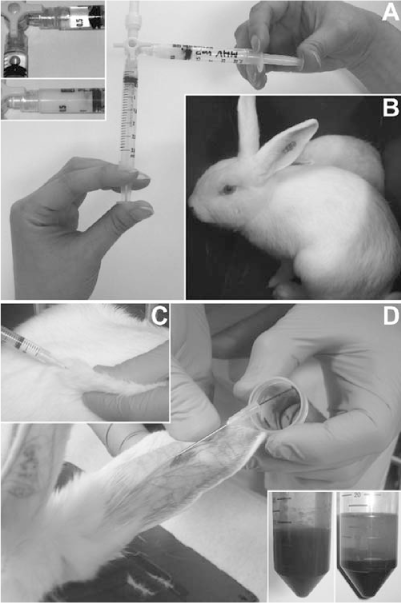
(A) Prepration of syringes for immunization using two syringes and a three-way stopcock. Insets show syringes with antigen and Freund’s adjuvants before and after mixing. (B) Young adult New Zealand white rabbit with ear tattoo. (C) Subcutaneous immunization of a rabbit. (D) Collection of a test bleed of 15–20 ml from an ear vein of a rabbit. Insets show a fresh bleed and a bleed after clotting and centrifugation the next day.
-
3.
Disconnect the syringes and use the antigen suspension the same day. Optionally, the syringes can be stored for later use, overnight at 4°C or for longer periods at –80°C.
-
4.
For booster immunizations FICA is used instead of FCA. Material for two boosts can be prepared in one action by doubling the volumes above. Filled syringes can be stored at –80°C for prolonged periods of time.

3.1.5 Rabbits and the Schedule for Immunization and Bleeding
Young adult New Zealand white rabbits (preferably females, weighing bet- ween 2 and 3 kg) have been used routinely in our studies (Fig. 16.3). The young age of the animals is thought to be particularly important to ensure a strong primary response to the antigen. Although it is often advised to use two animals per antigen, in our experience—with just a few exceptions—both animals generally give the same (positive or negative) result, although titers of the antiserum and background signal(s) may vary between such duplicates. Still, if the number of animals available or housing capacity is limited, and also for financial and ethical reasons, it may be wiser to use a single animal per antigen and—in the event of failure—return to such an antigen in a subsequent round of immunizations.
The rabbits are injected subcutaneously at three or four places on their back (Fig. 16.3). Given the strong inflammatory response induced by FCA, the animals are monitored closely following the primary immunization. The interval between the primary immunization and the first booster, and between subsequent boosters, is about 4 weeks. It is essential to obtain a preimmunization bleed on (or before) the day of the primary immunization, which will be used to assess the response against the antigen (see below). The standard schedule for immunization and bleeding would look like this:
-
Day 1: Preimmunization bleed and primary immunization.
-
Day 28: First booster immunization.
-
Day 38: First test bleed.
-
Day 56: Second booster immunization.
-
Day 66: Second test bleed.
-
Day 70: Final bleed (∼50 ml of serum can be obtained).
Bleeds should be limited to 15% of the animal’s total blood volume and a 4-week recovery period should be allowed. As a “rule of thumb,” the blood volume of rabbits is about 56 ml/kg of body weight—assuming the animal is mature, healthy, and adequately nursed.
In our experience, a (good) response is unlikely (but not impossible…) if there is no positive signal after two or three boosts. Although there have been some exceptions to this rule, it is advisable—for financial reasons as well as ethical considerations—to terminate the experiment after ∼70 days and, if necessary, try again with an additional animal or an alternative antigen later on.
3.1.6 Preparation of Serum from Bleeds
-
1.
Collect 15–20 ml of blood (usually from an ear vein of the rabbit; Fig. 16.3) in a 50-ml centrifuge tube and allow complete clotting of the blood in a water bath at 37°C for 1 h.
-
2.
Use a Pasteur pipette with a melted tip to gently liberate the clot from the wall of the tube. Be sure to cause minimal lysis of red blood cells, to ensure a clear serum sample later on. Subsequently, leave the clot to shrink overnight at 4°C (Fig. 16.3).
-
3.
Centrifuge the tube at 1300 ×g for 10 min to further reduce the volume of the clot.
-
4.
Carefully, with a pipette, remove as much serum as possible from the tube without touching/damaging the clot; in case of doubt, use a second collection tube for the last few ml (also an additional spin might help), which may be less clear and might be saved as a backup sample only.
-
5.
Prepare some smaller and some larger aliquots of the serum and store at –20°C or –80°C. Sera can be kept for many years, but repeated freezing and thawing should be avoided. Also, it is advisable to use tubes with a screw cap lid containing a rubber seal, which will minimize evaporation during prolonged storage. Store a small sample (0.5 to 1 ml) at 4°C for testing.
-
6.
Working stocks of antisera (in screw cap tubes) can be kept at 4°C for many months; if desirable, 0.05% (final concentration) of sodium azide (highly toxic!) can be added as a preservative, but in our experience this is not necessary if sera are kept cool and handled with care. It is advisable to spin antisera (in particular the less clear ones) for 1 min at full speed in a microcentrifuge prior to use.
3.2 Testing of the Antiserum
The native proteins that are the targets for antiserum production are usually highly structured molecules and obviously the reactivity of the antiserum will be influenced by the conformation of the antigen used for immunization. In particular, when synthetic peptides are used the structural resemblance between antigen and target may be limited. This probably explains why—in our experience—peptides derived from the termini of the target protein, which are often less structured than the protein core, generally work better than internal peptides.
Although an ELISA approach, based on the antigen used for immunization, can be employed for an initial screening of the immune response in the animal, this result may be relatively meaningless when it comes to the question of whether the antiserum will ultimately react with the viral protein target. One will in fact be measuring the response against the combination of peptide and carrier protein or, in the case of immunization with proteins expressed in and purified from E. coli, against the target and contaminants present in the antigen. All the immunizations we carried out with BSA-coupled peptides produced sera that reacted positively in an ELISA using plates coated with the uncoupled peptide, but less than half of those turned out to be useful in IF, WB, or IP. Therefore, it is advisable to screen immediately using samples containing the native, full-length viral protein target.
Moreover, during this screening process, the conformation of the target is an issue. When screening formaldehyde-fixed whole cells by microscopy techniques the target is fixed but structured. During WB analysis proteins are subjected to denaturing conditions and fixed to the membrane used for blotting, whereas IPs are done in solution and can be performed under both native and denaturing conditions. In fact, the level of denaturation in IP experiments can be easily influenced by varying the percentage of SDS in the IP buffer. Often, IPs with antisera raised using synthetic peptides work better in the presence of relatively high (0.25–0.5%) concentrations of SDS, probably because the epitope in the denatured target resembles the antigen used for immunization more closely under these conditions. An additional significant advantage is the fact that the higher SDS concentrations will strongly reduce the background IP signal and result in a much cleaner analysis (see below).
In our experience, antisera that work well in IF assays usually also work well in WB and IP. Conversely, sera that are negative in IF may still be highly reactive in WB and/or denaturing IP. Consequently, it is important to test new antisera in at least two of these three assays. In our daily practice, we have usually relied on IF for preliminary screening and WB for confirmation. There is an additional reason to confirm the IF results by subsequent WB or IP analysis: in IF assays antisera can sometimes show a strong reaction with cellular proteins (Fig. 16.4), either—at low dilutions—because of the lack of a specific response against the target or—at higher dilutions—because of an unexpected cross-reactivity with cellular proteins. WB or IP analysis provides important information about the molecular mass of the target that is recognized, and may thus prevent premature conclusions about the specificity of the antiserum. The correct assessment of specificity is also aided by the inclusion of two important controls: the preimmunization serum (which should obviously not show the same signal) and mock-infected control cells (which might reveal that it is in fact a cellular target that is being recognized). When performing initial screening with IF assays, it is practical to use cell cultures that have been infected at an MOI of 0.5–1 and therefore contain a mixture of virus-infected and mock-infected cells in the same specimen.

Examples of erroneous labeling patterns obtained with various rabbit antisera in immunofluorescence microscopy: (A) Antiserum raised against nsp11 of the arterivirus EAV recognizing a cytoskeletal component. (B) Antiserum raised against SARS-CoV nsp1 producing a mitochondrion-like labeling pattern. (C) Antiserum raised against SARS-CoV nsp3 ( 4), which was very specific in Vero-E6 cells (see Fig. 5), resulting in a strong, punctate nuclear labeling in BHK-21 cells that expressed the ACE-2 receptor for SARS-CoV. (D) SARS-CoV-infected cells labeled several weeks after fixation and embedded using ProLong mounting fluid. An aspecific nucleolar background labeling was observed, especially in the green range of the fluorescence spectrum. The specific, much brighter signal is derived from an anti-nsp3 labeling using a rabbit antiserum that was directly coupled to Alexa Fluor-488 ( 4).
3.2.1 Immunofluorescence Assay
Semiconfluent cells seeded on glass cover slips (10-mm-diameter) are the preferred specimens for initial testing. The cells can either be infected with the target virus or transfected with a vector expressing the target protein. Obviously, cells should be fixed at a time point when the target protein is convincingly expressed. The most reactive rabbit antisera that we have produced can be used in IF assays at dilutions of between 1:1000 and 1:5000. For initial testing, however, dilutions on the order of 1:100 to 1:500 are advised.
-
1.
Wash the cells once with PBS and fix the cells at room temperature with 3% paraformaldehyde in PBS for at least 30 min (or overnight).
-
2.
Wash the cells once with PBS containing 10 mM glycine (coverslips in sealed dishes can be stored at 4°C in PBS for many weeks).
-
3.
Using sharp tweezers, carefully transfer coverslips to the wells of a prelabeled 24-well cluster containing PBS-glycine. Be sure to remember, every time you handle the coverslips, on which side there are cells. While in the cluster, cells should always be facing upward.
-
4.
Permeabilize the cells at room temperature for 10 min in PBS containing 0.1% Triton X-100.
-
5.
In 5 min, wash the cells three times with PBS-glycine and leave them in the last wash step.
-
6.
Dilute the primary antiserum (initial dilutions, e.g., 1:100 and 1:500) in PBS containing 5% FCS; 50 μl per coverslip (10-mm-diameter) will be needed.
-
7.
Cut a large piece of parafilm, place it in a larger dish, label the position of the various samples, and place 50-μl drops of the antiserum dilutions on the parafilm. One by one, take the coverslips from the 24-well cluster, remove excess PBS by touching a tissue to the side of the coverslips, and place the coverslips on the drops with the cells facing the antiserum.
-
8.
Incubate for 30–60 min at room temperature (or 37°C); make sure the samples do not dry out during this incubation (e.g., by placing a wet tissue in the dish).
-
9.
Return the coverslips to the 24-well cluster; in 20 min wash three times with PBS-glycine and leave them in the last wash step.
-
10.
Prepare a dilution of the fluorescently labeled secondary antibody. Optimal dilutions of conjugates should be determined separately using a well-defined primary antiserum. Again 50 μl per coverslip will be needed. Optionally, 1 μg/ml of Hoechst 33258 can be added to this dilution for staining of nuclear DNA.
-
11.
Incubate and wash as described under steps 7 to 9.
-
12.
Take the coverslips from the 24-well cluster. Embed the specimens onto glass microscopy slides in a mounting fluid [e.g., Mowiol or ProLong (Molecular Probes)]. Avoid air bubbles in the mounting fluid by slowly and carefully sliding the coverslip on a small drop (∼5 μl) of mounting fluid.
-
13.
Store the specimens in the dark at 4°C. The mounting fluid should harden at least overnight before high magnification lenses and immersion oil are used.
-
14.
Analyze the specimens in a fluorescence microscope using the filter sets required for the label attached to the secondary antibody.
3.2.2 Immunofluorescence Double-Labeling Experiments
Double-labeling experiments can be done to compare the localization of two (or more) proteins of interest in the same cell by combining a rabbit antiserum recognizing one protein and, e.g., a mouse monoclonal antibody recognizing a second target. Obviously, the two primary antisera have to be detected with suitable conjugates carrying different fluorescent labels, preferably with well-separated emission spectra. Following initial optimization (testing of different dilutions, balancing of the two signals, and controls for specificity of primary and secondary antibodies), one can usually carry out the labeling using a two-step approach. First, specimens are simultaneously incubated in a combined dilution of the two primary antibodies and, subsequently, after extensive washing, in a combined dilution of the two conjugates. In case of background and/or specificity problems, however, it may be necessary to perform the labeling in four consecutive steps.
In IF assays, double labeling with two antisera from the same species is only possible when one of the two is directly coupled to a fluorescent group. We have recently been successful (Fig. 16.5) ( 4) in purifying the Ig fraction from small volumes (2–3 ml) of rabbit antisera using a commercially available protein A column and have subsequently conjugated these antibodies to Alexa Fluor-488. The IF assay then consisted of three incubation steps: (i) incubation with the uncoupled rabbit antiserum, (ii) incubation with the anti-rabbit conjugate recognizing the first antibody, and (iii) incubation with the Alexa Fluor-488-coupled second rabbit antiserum. The order of these steps is very important to avoid binding of the anti-rabbit conjugate to the directly labeled second rabbit antiserum.

Examples of immunofluorescence microscopy double-labeling experiments. Top panel: double labeling of EAV-infected Vero cells with an anti-nsp3 rabbit antiserum (left) and a mouse monoclonal antibody recognizing the N protein (right). Bottom panel: double labeling of SARS-CoV-infected Vero cells with two rabbit antisera, an anti-nsp3 serum that was directly coupled to Alexa Fluor-488 (left) and an anti-M rabbit antiserum that was visualized with a Cy3-conjugated donkey-anti-rabbit IgG secondary antibody (right). See text for details.
3.2.3 Western Blotting Analysis
During Western blotting (WB) analysis samples containing the protein of interest are separated according to size in acrylamide gels and transferred to a membrane, which is subsequently incubated with the antiserum. Protein bands reacting with the antiserum are detected using a secondary antibody and accompanying assay (a variety of enzyme-linked or fluorescent conjugates is available; here we use a peroxidase-coupled secondary antibody). As in the case of IF assays, lysates to be tested can be derived from cells that are either infected or transfected with an appropriate expression vector. For infection lysates, we use a high multiplicity of infection to avoid a mixture of infected and uninfected cells in the sample. Cells are lysed in protein lysis buffer, which leave the nuclei intact and allow their removal by centrifugation. For initial testing, an amount of lysate equaling ∼5 ×10⁵ cells per 5 cm gel width (or 10––15 slots) can be used. Alternatively, purified protein (e.g., expressed in E. coli) can be used (100–500 ng is usually sufficient). Most antisera can be used at a 1000-fold dilution or higher, but we advise starting the testing with a 1:500 dilution (Fig. 16.6A).

Example of a standard test of a rabbit antiserum in Western blot and immunoprecipitation. The antiserum used here was raised against a domain in the C-terminal region of pp1a of the arterivirus EAV ( 8) and recognizes a large set of processing intermediates and end products, which are indicated by arrowheads: (A) Western blot analysis: EAV- and mock-infected cell lysates were prepared at 8 h postinfection, run on an SDS-polyacrylamide gel, blotted to PVDF membrane, and incubated with the postimmune serum at a 1:1000 dilution. Detection was with an anti-rabbit IgG HRPO conjugate and a chemiluminescence assay. [Reproduced from ( 13).] (B) Immunoprecipitation: EAV-infected cells were labeled with 35S-methionine/cysteine for 3 h, from 5–8 h postinfection and lysates were used for IP using 5 μl of antiserum per sample. Following the IP, samples were run on an SDS-polyacrylamide gel and signal was detected using autoradiography. As specificity controls, the preimmune serum was tested on EAV-infected cells and the postimmune serum was tested on mock-infected cells. Furthermore, for the left panel the binding of the antiserum to the antigen was done in the presence of 0.1% SDS, whereas 0.5% SDS was used for the right panel. The comparison illustrates how higher SDS percentages can reduce the background signal and improve the overall picture.
-
1.
Wash the cells with cold PBS and—to a 10-cm2 dish with 1–2 ×10⁶ cells—add 300 μl of cold protein lysis buffer.
-
2.
Incubate for 5 min while monitoring lysis with a microscope. Transfer the lysate to a labeled microfuge tube and spin down the nuclei for 2 min at full speed in a microcentrifuge.
-
3.
Transfer the supernatant to the new tube, leave the pellet (nuclei, often barely visible) behind and add 1/100 volume of 0.5 M EDTA.
-
4.
The lysate can now be used for WB or stored in the –20°C/–80°C freezer.
-
5.
Prepare an SDS-PAGE gel (or minigel) of a suitable acrylamide percentage (depending on the size of the protein of interest) and run: (i) the lysate containing the protein of interest, (ii) a control lysate (mock-infected or untransfected cells), and (iii) a molecular weight marker. Several sets of these samples can be run on one gel to try different antiserum dilutions, or wider slots can be used and strips cut with the right samples after blotting.
-
6.
With a pencil mark one side of the membrane; this is the side of the membrane that will face the gel during blotting and, subsequently, the solutions during incubation. Prewet the PVDF membrane in methanol for 5 min; never touch the PVDF membrane with bare fingers; always use gloves! Dilute 10X WTB to give 1X WTB and incubate the membrane in 1X WTB for 10 min.
-
7.
Take the gel from between the glass plates and briefly wash it in 1X WTB (not longer than 5 min so that the gel does not swell).
-
8.
Build the electroblot stack—from cathode to anode—with the following layers: three sheets of Whatman paper presoaked in WTB (and optionally one sheet of Whatman paper soaked in WTB with 0.1% SDS), the equilibrated gel, the equilibrated and marked membrane, three sheets of presoaked Whatman paper. Avoid air bubbles between the layers!
-
9.
Blot at 15 V (fixed) for 20 min.
-
10.
Take out the membrane and rinse it in H2O for 5 min.
-
11.
Dilute the antiserum (1:500) and the preimmune serum as a control (1:500) in PBS-TMB and incubate the blots for 1 h at room temperature while swirling.
-
12.
Wash the blot three times in PBS-T for 5 min.
-
13.
Dilute the peroxidase-conjugated secondary antibody (swine-anti-rabbit IgG HRPO) in PBS-TMB and incubate the blots for 1 h at room temperature while swirling.
-
14.
Wash the blot three times in PBS-T for 5 min.
-
15.
Prepare the solutions for the chemiluminescence assay according to the manufacturer’s instructions.
-
16.
Gently “semidry” the blot with some Whatman paper (let the fluid run off; do not really dry it!).
-
17.
Spread a piece of plastic foil on the bench and tape the edges to make a smooth surface.
-
18.
Put the chemiluminescence solution on the plastic foil and incubate the blot with the “protein side down” for 5 min.
-
19.
Remove the excess of fluid with some Whatman paper and wrap the blot in plastic foil.
-
20.
Expose an X-ray film to the blot for 1–2 min, develop the film, and check if a longer exposure is required. To avoid overexposure of the film, it may be wise to wait about 30 min before making the first exposure.
3.2.4 Immunoprecipitation
Proteins of interest can be “fished out” of cell lysates by immunoprecipitation. Briefly, antibodies are allowed to bind to the protein and the protein-antibody complexes are then purified by having them bind to beads carrying the Ig-binding proteins A or G on their surface, which are subsequently spun down and washed repeatedly to remove unbound proteins. The simplest form of protein A carrying beads are formalin-fixed Staphylococcus aureus cells (e.g., pansorbin; Calbiochem), but alternatively protein A or G coupled to sepharose can be used. Usually, metabolically labeled protein lysates (e.g., 35S-methionine-labeled) are used for immunoprecipitation studies and samples are run on SDS-PAGE gels that can then be used for autoradiography.
In contrast to WB analysis, immunoprecipitation relies on recognition of the target in solution. Depending on the conditions used, proteins can either be close to their native confirmation, partially denatured, or completely denatured (e.g., in the presence of high concentrations of SDS). Thus, the conformation of the antigen used for immunization may influence the results. In our experience, linear antigens such as synthetic peptides may yield antisera that work considerably better in immunoprecipitation assays carried out under stringent denaturing conditions (e.g., 0.5–1% SDS), which will often also reduce the background in the assay (Fig. 6 B). Nevertheless, the optimal concentration of SDS should be determined for every antigen-antiserum pair since the optimum may be as low as 0.1% SDS, e.g., when using antibodies recognizing mainly (or exclusively) conformational epitopes. Furthermore, the amount of antiserum in the immunoprecipitation assay is important. For initial screening of rabbit antisera we usually test 1 and 5 μl of the antiserum in a 300 μl total IP volume.
-
1.
Take 50 μl of 35S-labeled cell lysate in protein lysis buffer ( 12)(equaling about 2–4 ×10⁵ cells; obviously the expression level of the target protein is to be considered as well); add 250 μl of IP buffer and the antiserum (1 or 5 μl). Incubate these ∼300-μl samples overnight (or for at least 3 h) at 4°C while swirling.
-
2.
Wash the pansorbin cells (25 μl for each sample) by mixing with an equal volume of IP buffer, spin down for 20 sec at full speed in a microcentrifuge, and resuspend the pansorbin cell pellet in the original volume (again, 25 μl for each sample).
-
3.
Add 25 μl of washed pansorbin cells to each immunoprecipitation and incubate at 4°C for more than 1 h while swirling.
-
4.
Spin down for 1 min at full speed in a microcentrifuge, remove the supernatant, and add 500 μl of weak wash buffer A; vortex until the pellet is completely resuspended. (Optionally, this step can be repeated once to get a cleaner result.)
-
5.
Spin down for 1 min at full speed in a microcentrifuge again and repeat the same washing procedure with weak wash buffer B.
-
6.
Resuspend the pellet in 30 μl of LSB by pipetting up and down.
-
7.
Before loading the samples on an SDS-PAGE gel, denature at 96°C for 3 min. (For some proteins, e.g., very hydrophobic ones, it may be better not to heat the samples and just leave them in LSB for 15 min or longer.)
-
8.
Spin the pansorbin cells down for 2 min at full speed in a microcentrifuge; do not resuspend the pellet! Transfer the supernatant to a new tube and load part of this sample onto an SDS-PAGE gel.
-
9.
Following SDS-PAGE, process the gel for autoradiography or phosphorimager analysis according to standard protocols and expose for 1–7 days.
4 Notes
-
1.
Not all bleeds of the same rabbit have the same concentration of antibody and thus the dilutions to be used can vary.
-
2.
Before embedding, blot the edge of the coverslip as well as the side without cells on tissue paper. Remnants of PBS on the coverslip can cause background when the dried PBS forms crystals.
-
3.
Mounting solutions can sometimes have strange side effects, especially when the cells are not freshly fixed. For example, the use of ProLong Gold mounting fluid can generate a green nonspecific nucleolar signal.
-
4.
When microscopy slides used for embedding are not clean, wipe them first with a tissue with 70% ethanol, next with water, and then with a dry paper towel/tissue. When ethanol is not removed, a (sometimes bright) orange background may result.
-
5.
Occasionally, antisera judged to be negative in IF using paraformaldehyde-fixed cells can become positive using methanol-fixed cells (or the other way round). However, methanol fixation is less gentle and generally the morphology of the cell is less well preserved. Fixation is performed for 10 min at –20°C (using ice-cold 100% methanol or 95% methanol/5% acetic acid) and cells are subsequently transferred to and kept in PBS-glycine. Methanol immediately dissolves all cellular membranes, so there is no need for permeabilization with Triton-X100 during the IF assay.
-
6.
Western blotting results can be improved by using longer washing steps.
References
Snijder, E. J., Siddell, S. G., and Gorbalenya A. E. (2005) The order Nidovirales. In: Mahy, B. W., and ter Meulen, V. (eds.) Topley and Wilson’s Microbiology and Microbial Infections: Virology volume. Hodder Arnold, London, pp. 2390–2404.
Ziebuhr, J., Snijder, E. J., and Gorbalenya, A. E. (2000) Virus-encoded proteinases and proteolytic processing in the Nidovirales. J. Gen. Virol. 81, 853–879.
Snijder, E. J., Bredenbeek, P. J., Dobbe, J. C., Thiel, V., Ziebuhr, J., Poon, L. L. M., et al. (2003) Unique and conserved features of genome and proteome of SARS-coronavirus, an early split-off from the coronavirus group 2 lineage. J. Mol. Biol. 331, 991–1004.
Snijder, E. J., van der Meer, Y., Zevenhoven-Dobbe, J., Onderwater, J. J. M., van der Meulen, J., Koerten, H. K., et al. (2006) Ultrastructure and origin of membrane vesicles associated with the severe acute respiratory syndrome coronavirus replication complex. J. Virol. 80, 5927–5940.
Tijms, M. A., van der Meer, Y., Snijder, E. J. (2002) Nuclear localization of non-structural protein 1 and nucleocapsid protein of equine arteritis virus. J. Gen. Virol. 83, 795–800.
Denison, M. R., Spaan, W. J. M., van der Meer, Y., Gibson, C. A., Sims A. C., Prentice, E., et al. (1999) The putative helicase of the coronavirus mouse hepatitis virus is processed from the replicase gene polyprotein and localizes in complexes that are active in viral RNA synthesis. J. Virol. 73, 6862–6871.
van Dinten, L. C., Wassenaar, A. L. M., Gorbalenya, A. E., Spaan, W. J. M., and Snijder, E. J. (1996) Processing of the equine arteritis virus replicase ORF1b protein: identification of cleavage products containing the putative viral polymerase and helicase domains. J. Virol. 70, 6625–6633.
Snijder, E. J., Wassenaar, A. L. M., and Spaan, W. J. M. (1994) Proteolytic processing of the replicase ORF1a protein of equine arteritis virus. J. Virol. 68, 5755–5764.
Hopp, T. P., and Woods, K. R. (1981) Prediction of protein antigenic determinants from amino-acid-sequences. Proc. Natl. Acad. Sci. USA–Biol. Sci. 78, 3824–3828.
Jameson, B. A., and Wolf H. (1988) The antigenic index—a novel algorithm for predicting antigenic determinants. Comp. Appl Biosci. 4, 181–186.
Kolaskar, A. S., and Tongaonkar, P. C. A. (1990) Semiempirical method for prediction of antigenic determinants on protein antigens. FEBS Lett. 276, 172–174.
deVries, A. A. F, Chirnside, E. D., Horzinek, M. C., and Rottier P. J. M. (1992) Structural proteins of equine arteritis virus. J. Virol. 66, 6294–6303.
van Aken, D., Zevenhoven-Dobbe, J. C., Gorbalenya, A. E., and Snijder, E. J. (2006) Proteolytic maturation of replicase polyprotein pp1a by the nsp4 main proteinase is essential for equine arteritis virus replication and includes internal cleavage of nsp7. J. Gen. Virol. 87, 3473–3482.
Acknowledgments
The authors would like to thank Jan Wouter Drijfhout and Willemien Benckhuijsen (LUMC Department of Immunohaematology) for advice and assistance on peptide design and synthesis. We are grateful to the staff of the LUMC animal facility for almost 15 years of pleasant collaboration and reliable housing and handling of the rabbits used for antiserum production. This work was supported (in part) by the European Commission int the context of the activities of the Euro-Asian SARS-DTV Network (SP22-CT-2004-511064).
Author information
Authors and Affiliations
Editor information
Editors and Affiliations
Rights and permissions
Copyright information
© 2008 Humana Press, a part of Springer Science+Business Media, LLC
About this protocol
Cite this protocol
Zevenhoven-Dobbe, J.C., Wassenaar, A.L.M., van der Meer, Y., Snijder, E.J. (2008). Production of Monospecific Rabbit Antisera Recognizing Nidovirus Proteins. In: Cavanagh, D. (eds) SARS- and Other Coronaviruses. Methods in Molecular Biology, vol 454. Humana Press, Totowa, NJ. https://doi.org/10.1007/978-1-59745-181-9_16
Download citation
DOI: https://doi.org/10.1007/978-1-59745-181-9_16
Published:
Publisher Name: Humana Press, Totowa, NJ
Print ISBN: 978-1-58829-867-6
Online ISBN: 978-1-59745-181-9
eBook Packages: Springer Protocols