
Abstract
Glucan particles (GPs) are spherical hollow particles derived from Saccharomyces cerevisiae cell walls and mainly consist of β-1, 3-d-glucans. The inner hollow cavity of glucan particles can be loaded with different compounds, including protein antigens, and delivered to macrophages and dendritic cells. Moreover, the GP delivery system possesses β-glucan’s intrinsic immunostimulatory properties. Therefore, GPs serve as both an antigen-presenting cell-targeted delivery system and an adjuvant.
Here, we describe the production of GPs from S. cerevisiae using hot alkaline and solvent extraction and characterization of these particles for morphology, particle density, and hydrodynamic volume. A detailed protocol for loading and entrapping a model antigen, ovalbumin (OVA), into these particles using yeast RNA is presented. Similar methods are used to load pathogen-specific antigens (peptides, proteins, soluble extracts) which then can be tested in in vivo vaccination models.
Key words
1 Introduction
While vaccination provides remarkable protection against many diseases, vaccines have remained elusive for many infectious killers. Effective vaccines require antigen(s) delivered in a manner that stimulates protective immune responses . Approved subunit vaccines contain adjuvants such as alum that help stimulate protective antibody responses. However, for many infectious diseases for which a vaccine is not yet available, protection may require adaptive T cell immunity in addition to (or in lieu of) antibody. Thus, there is an urgent need for safe and effective vaccination systems that elicit strong and long-lasting protective immunity to delivered antigens [1].
Glucan particles (GPs) are spherical empty empty and highly purified cell walls of Saccharomyces cerevisiae and mainly consist of β-1, 3-d-glucans [2]. GPs are obtained from baker’s yeast, using a series of hot alkaline extractions, followed by ethanol and acetone extraction. GPs can be loaded with many classes of drugs due to the porous structure of the shell’s hydrocolloid polysaccharide matrix and hollow cavity inside the GPs. Previous studies have shown that proteins (including antigens), DNA, siRNA, and small molecule drugs can be loaded into GPs [3–7].
β-1, 3-d-glucans are the major pathogen-associated molecular patterns (PAMPs) of fungi and are recognized via Dectin-1 (D1) , complement receptor 3 (CR3) and scavenger receptors by macrophages , neutrophils , and dendritic cells [8, 9]. Recognition of GPs via these receptors alerts the host phagocytic immune cells and starts a series of events including particle uptake, oxidative burst, and release of pro-inflammatory chemokines/cytokines . After maturation and migration of these antigen-presenting cells, T and B cell responses are also initiated [9–11]. Therefore, GPs can be utilized as a vaccine delivery system with adjuvant properties.
GPs and free antigen co-administration stimulate IgG1 antibody production in vaccinated mice; however, delivering the antigen inside the GPs causes stronger immune response including increased IgG2c and CD4+ T cell responses. GPs induce strong CD4+ T cell responses and antibody production even at sub-microgram antigen doses [12, 13]. GP-based vaccines containing antigen extracts prepared from Cryptococcus neoformans protected mice against lethal C. neoformans challenge [14].
This chapter outlines the methods in detail for encapsulating a model antigen (ovalbumin) inside the GPs. The chapter is organized as follows: It begins by presenting the materials to be used, followed by the methods of GP production, particle characterization, and fluorescently labeled ovalbumin loading inside the GPs. Notes are presented at the end of the chapter.
2 Materials
2.1 Production of Glucan Particles
-
1.
S. cerevisiae (Fleischmann’s baker’s yeast) 100 g.
-
2.
Sodium hydroxide.
-
3.
Ethanol—100%.
-
4.
Acetone.
-
5.
Distilled water.
-
6.
Erlenmeyer flask (2 L volume-borosilicate).
-
7.
Magnetic stirring bar.
-
8.
Hot plate with magnetic stirrer.
-
9.
Thermometer.
-
10.
Centrifuge.
-
11.
Spatula.
-
12.
50 mL conical centrifuge tubes.
-
13.
Fume hood.
-
14.
Polytron homogenizer or equivalent.
-
15.
Centrifuge bottles (0.5 L).
2.2 Particle Density (Number of Particles/mg GP) and Hydrodynamic Volume
-
1.
Dry glucan particles.
-
2.
Microcentrifuge tubes.
-
3.
Analytical balance.
-
4.
Vortex mixer.
-
5.
Pipettor and pipette tips (10, 100, 1000 μL).
-
6.
Hemocytometer.
-
7.
Distilled water.
-
8.
Sonicator.
-
9.
Microscope—200× magnification.
2.3 Fluorescent Labeling of Ovalbumin
-
1.
Ovalbumin solution: Measure and dissolve 100 mg of ovalbumin in 10 mL of 100 mM carbonate buffer, pH 9 in a 15 mL conical centrifuge tube.
-
2.
Fluorescein isothiocyanate (FITC) in DMSO solution: Dissolve 10 mg of FITC in 2 mL of DMSO (5 mg/mL final concentration).
-
3.
1 M Tris pH 8: Dissolve 121.1 g of Tris base in ~700 mL of distilled water. Adjust pH to 8 using concentrated HCl (~80 mL). Bring final volume to 1 L.
-
4.
100 mM sodium carbonate-sodium bicarbonate buffer, pH 9.2: Mix 10 mL of 0.1 M sodium carbonate with 90 mL of 0.1 M sodium bicarbonate [15].
-
5.
Fluorescent microplate reader or spectrofluorimeter.
2.4 Fluorescent Ovalbumin Loading
-
1.
Empty GPs 10 mg.
-
2.
FITC-labeled ovalbumin.
-
3.
Torula yeast RNA, type IV (yRNA).
-
4.
0.9% saline.
-
5.
Microcentrifuge tubes.
-
6.
Heat block.
-
7.
Pipette and pipette tips.
-
8.
Microscope slides and slide covers.
-
9.
Centrifuge.
-
10.
Plate reader and 96-well plate.
-
11.
Fluorescence microscope—200× magnification.
-
12.
Fluorescent microplate reader or spectrofluorimeter.
-
13.
Lyophilizer.
2.5 Sample Preparation for SDS-PAGE
-
1.
FITC-labeled ovalbumin.
-
2.
GP-ovalbumin formulations (experimental and control samples) and also the saved supernatants from the wash steps.
-
3.
6× SDS-PAGE loading buffer: Mix 3.75 mL of 1 M Tris pH 6.8, 1 g SDS, 5 mL glycerol, 1 mL beta-mercaptoethanol, 30 mg bromophenol blue.
-
4.
6 M urea: Dissolve 360 mg of urea in 1 mL distilled water.
-
5.
Heat block.
-
6.
Pipette and pipette tips.
-
7.
Cup-sonicator.
-
8.
Centrifuge.
3 Method
3.1 Production of Glucan Particles
-
1.
Add 500 mL water in a 2 L flask and add 100 g of yeast cells (Fig. 1). Use a homogenizer to break up clumps. Insert a magnetic stir bar, and add 20 g of solid sodium hydroxide (see Note 1 ). Add distilled water to get 1 L total volume.
Fig. 1 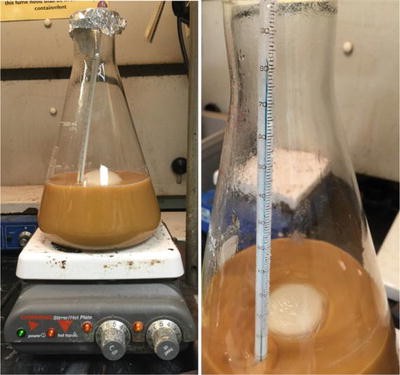
Alkaline hydrolysis setup for the production of glucan particles
-
2.
Place the flask on a stirring hot plate, put a glass thermometer in the flask, and heat to 80 °C for 1 h while mixing. Start timing when the temperature reaches 80 °C. Cover the mouth of the flask with aluminum foil to prevent evaporation. Maintain temperature between 80 and 85 °C. Caution: hot caustic.
-
3.
Cool down the mixture to room temperature and then transfer the contents to two 500 mL centrifuge bottles.
-
4.
Centrifuge at 2000 × g for 30 min, discard supernatant (Fig. 2). Caution: caustic. The supernatant will have a dark brown color and may contain white floating partially saponified lipids, which should also be discarded. Suspend the pellet in 500 mL of distilled water using a Polytron homogenizer (0.5–0.75× full speed until pellet is uniformly suspended) and spin down again. Repeat this wash step until the supernatant is clear and the pH is <10. It usually takes four to five wash steps to achieve a clear supernatant.
Fig. 2 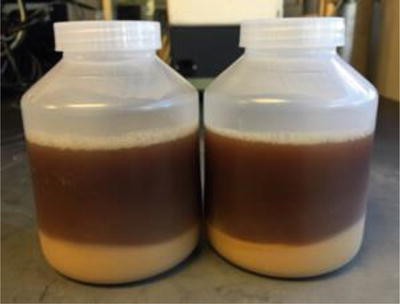
Centrifuge bottles after first spinning (pH > 10). Dark brown supernatant and white floating partially saponified lipids must be discarded. Pellet must be washed until the supernatant is clear and pH < 10 (it usually requires four to five washes)
-
5.
Adjust the pH of the suspension to pH 6–8 using hydrochloric acid (see Note 2 ).
-
6.
Repeat the wash step one more time to remove formed salt.
-
7.
Suspend the pellets in 250 mL of water using the Polytron homogenizer.
-
8.
Divide the suspended pellet into 5–50 mL conical tubes.
-
9.
Collect the insoluble fraction by centrifugation (2000 × g for 30 min) and discard supernatant. Packed pellet volume should be <15 mL.
-
10.
Add 30 mL of ethanol per tube. Suspend the pellets using a Polytron homogenizer to achieve a uniform suspension.
-
11.
Collect the insoluble fraction by centrifugation (2000 × g for 30 min) and discard supernatant. The supernatant appears slightly yellowish at first; repeat until it is clear. It typically takes three to four ethanol extractions (Fig. 3).
Fig. 3 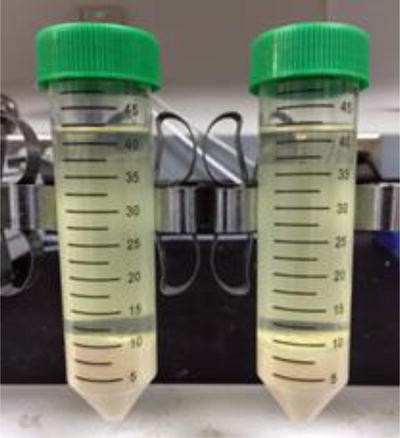
Centrifuge tubes after first ethanol wash. The supernatant appears slightly yellow due to extracted lipids. It typically takes three to four ethanol extractions to obtain a clear supernatant
-
12.
Suspend the pellet in 20 mL of acetone using a Polytron homogenizer in a fume hood to a uniform suspension. Note: acetone is flammable.
-
13.
Centrifuge and discard acetone as in the previous wash steps. Repeat acetone washes two times.
-
14.
After the last acetone wash, dry the pellet in a fume hood. Use a spatula to break up clumps every 15 min for the first hour, dry at room temperature for 48 h or until constant weight.
-
15.
The final product should be around 8–12 g of an off-white fine powder (Fig. 4). Weigh and characterize the GPs for morphology, number of particles per mg and hydrodynamic volume (water absorption capacity).
Fig. 4 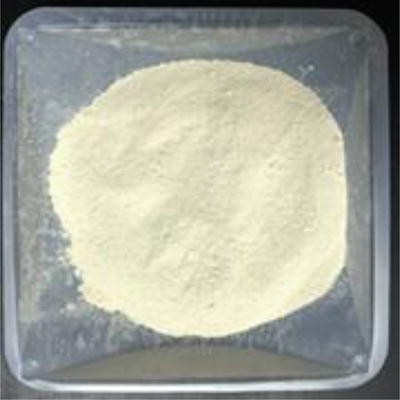
Final dry GP product


3.2 Number of Particles per mg GP
-
1.
Add ~1 mg of GPs to a microcentrifuge tube. Note absolute GP weight. Add 0.5 mL of distilled water and sonicate the tube to obtain single particles.
-
2.
Adjust concentration to 1 mg GP/mL with distilled water.
-
3.
Vortex/cup sonicate to uniform suspension.
-
4.
Make 1:100 dilution in water and count particles with a hemocytometer using a microscope with a magnification of ≥200×. The particles will appear as ~4–5 μm slightly ellipsoidal spheres resembling the morphology of the starting yeast material (Fig. 5). If the particles appear as smaller fragments, then the yeast cell source used is unacceptable and the particles are not useful for the encapsulation of antigens.
Fig. 5 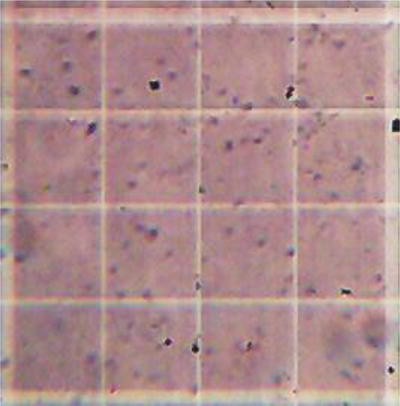
Image (20×) of glucan particle counting using a hemocytometer
-
5.
Calculate the number of particles in a 1 mg of GPs (see Note 3 ).

3.3 Hydrodynamic Volume of the Particles (Water-Binding Capacity, Fig. 6)
-
1.
Weigh two empty microcentrifuge tubes and record weights (W1). Add ~50 mg of GPs to these tubes. Weigh again and note the measurements (W2).
-
2.
Add 1 mL water to tubes, vortex and cup sonicate to obtain suspension. Incubate the tubes 1 h at room temperature (see Note 4 ).
-
3.
Centrifuge at 10,000 × g for 10 min.
-
4.
Discard water with fine pipette tip, paying attention to not disturb the pellet.
-
5.
Spin again to remove all water. Weigh tubes and record weights (W3).
-
6.
Calculate hydrodynamic volume (HV) = \( \frac{\left(\mathrm{W}3-\mathrm{W}2\right)}{\left(\mathrm{W}2-\mathrm{W}1\right)} \) mg water/mg GP (see Note 4 ).

Hydrodynamic volume , pictures from left to right showing from left to right (a) dry 50 mg GPs sample, (b) particles suspended in 1 mL water, (c) sample after centrifugation, (d) careful removal of excess water, and (e) wet pellet
3.4 Fluorescently Labeling Ovalbumin
-
1.
Mix and add FITC in DMSO solution to ovalbumin solution.
-
2.
Wrap the tube with aluminum foil to prevent photobleaching of fluorescent dye. Place the tube on a rotator and incubate at room temperature overnight.
-
3.
Add 1 mL of 1 M Tris pH 8 to quench unreacted FITC. Incubate for 15 min at room temperature.
-
4.
Purify protein by dialysis against 5 L distilled water until fluorescence of dialysate is equivalent to water. Carry out this step at 4 °C in the dark.
-
5.
Lyophilize the protein to concentrate. Store dry powder at −20 °C.
-
6.
Dissolve the FL-ovalbumin in distilled water at 25 mg/mL for loading experiments, store in aliquots at −20 °C.
3.5 Fluorescent Ovalbumin Loading and Trapping into GPs
-
1.
Weigh 5 mg GPs into two microcentrifuge tubes.
-
2.
Prepare two mixing sticks by sealing the tip of small pipette tips (1–20 μL) and place into tubes (see Note 5 and Fig. 7).
Fig. 7 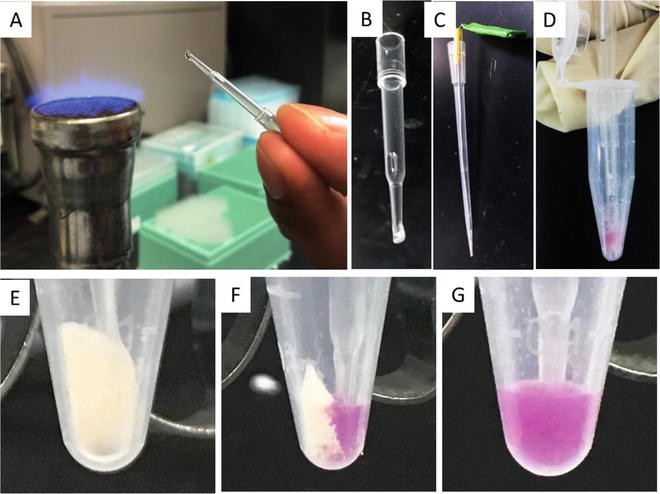
Top: (a) sealing of a small pipette tip (1–20 μL) with a Bunsen burner, (b) sealed pipette tip for mixing of GP samples, (c) image of a mixing stick device, and (d) mixing of GP samples and solution into a thick paste using the mixing device inserted into the sealed pipette tip. Bottom: Closeup of 5 mg GP pellets (e) before addition of loading solution (dry pellet), (f) at beginning of mixing the GP sample and solution containing Nile red dye showing dry and wet portions of the pellet, and (g) homogenous paste after mixing
-
3.
Dissolve the fluorescent ovalbumin at 25 mg/mL in sterile water and add 20 μL to each tube. Mix the protein and dry particles into a thick paste using the sealed pipette tip, making sure all of the particles are uniformly wetted. Briefly centrifuge tubes containing the mixing stick (~5 s) to bring the mixture down to the bottom of the tube. Repeat the mixing and centrifugation a total of three times to obtain a homogenous paste. Capillary action draws the soluble protein into the dry particles. A volume of 20 μL of protein is ~1/2 hydrodynamic volume (Subheading 3.3) ensuring most of the protein is absorbed into the GPs.
-
4.
Freeze-dry the tubes in order to remove the water.
-
5.
To push any residual protein either remaining outside the particles, or within the matrix of the particle wall into the hollow cavity of the GPs, add 10 μL of sterile water to each tube (see Note 6 ). Mix three times as described above. A volume of 10 μL of protein is ~1/4 hydrodynamic volume (Subheading 3.3) resulting in >95% of the protein inside the GPs.
-
6.
Freeze dry to remove the water as above.
-
7.
Set a heat block to 50 °C. Pre-warm the tubes containing the dry GPs loaded with fluorescent Ova to 50 °C. For labile proteins a temperature of 37 °C can be used.
-
8.
Prepare a supersaturated yRNA solution in 0.9% saline at 25 mg/mL by heating the material in a boiling water bath or microwave until boiling to dissolve the yRNA. Not all the RNA will dissolve. For microwaving, use a 15 mL tube with large headspace and heat the tube 5 s at a time. Mix and immediately transfer the supersaturated yRNA solution into a microcentrifuge tube on a 50 °C heat block. It is important to keep tubes warm; if the mixture cools down, then the yRNA starts to precipitate. Briefly centrifuge at 10,000 × g for 5 s to remove insoluble yRNA. Incubate at 50 °C until the yRNA supernatant is clear.
-
9.
Add 25 μL of soluble, clear 50 °C yRNA (25 mg/mL) to the first tube and 0.9% saline at 50 °C to the second tube . Using the mixing stick, mix the yRNA and dry tubes containing GPs loaded with fluorescent OVA while keeping them warm on the heat block. Centrifuge the microcentrifuge tube for 5 s at full speed. Allow the tube to temperature equilibrate to 50 °C and repeat the mixing and centrifugation three times until a uniform paste is obtained. Incubate tubes for an additional 10 min at 50 °C after particles absorb the yRNA. The yRNA complexes with the ovalbumin trapping the protein inside the GPs.
-
10.
Add another 25 μL of yRNA (25 mg/mL) to the first tube and 0.9% saline to the second tube. Mix as above. Incubate for 10 more minutes to continue the trapping reaction.
-
11.
Prepare another yRNA solution at 5 mg/mL in 0.9% saline. Equilibrate to 50 °C to solubilize the yeast RNA. Add 450 μL of soluble 5 mg/mL yRNA to the first tube and 450 μL of 0.9% saline to the second tube. Cup-sonicate tubes and remove the stirring sticks. Microtip sonicate the suspension at setting 7 for 5–10 s or until the particles are suspended into a uniform suspension. Incubate the tubes for 20 more minutes on the heat block to complete the trapping reaction.
-
12.
Centrifuge the tubes at 10,000 × g for 5 min. Collect and save the supernatants in two fresh microcentrifuge tubes. Wash the pellets with 250 μL of 0.9% saline three times. Save and combine the supernatants with corresponding supernatants from previous washes. The total volume of supernatant should be ~1 mL for both tubes. These pooled supernatants will be used for loading efficiency assessment (step 1).
-
13.
Suspend the pellet in 500 μL of 0.9% saline. Sonicate using a tip sonicator as described above to a uniform suspension and flash freeze the samples using dry ice or liquid nitrogen and store at −80 °C.

3.6 Assessment of Ovalbumin Loading Efficiency
3.6.1 Fluorescence Measurements
-
1.
Prepare free FL-ovalbumin solution for calculations: Put 20 μL of FL-ovalbumin (25 mg/mL) in a microcentrifuge tube. Add 980 μL of 0.9% saline. Transfer 100 μL of this solution into 3 wells of a 96-well microplate plate.
-
2.
Also, transfer 100 μL of pooled supernatants of control and experimental samples to three wells of a 96-well plate.
-
3.
Measure fluorescence using a fluorescent microplate reader (excitation wavelength 494 nm and emission wavelength: 518 nm). Alternatively, a spectrofluorimeter can be used by adjusting standard and sample volumes as necessary. Calculate the encapsulation efficiency using the formula below:
% Encapsulation efficiency = \( \left(1-\frac{\mathrm{fluorescence}\, \mathrm{value}\, \mathrm{of}\, \mathrm{the}\, {\mathrm{sample}}^{\prime}\mathrm{s}\, \mathrm{s}\mathrm{upernatant}}{\mathrm{fluorescence}\, \mathrm{value}\, \mathrm{of}\, \mathrm{the}\, \mathrm{free}\, FL- ovalbumin}\right)\times 100. \)
Over 90% encapsulation efficiency is expected with this method in tube 1.
3.6.2 Microscopy
-
1.
Prepare microscopic slides from both control saline and yRNA trapped samples. Observe the particles with a fluorescent microscope using a fluorescein filter and 100× objective. Observation of fluorescence inside the GPs indicates a good loading, while fluorescence outside of particles indicates unencapsulated protein (see Note 5 , Fig. 8).
Fig. 8 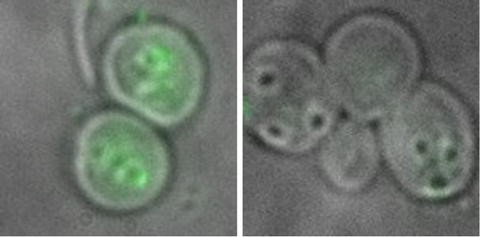
Fluorescence microscopy image showing a GP-fluorescent ovalbumin core

3.6.3 Sample Preparation for SDS-PAGE
Protein loading into GPs can be further confirmed by SDS-PAGE. A standard SDS-PAGE protocol can be used with a minor modification of sample preparation.
-
1.
Aliquot 10 μL of GP-ovalbumin formulations (control and experimental samples) into two microcentrifuge tubes.
-
2.
Centrifuge the tubes at 10,000 × g for 5 min.
-
3.
Remove the supernatant without disturbing the pellet. Add 15 μL of 6 M urea solution (see Note 6 ).
-
4.
Add 3 μL of 6× SDS-page loading buffer to the GP-ovalbumin samples and mix.
-
5.
Cup sonicate the tubes.
-
6.
Aliquot 15 μL of collected supernatants from loading experiments into two microcentrifuge tubes. Add 3 μL of 6× SDS-page loading buffer.
-
7.
Pipette 2 μL of FL-ovalbumin (25 mg/mL), in a tube and mix with 10 μL of distilled water and 3 μL of 6× loading buffer.
-
8.
Place all the tubes on a heat block at 100 °C, boil for 5 min.
-
9.
Supernatants and free ovalbumin control samples are ready to run after this step. However, GP-ovalbumin formulations require additional processing to extract the encapsulated protein. Briefly centrifuge the tubes to bring the condensation down. Cup sonicate the tubes for ~30 s and place on the heat block again for 5 min. Repeat this cup-sonication, heating, and centrifugation steps three times in total in order to extract the protein from GPs.
-
10.
Samples can be stored at −20 °C until the gel is run.
-
11.
Observing ovalbumin identity bands in the experimental GP-ovalbumin sample and not in the corresponding supernatant indicates a good encapsulation. Observing an ovalbumin identity band in the supernatant fraction of experimental sample indicates a poor loading reaction (Fig. 9 ).
Fig. 9 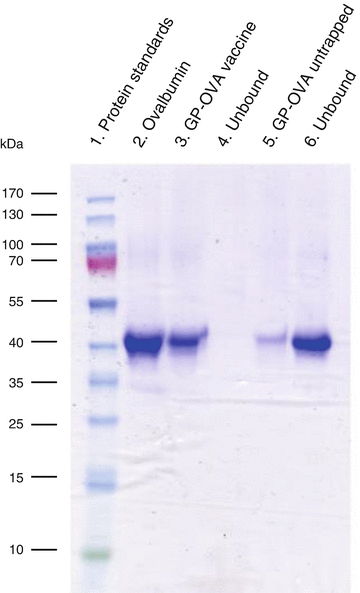
SDS PAGE analysis of encapsulated (pellet) and unencapsulated (soluble) fractions to assess antigen loading

4 Notes
-
1.
It is important to first add water to the flask and then weigh and add sodium hydroxide to flask for safety reasons. Wear protective goggles, gloves, and lab coat and place the stirring hot plate in a fume hood. Start with concentrated HCl (12.1 N). Add it dropwise in the fume hood, while mixing and measuring the pH. When the pH is close to 8, use a diluted HCl (1 N) solution to prevent sudden pH drop.
-
2.
We usually get ~5 × 10⁸ particles/mg GP. The size, lipid and protein content of the yeast and the purification process affect the particles per mg and the hydrodynamic volume . For example, diploid yeast strains yield larger particles than their haploid counterparts; the particles per mg are usually lower with diploid strains. Less pure particles, or particles with a thicker cell wall also have lower particles per mg. Particles/mg is directly correlated with the hydrodynamic volume.
-
3.
Hydrodynamic volume is the amount of liquid 1 mg of particles can absorb fully. Using a volume less than hydrodynamic volume during loading steps ensures that the “payload” gets fully absorbed into GPs. Soluble payload in the solvent moves into particles along with the solvent by capillary action. Hydrodynamic volume is typically ~10 mg of water per mg GPs, but can range from 8 to 12 mg depending upon the number of particles per mg.
-
4.
Pass the open ends of pipette tips through a Bunsen burner flame. Pipette tips should stay in the microcentrifuge tubes until the final wash step. Therefore, length of the pipette tip should not prevent closing the caps of microcentrifuge tubes. In order to mix, use a secondary pipette tip as shown below (Fig. 7).
-
5.
Use same fluorescence intensity and exposure time for both control and experimental sample . Observing fluorescence inside the GPs indicates a good loading, while fluorescence outside of particles indicates unencapsulated protein.
-
6.
Prepare 1 mL fresh urea solution each time as the urea solution is not stable.
References
Levitz SM, Golenbock DT (2012) Beyond empiricism: informing vaccine development through innate immunity research. Cell 148:1284–1292
Soto E, Ostroff GR (2012) In: Vetvicka V, Novak M (eds) Biology and chemistry of beta glucan. Bentham science publishers, Oak Park, IL, pp 48–67. doi:10.2174/97816080521031110101
Tesz GJ et al (2011) Glucan particles for selective delivery of siRNA to phagocytic cells in mice. Biochem J 436:351–362
Soto ER, Caras AC, Kut LC, Castle MK, Ostroff GR (2012) Glucan particles for macrophage targeted delivery of nanoparticles. J Drug Deliv 2012:1–13
Soto E, Kim YS, Lee J, Kornfeld H, Ostroff G (2010) Glucan particle encapsulated rifampicin for targeted delivery to macrophages. Polymers (Basel) 2:681–689
Soto ER, Ostroff GR (2008) Characterization of multilayered nanoparticles encapsulated in yeast cell wall particles for DNA delivery. Bioconjug Chem 19:840–848
Aouadi M et al (2009) Orally delivered siRNA targeting macrophage Map4k4 suppresses systemic inflammation. Nature 458:1180–1184
Goodridge HS, Wolf AJ, Underhill DM (2009) Beta-glucan recognition by the innate immune system. Immunol Rev 230:38–50
Huang H et al (2012) Relative contributions of dectin-1 and complement to immune responses to particulate β-glucans. J Immunol 189:312–317
Levitz SM, Huang H, Ostroff GR, Specht CA (2015) Exploiting fungal cell wall components in vaccines. Semin Immunopathol 37:199–207
Huang H et al (2009) Distinct patterns of dendritic cell cytokine release stimulated by fungal beta-glucans and toll-like receptor agonists. Infect Immun 77:1774–1781
Huang H, Ostroff GR, Lee CK, Specht CA, Levitz SM (2010) Robust stimulation of humoral and cellular immune responses following vaccination with antigen-loaded beta-glucan particles. MBio 1:e00164–e00110
Huang H, Ostroff GR, Lee CK, Specht CA, Levitz SM (2013) Characterization and optimization of the glucan particle-based vaccine platform. Clin Vaccine Immunol 20:1585–1591. doi:10.1128/CVI.00463-13
Specht CA et al (2015) Protection against experimental cryptococcosis following vaccination with glucan particles containing cryptococcus alkaline extracts. MBio 6:1–11
Buffer Reference Center|Sigma-Aldrich. at <;http://www.sigmaaldrich.com/life-science/core-bioreagents/biological-buffers/learning-center/buffer-reference-center.html#sodiumcarbonate>
Author information
Authors and Affiliations
Corresponding author
Editor information
Editors and Affiliations
Rights and permissions
Copyright information
© 2017 Springer Science+Business Media LLC
About this protocol
Cite this protocol
Mirza, Z., Soto, E.R., Dikengil, F., Levitz, S.M., Ostroff, G.R. (2017). Beta-Glucan Particles as Vaccine Adjuvant Carriers. In: Kalkum, M., Semis, M. (eds) Vaccines for Invasive Fungal Infections. Methods in Molecular Biology, vol 1625. Humana Press, New York, NY. https://doi.org/10.1007/978-1-4939-7104-6_11
Download citation
DOI: https://doi.org/10.1007/978-1-4939-7104-6_11
Published:
Publisher Name: Humana Press, New York, NY
Print ISBN: 978-1-4939-7103-9
Online ISBN: 978-1-4939-7104-6
eBook Packages: Springer Protocols