
Abstract
Bone metastasis from primary cancer sites creates diagnostic and therapeutic challenges. Calcified bone is difficult to biopsy due to tissue hardness and patient discomfort, thus limiting the frequency and availability of bone/bone marrow biopsy material for molecular profiling. In addition, bony tissue must be demineralized (decalcified) prior to histomorphologic analysis. Decalcification processes rely on three main principles: (a) solubility of calcium salts in an acid, such as formic or nitric acid; (b) calcium chelation with ethylenediaminetetraacetic acid (EDTA); or (c) ion-exchange resins in a weak acid. A major roadblock in molecular profiling of bony tissue has been the lack of a suitable demineralization process that preserves histomorphology of calcified and soft tissue elements while also preserving phosphoproteins and nucleic acids. In this chapter, we describe general issues relevant to specimen collection and preservation of osseous tissue for molecular profiling. We provide two protocols: (a) one-step preservation of tissue histomorphology and proteins and posttranslational modifications, with simultaneous decalcification of bony tissue, and (b) ethanol-based tissue processing for TheraLin-fixed bony tissue.
1 Introduction
1.1 Pre-Analytical Variability : An Addressable Roadblock for Precision Medicine
Molecular profiling is advancing into clinical applications such as precision medicine, demanding that one must consider the entire spectrum of clinical assay variability, including pre-analytical as well as post-analytical events, which could potentially impact the data. Pre-analytical variability can confound precision medicine due to biomolecule perturbation caused by time delays following tissue procurement, the preservation method, and tissue processing [1]. Living tissue that has been separated from its blood supply during surgical procurement goes through defined stages of reactive changes preceding death, beginning with oxidative, hypoxic, and metabolic stress. Depending on the delay time ex vivo, and manner of handling, biomarkers such as signal pathway phosphoproteins or mRNA will be elevated or suppressed in a manner that does not represent the biomarker levels at the time of excision [1,2,3,4,5,6,7,8].
George Poste in 2011 stated “A major impediment to progress in the hunt for biomarkers is the lack of standardization in how specimens are collected” [9]. Funding agencies now require stringent characterization of specimens, rigorous quality control in specimen acquisition handling and storage, validation of key reagents, and confirmation of critical reagent specifications [10]. Furthermore, measurement of phosphoprotein signal pathway epitopes or nucleic acids in bony specimens adds additional sources of variability that can affect the ability to detect these critical molecular targets. To reduce pre-analytical variability and preserve epitopes, we have developed a tissue fixation chemistry (TheraLin , Grace Bio-Labs, Bend, OR) comprised of a precipitating fixative, a permeation enhancer, phosphatase and kinase inhibitors, reversible cross-linkers, and a carboxylic acid in an isosmotic salt solution [4, 5, 11]. TheraLin is a one-step fixative and decalcification solution that fixes and preserves the histomorphology of soft tissue and bony tissue for downstream protein, DNA, and RNA analyses. However, one must still be cognizant of factors contributing to pre-analytical variability (see Notes 1 and 2 ). Adherence to the following guidelines for tissue procurement will aid in providing quality specimens suitable for diagnosis and/or research [1, 5].
-
1.
Tissue is alive and reactive to ex vivo stress. Kinase pathways are active and reactive until the tissue cells are stabilized. RNA transcription is reactive to ex vivo stress, and RNA stability rapidly declines over time in a highly temperature-dependent manner. Tissue procurement protocols must recognize these facts and provide methods for limiting exposure to extreme environmental conditions.
-
2.
Reactive changes occurring in tissue post excision can generate false elevation as well as false declination in protein and nucleic acid analytes. This may be a significant source of bias in the analysis of protein or nucleic acid as potential biomarkers .
-
3.
Protein signaling pathway stabilization methods should block both sides of the kinase/phosphatase kinetic reaction. Blocking only phosphatases can cause false elevation of an analyte’s phosphorylation level.
-
4.
Tissue should be stabilized as soon as possible after excision. Taking into consideration the average time for procurement in a community hospital, the recommended maximum elapsed time is 20 min from excision to stabilization (e.g., flash freezing, thermal denaturation, or chemical stabilization).
-
5.
Tissue stabilization and preservation methods should be compatible with the intended downstream analysis. Preservation of tissue histology and morphology is essential for verification of tissue type and cellular content.
-
6.
Documentation of the sample excision/collection time, elapsed time to preservation/stabilization, and length of fixation time and type of preservation are critical data elements for sample quality assessments.
1.2 Bone Metastasis : Opportunities for Therapeutic Intervention
Breast, prostate, thyroid, lung, and renal primary tumors frequently metastasize to bone , creating considerable pain and disability for the patient due to destruction and remodeling of the bone by the tumor cells [12]. Tumors originating from these various tissues colonize the bone in similar locations within the bone, suggesting there are common features of the tumor/bone niche that allow the histologically different tumor cells to disseminate and colonize the bone [13]. Some molecular mechanisms underlying bone metastasis have been deciphered. For example, tumor-derived, but not stromal cell-derived, β3 integrin has been associated with vascular dissemination of breast tumor cells to bone [14]. In cohorts of breast cancer patients, gene expression analysis showed that estrogen-receptor-negative patients had a strong association between high β3 expression, early metastasis, and shorter disease-free survival [14]. Hormone receptor modulation is often used therapeutically in breast and prostate cancer treatment. Bone metastases may express similar or different patterns of hormone receptor activity, thus providing opportunities for molecular profiling of bone lesions and design rationale therapies. Androgen receptor copy number amplification has been confirmed in bone marrow biopsies of patients with hormone-resistant prostate cancer [15]. This finding provides one explanation for hormone-refractory disease and suggests an opportunity to select patients for second-line antiandrogen therapy [15].
Molecular profiling of immune cell populations in the bone microenvironment has demonstrated the role of CD169+ macrophages in bone lesion formation [16]. Macrophages normally populate tissues, including bone and bone marrow, and can influence anabolic and catabolic bone growth via osteoblast and osteoclast functions [16]. CD169+ macrophages were shown in an immune-competent mouse model of metastatic prostate cancer to mediate the pathologic formation of tumor woven bone in skeletal lesions [16]. Depletion of the CD169+ macrophages, but not pan-macrophage depletion, decreased the formation of tumor woven bone, indicating that specific subpopulations of macrophages may enhance tumor growth [16].
These studies highlight the adhesion, immune, and hormonal pathways that are being elucidated by molecular profiling of bony tissue. However, to fully capitalize on the molecular and histopathologic information contained within bony tissues, the pre-analytical specimen processing must be simple, relatively fast, and able to retain both histomorphology and protein and nucleic acid content in bony and surrounding soft tissues.
1.3 Demineralization (Decalcification) of Osseous Tissue
Bone is highly vascularized and serves as a repository for hematopoietic progenitor cells, resident immune cells, and megakaryocytes, as well as osteoblasts and osteoclasts [12, 13]. These resident cells are protected within a calcified cortical (compact, hard) outer surface and a cancellous (spongy, trabecular) interior that impedes histologic processing into thin sections for microscopic visualization . Osseous tissues can be disrupted using pulverization such as adaptive focused acoustics to extract proteins from bone tissue without prior demineralization [17, 18]. However, in order to make preparations of bone (with associated soft tissues) that are suitable for microscopic study, the bone must be demineralized before it can be cut into thin sections. The principle of bone demineralization is to change the insoluble inorganic salts of bone to soluble salts that diffuse out of the tissue into the surrounding medium [19]. Demineralization strategies include solubilizing the calcium matrix in acid [19,20,21], chelating the calcium with ethylenediaminetetraacetic acid (EDTA) [22, 23], strong cation ion-exchange resins [24, 25], or the recently published ammonium phosphate and ammonium bicarbonate extraction method [26]. Acid demineralization occurs more rapidly than EDTA chelation demineralization; however, strong acids or extended demineralization time can cause undesirable artifacts and destroy protein epitopes [27, 28]. Critical aspects for choosing the optimal demineralization strategy are (a) the surface area of the specimen, (b) the fixation method (formalin, alcohol, acid-alcohol, etc.), and (c) the molecule of interest (protein, DNA, RNA ) for downstream analysis. Therefore, the optimal demineralization strategy is often determined empirically.
Morris and Benton performed comprehensive, well-controlled comparisons of acid demineralization strategies, culminating in four important points that are applicable to all acid demineralization protocols: (1) The bone tissue surface area, not the weight, determines the time for demineralization. (2) The time required for demineralization progressively increases due to the diffusion distance of the calcium through the inner bone matrix. (3) Agitation of the bone specimen in the acid solution decreases the time for demineralization. (4) Increasing the temperature to a maximum of 36 °C resulted in a 15% reduction in time for demineralization [19]. They also evaluated nine different acids regarding depth of demineralization, amount of minerals removed (calcium and phosphorus), solubility of the calcium salts, and the dissociation constants [19]. Although Morris and Benton found that hydrochloric and nitric acid were the optimal demineralization acids based on their criteria [19], weaker acids such as acetic, lactic, and ascorbic acids are now commonly used due to better preservation of protein epitopes [29].
In situ hybridization (ISH) with demineralized bone has been enhanced using EDTA , rather than acid-based demineralization protocols [21,22,23]. Alers et al. found that acid demineralization was not compatible with DNA ISH using centromere-specific probes, but EDTA demineralization produced acceptable results [22]. To preserve mRNA in formalin-fixed, 1.5 cm femoral head specimens, Walsh et al. demineralized the bony tissue in 20% EDTA for 10 days. The EDTA solution was renewed daily [21]. Their assessment of EDTA cellular architecture was rated acceptable because osteoblasts and osteoclasts were closely opposed to trabecular surfaces, without gaps or discoloration.
The one-step fixative + decalcification processes described in this chapter meet the requirements for rigorous, reproducible processing of bony specimens for molecular profiling. Multiple tissue sections from the same paraffin block can be cut and distributed for (a) histopathologic diagnosis, (b) immunohistochemistry , (c) microdissection, (d) proteomic analysis, and (e) nucleic acid analysis. Finally, the tissue can be stored indefinitely at room temperature or 4 °C as a paraffin block . One-step fixative + decalcification can transform precision medicine and research because (a) pre-analytical variables caused by tissue preservation delays will be eliminated, (b) no additional equipment or costly freezers are required, and most importantly (c) histopathologic verification can be conducted with the same tissue block used for molecular profiling of protein, DNA, or RNA . Herein we describe a method for one-step fixation and decalcification of bony tissue and tissue processing for subsequent embedding into a paraffin block that are compatible with any automated tissue processor.
2 Materials
2.1 Fixation and Decalcification
-
1.
Fresh, bony tissue specimen up to 10 mm in the longest dimension (see Note 4 ).
-
2.
TheraLin tissue preservative (Grace Bio-Labs). Store at 2–8 °C.
-
3.
Polypropylene specimen container with a tight-sealing lid.
-
4.
Rotator mixer.
2.2 Tissue Processing
-
1.
Tissue-Tek VIP tissue processor .
-
2.
Fixed tissue specimens, 10 × 5 × 10 mm maximum dimensions.
-
3.
Xylene 11.4 L (see Note 5 ).
-
4.
Paraffin polymer 10.5 kg (see Note 6 ).
-
5.
Ethanol: 70%, 95%, and 100% histology grade anhydrous, 3.8 L, 7.6 L, and 15.2 L, respectively.
-
6.
Reagent grade water: type 1, 18.2 MΩ-cm resistivity, total organic carbon <25 ppm.
-
7.
Tissue cassettes.
-
8.
Pencil or tissue cassette marking pen (see Note 7 ).
-
9.
Activated carbon powder for filtration, 3.25 lb (1.47 kg).
-
10.
Funnel.
-
11.
Tap water 3.8 L .
3 Methods
TheraLin is an alcohol-based fixative compatible with both soft tissue and bony tissue specimens. Calcified tissue does not require additional decalcification in acid or EDTA prior to tissue processing and paraffin embedding.
3.1 Fixation and Decalcification
-
1.
Within 15 min of tissue acquisition (resection), cut surgical specimens to a maximum of 10 × 5 × 10 mm.
-
2.
Place the specimens into TheraLin in a polypropylene container with a tight-sealing lid. Use 10 volumes of fixative for each cubic millimeter (cm3 = 1 mL) of tissue. Tissue may be placed in a labeled tissue cassette, and the entire cassette can be submerged in TheraLin . TheraLin is stored at 2–8 °C but should be used for fixation/decalcification at room temperature.
-
3.
Place the tissue + TheraLin container on a rotator mixer. Rotate at a rate that allows moderate movement of the fluid in the container. The rate will vary depending on the container size and shape.
-
4.
Rotate/mix for at least 14–16 h. Larger pieces of bony tissue may need to be decalcified for 24–48 h. For larger pieces of bone /calcified tissue, it may be necessary to replace the fixative with fresh fixative after 24 h for optimal decalcification.
3.2 Tissue Processing (See Note 8 )
Tissue processing refers to replacing water in tissues via substitution of water with alcohols and then replacing the alcohols with xylene (or a xylene substitute ), followed by infiltration of the tissue with paraffin . Paraffin and ethanol are immiscible. The xylene or xylene substitute is miscible in both ethanol and paraffin, allowing displacement of the alcohol in the tissue with xylene and then displacement of the xylene with molten paraffin (see Note 9 ) [29].
Tissue processing and embedding into a paraffin block physically stabilizes fragile, friable tissue pieces for tissue sectioning on a microtome . The method below describes the use of an automated tissue processor in which tissue specimens are processed through ethanol without any formalin steps. The specimens are placed in a single compartment (retort), and fluids are pumped in and out under controlled conditions of fluid circulation, vacuum /pressure, and temperature. Liquid in the first 10 reservoirs is sequentially drawn into the retort via a vacuum and returned to the reservoir by positive air pressure [30]. A series of alcohols dehydrate the fixed tissue, followed by clearing in xylene . Molten paraffin is pulled into the retort to impregnate the tissues. Paraffin is pumped out, the specimens are removed from the retort, and xylene is pumped in to remove excess paraffin. Following processing and tissue embedding in a paraffin block , tissue sections may be cut from the block on a microtome and used for H&E staining, periodic acid-Schiff [4] staining, immunohistochemistry , DNA single nucleotide polymorphism (SNP) analysis, mass spectrometry, Western blotting, reverse-phase protein microarray, laser capture microdissection, etc. (see Note 10 ).
3.2.1 Reagent Preparation
Process the tissue in a tissue processor using ethanol, without any internal formalin processing steps (Table 1). Use vacuum and agitation, if available, during tissue processing (see Note 11 ).
-
1.
Prepare 3.8 L of 70% ethanol in type I reagent grade water.
-
2.
Prepare 7.4 L of 95% ethanol in type I reagent grade water.
-
3.
Remove the xylene reservoirs from the Tissue-Tek processor. Slowly lower the reservoir to allow any fluid remaining in the tubing inside the reservoir to drain back into the reservoir.
-
4.
Dispose xylene into an appropriate chemical waste carboy. To completely empty the reservoir, pour out the reagent by tipping the reservoir horizontally (tilt reservoirs along the long axis).
-
5.
Refill the reservoirs with xylene (3.8 liters/reservoir × 3 reservoirs).
-
6.
Replace the reservoirs into their proper locations in the reagent reservoir, taking care that the inner tubing does not enter the handle and is properly aligned inside the reservoirs (Table 2).
Table 2 Tissue-Tek VIP tissue processor program compatible with TheraLin -fixed bony tissue specimens -
7.
Repeat the process for the 100% ethanol, 95% ethanol, and 70% ethanol and tap water reservoirs. Tap water is used to generate pressure for pumping reagents in/out.
-
8.
Add paraffin (solid) to the tissue processor paraffin reservoirs.
3.2.2 Programming the Tissue-Tek Tissue Processor
The tissue processor takes 24 h to warm-up. During warm-up the instrument standby light will blink. The interface with the Tissue-Tek processor is through a laminate touch board console, and access to the touch board to input commands is controlled via a magnet.
-
1.
To input commands into the Tissue-Tek processor, place the control magnet on the touch pad labeled key “PROGRAM” (Fig. 1a).
Fig. 1 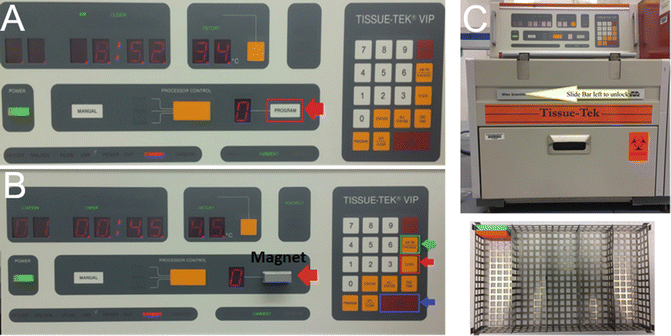
Tissue-Tek tissue processor console. (a) The programmable area is outlined in red and indicated by a red arrow. To input commands into the instrument, the control magnet must be placed on the “PROGRAM” keypad. (b) Tissue-Tek processor console with control magnet placed on the “PROGRAM” keypad. The outlined touch pad keys correspond to setting the current time. The touch pad key outlined in red will initiate the clock input. The touch pad key outlined in green will toggle between AM and PM. The touch pad key outlined in blue, “ENTER,” will store the values entered on the touch pad. (c) To open the retort, the interlock bar must be moved to the left as indicated by the yellow arrow. Tissue cassettes must be placed in the wire basket in rows. The row spacers can be adjusted to accommodate fewer cassettes or different size cassettes. The basket lid must be in place during processing to prevent the cassettes from floating
-
2.
Confirm that the current time is correctly displayed in the clock panel. Adjust the clock if necessary. Press clock; either AM or PM will be blinking. Select the AM/PM diagnosis touch pad key, and press ENTER. Set the current time using the number buttons in the format 0:00 for 12:00 AM or PM to 11:59 AM or PM and then press enter (Fig. 1b).
-
3.
Program the Tissue-Tek 3000 Processor by pressing the orange PROGRAM button. As the button is pushed, the number next to the program/control magnet will change representing the selected program. This is shown in Fig. 1b with the program number outlined in green and the program button outlined in red with a red arrow pointing at it.
-
4.
To view the current program, push the red VERIFY button to cycle through each step. During processing the instrument operates sequentially between stations but skips any stations with a time of 0:00. The time and temperature associated with each station program are visible in the digital display. If vacuum /pressure is being used at a given station, the p/v cycle will be illuminated in green.
-
5.
To edit a program, press VERIFY until you reach the desired station. Use the number keypad to enter the time for the particular station. The digits will enter right to left. Hours must be input as hours-minutes (1:00) format, not in minute format 0:60. To input all zeros, press the CLEAR button. After the desired time is entered, press ENTER. Next use the number keypad to enter the temperature for that particular station. After the temperature is set, press the ENTER key. Next you will need to designate if this station will utilize the vacuum /pressure option. To remove this option, press the clear button (the p/v cycle will no longer be illuminated in green). Repeat this step for each station you wish to edit.

3.2.3 Tissue Processing
Tissue must be completely fixed in TheraLin prior to starting the tissue processing cycle (see Note 12 ). The tissue processing conditions (ethanol concentrations, temperatures, time, pressure/vacuum ) outlined below can be used with any automated tissue processor.
-
1.
Label both sides/the front of a tissue cassette using pencil or a tissue cassette marking pen (see Note 7 ). Include sample identifiers and date of tissue collection/processing.
-
2.
Retrieve the TheraLin -fixed tissue. If necessary, cut/trim the tissue to a suitable size for processing (no larger in width than the size of the cassette 10 × 5 × 10 mm). The tissue must be able to freely move within the cassette during processing.
-
3.
Open the retort latches. To access the retort latches, slide the interlock bar on the front of the Tissue-Tek processor to the left (Fig. 1c).
-
4.
Remove the wire basket from retort and place the tissue cassettes within basket lanes (Fig. 1c). Place the basket back into retort and cover the basket with the lid. The lid must be present during processing or the tissue cassettes will float, resulting in improper processing.
-
5.
Re-latch the retort latches and slide the interlock bar back to the right. Ensure that the retort gasket is free from paraffin residue.
-
6.
Place the control magnet onto the PROGRAM keypad (Fig. 1a).
-
7.
Select the desired program by pressing the orange PROGRAM button, and verify the station settings. If necessary, reprogram the instrument as outlined in Subheading 3.2.2.
-
8.
To start tissue processing , remove the magnet (start should be illuminated in green), and then press and hold the PROCESSOR CONTROL button until the instrument beeps. This must be done within thirty seconds of removing the magnet.
-
9.
To set up the processor for a delayed start, you must enter the finish date/time. This is accomplished by pressing the orange END TIME button. Enter the number of days which will pass until you want the processor to finish (e.g., if it is Friday and you want the tissue to be ready on Monday, select 3 days and press ENTER). Confirm AM or PM, and press ENTER. Enter the time when the tissue will be taken out of the processor. The instrument will beep to alert that an error occurred if there is not sufficient time to run the program (see Note 13 ).
3.2.4 Post-Processing/Purge Cycle
-
1.
After the tissue processor has completed, the instrument will beep loudly. The tissue will remain in molten paraffin until the unit has been programmed to drain the molten paraffin out. During this stage, the drain text (which is underneath the start text) will be illuminated in green (see Note 14 ).
-
2.
Place the control magnet on the program area. Next push the large yellow button next to the drain text (under processor control). The unit will pump out the molten paraffin (this takes a few minutes).
-
3.
Open the retort as explained in step 4 of processing. The instrument will beep, this is normal. To help keep the instrument clean, scrape any errant paraffin from the inside of the retort door and around the top of the retort with a plastic scraper. Remove basket, and wipe out the inside of the retort with a paper towel to remove any remaining paraffin.
-
4.
Remove the tissue cassettes from the wire basket, and transfer them to a tissue embedding station for embedding into a paraffin block (see Note 15 ).
-
5.
Replace the wire basket into the retort. If any metal embedding boats or embedding utensils need to be deparaffinized , place them in the basket as well, and replace the basket lid.
-
6.
Close the retort and re-engage the interlock bar. The console should now have “CLEAN” illuminated in green within the processor control panel. Place the control magnet on the keypad, and press the PROCESSOR CONTROL button.
-
7.
After the clean cycle is finished, the instrument will beep. Ensure that “AMBIENT” is illuminated in green on the touch pad console. Open the retort, remove the basket, and wipe out any residual paraffin with a paper towel.
-
8.
Replace the wire basket in the retort. If the Tissue-Tek processor will not be used in the upcoming days, shut down the instrument by turning off the main power switch on the back of the instrument.
3.2.5 Maintenance of the Tissue-Tek Processor
In order prevent the accumulation of paraffin within the Tissue-Tek processor and to prevent processing artifacts in the tissue, periodic cleaning is required [27, 28].
-
1.
After each run, wipe down the top of the retort area with gauze to remove paraffin .
-
2.
Daily, check and clean all spill trays.
-
3.
Weekly, wipe down the inner oven door with a plastic scraper, and wipe the oven door with gauze to remove excess paraffin .
-
4.
If the Tissue-Tek processor is only used several times per week, perform a partial reagent change at least once a month.
-
5.
If the Tissue-Tek processor is operated daily, a full reagent change should be performed based on condition of the reagents.
-
6.
Monthly, check the overflow bottle which is located within the back of the instrument. Observe it through the screen to ensure no contaminates are present.
4 Notes
-
1.
The addition of a phosphatase inhibitor to a native (non-denatured) protein sample may result in false elevation of phosphorylated proteins due to the inhibited action of kinases. It is important to consider inhibiting both phosphatases and kinases in a sample or using protein denaturing conditions which are likely to denature both phosphatases and kinases.
-
2.
Some phosphoprotein antigen epitopes are not adequately preserved by formalin fixation and paraffin embedding.
-
3.
To prevent nucleic acids from denaturing during routine histological processing, ensure that the paraffin wax temperatures do not exceed 65 °C. Lower tissue processing temperatures keep the nucleic acid structures intact which facilitates downstream analysis such as in situ hybridization .
-
4.
Fresh specimens should be fixed in TheraLin as soon as possible after excision/procurement to prevent protease and nuclease degradation of protein and nucleic acids, respectively. TheraLin will simultaneously fix and demineralize the tissue specimen (Fig. 2).
Fig. 2 
TheraLin tissue fixative preserves histomorphology of soft and bony tissue with simultaneous bone decalcification. A mouse femur and tibia/fibula were excised and placed into TheraLin tissue preservative for 24 h, followed by processing in ethanol into a paraffin block . (a) Articulation of the knee joint showing the articular cartilage, epiphyseal plate, and bone marrow (nuclei = blue, cytoplasm = pink, 40× magnification). (b) 200× magnification of the knee articulation. (c) Epiphyseal plate and bone marrow of femur (100× magnification). (d) Transverse section of a mouse rib (rb) with surrounding muscle (m) and adipose tissue (a) demonstrating preservation of both soft tissue and bony tissue in the same specimen (100× magnification)
-
5.
Xylene is the preferred clearing agent for bony tissue processing . Xylene substitutes , such as D-limonene or DL-limonene, slowly penetrate tissues and are not miscible with all mounting media [29].
-
6.
Paraffin , also referred to as “wax,” is often blended with polymers such as styrene or polyethylene to achieve specific characteristics related to tissue infiltration and sectioning. Paraffin/paraffin blends usually melt between 52 and 60 °C and solidify at room temperature. The type of paraffin affects the rate of infiltration, brittleness of the paraffin-tissue block, and the thinness of the sections that can be cut from the block. Pure paraffin infiltrates faster than polymer blends. Polymer blends with the highest ratio of polymer-paraffin provide the ability to cut thinner tissue sections [29]. Paraplast is a combination of paraffin and plastic polymers, with a melting point of 56 °C. Paraplast is compatible with most solvents and staining techniques. Paraplast Plus contains dimethyl sulfoxide (DMSO) and also has a melting point of 56 °C. The DMSO improves the rate of tissue infiltration, making it easier to cut hard or brittle tissues.
-
7.
Tissue cassettes must be labeled using a #2 pencil or a tissue cassette marking pen specifically designed for writing on the plastic cassette. Other types of laboratory marker ink will dissolve in the alcohols and xylene during tissue processing . In our hands, a pencil provides the darkest, most indelible marking on a tissue cassette.
-
8.
Critical note: TheraLin -fixed tissues should be processed through ethanol, without using any internal formalin processing steps. TheraLin is an alcohol-based fixative. Formalin cross-links proteins via methylene bridge formation. These cross-links interfere with antigen detection. A dedicated tissue processor in which only ethanol and xylene solutions are used is recommended for processing TheraLin -fixed tissues. If a tissue processor has been used for formalin processing, ensure that the formalin reservoirs are removed and replaced with dedicated reservoirs containing only ethanol solutions. Ensure that the reservoir tubing that was in contact with formalin has been thoroughly rinsed prior to switching to an ethanol reservoir.
-
9.
The chemical (xylene or a xylene substitute ) used to replace the alcohol is called a “clearing agent” because the solutions are fully miscible. Replacing alcohol with xylene in tissue or on a tissue section is referred to as “clearing.” Xylene and xylene substitutes have a high refractive index which confers optical clarity to the tissue [29].
-
10.
Tissue sections to be used for downstream in situ hybridization should be sectioned on a microtome using DNase - and RNase-free conditions. Use fresh diethyl pyrocarbonate (DEPC) -treated water in the tissue section float bath.
-
11.
To conserve alcohol, xylene , and paraffin , some of the reagents are replaced, while others are rotated. This process is referred to as a “partial reagent change.” One important difference between a full reagent change and a partial reagent change is that a partial reagent change begins with paraffin which is in its molten state, rather than a solid.

Paraffin Rotation:
-
(a)
Acquire a sturdy waste bucket and line the bucket with a sturdy plastic bag.
-
(b)
Open the oven door. Slowly and gently disengage the reservoir from station 11, and pour the paraffin into the waste container.
-
(c)
Wipe the oven floor with a paper towel to remove any excess paraffin .
-
(d)
Slowly and gently remove the reservoir from station 12 and move it to station 11.
-
(e)
Wipe the oven floor of station 12 with a paper towel to clean up any excess paraffin .
-
(f)
Gently and slowly remove the reservoir from station 13 and move it to station 12.
-
(g)
Wipe the oven floor of station 13 with a paper towel to clean up any excess paraffin .
-
(h)
Fill the empty reservoir originally in station 11 with molten paraffin up to the line, or fill with paraffin pellets (warning: if molten paraffin is not utilized in this step, the processor cannot be used until the new paraffin is completely molten and filled to the fill line). Put the reservoir in station 13.
Xylene Rotation:
-
(a)
The purge xylene should be changed during every other reagent rotation. Remove the reservoir from station 14. Allow the internal hose to drain into the reservoirs when removing the reservoir, and dispose of the xylene in the appropriate hazardous waste container. Refill the reservoir with fresh xylene (3.8 L) and replace it in station 14.
-
(b)
Remove the xylene reservoir from station 7. Allow the internal hose to drain into the reservoir, and dispose the xylene in a hazardous waste container.
-
(c)
Move the reservoir from station 8 into station 7. Allow the internal hose to drain into the reservoir.
-
(d)
Fill the reservoir which was previously in station 7 with xylene (3.8 L) and place the reservoir in station 8.
Alcohol Rotation:
-
(a)
The purge alcohol should be changed during every other reagent rotation. Remove the reservoir from station 15. Allow the internal hose to drain into the container when removing the reservoir, and dispose the contents in an appropriate container. Then refill with 100% ethanol (3.8 L) and replace in the reservoir station 15.
-
(b)
Remove 100% ethanol reservoir from station 4, and dispose the contents in proper container.
-
(c)
Move 100% ethanol reservoir from station 5 into station 4 (allow hose to drain).
-
(d)
Move 100% ethanol reservoir from station 6 into station 5 (allow hose to drain).
-
(e)
Fill reservoir which was previously in station 4 with 100% ethanol (3.8 L) and place in station 6.
-
(f)
Remove 95% ethanol reservoir from station 2, and dispose the contents in an appropriate container.
-
(g)
Move reservoir from station 3 into station 2 (allow hose to drain).
-
(h)
Fill reservoir previously in station 2 with 95% ethanol (3.8 L) and place in station 3.
-
(i)
Remove 70% ethanol from station 1, and dispose the contents in an appropriate waste container. Refill with 70% ethanol (3.8 L) and replace the reservoir into station 1.
-
12.
The Tissue-Tek VIP Processor requires 24 h to warm-up if the instrument has been turned off. Please note that, unlike formalin-fixed tissue, TheraLin -fixed tissue does not need to be transferred to 70% ethanol after an initial 24 h of fixation. TheraLin -fixed tissue should be left in TheraLin and transferred directly to the tissue processor. Do not expose the tissue to air for too long during transfer from TheraLin into the tissue cassettes and into the Tissue-Tek Processor. Exposure to air will allow the tissue to dry out resulting in morphological changes.
-
13.
Ideally, the Tissue-Tek processor should be programmed to start immediately rather than using a delayed start cycle. If a delayed start cycle is used for TheraLin -fixed tissue, the first station on the Tissue-Tek processor program must be 70% ethanol.
-
14.
Do not allow the tissue specimens to sit in hot paraffin after the processing cycle has ended. Tissues left too long in hot paraffin will become hard and brittle.
-
15.
After the tissue has been chemically fixed and infiltrated with paraffin , it must then be mounted into a paraffin block to enable sectioning into 2–8-micron-thick sections. A tissue embedding center contains a molten paraffin dispenser and warm and cold areas to prepare and form the tissue blocks. The same type of paraffin that was used in the tissue processor should be used to embed the tissue into a paraffin block. The components of a tissue embedding center are: (a) a paraffin oven containing the molten paraffin, (b) a tissue holding tank for storing the tissue prior to embedding, (c) a mold warming oven to keep the metal embedding molds warm prior to embedding the tissue, (d) the work stage containing a heated and cooled area to embed the tissue, and (e) a cold plate to solidify the prepared tissue blocks.
References
Espina V, Mueller C (2012) Reduction of preanalytical variability in specimen procurement for molecular profiling. Methods Mol Biol 823:49–57. doi:10.1007/978-1-60327-216-2_4
Becker KF (2015) Using tissue samples for proteomic studies-critical considerations. Proteomics Clin Appl 9(3–4):257–267. doi:10.1002/prca.201400106
Boellner S, Becker KF (2015) Recent progress in protein profiling of clinical tissues for next-generation molecular diagnostics. Expert Rev Mol Diagn 15(10):1277–1292. doi:10.1586/14737159.2015.1070098
Espina V, Edmiston KH, Heiby M, Pierobon M, Sciro M, Merritt B, Banks S, Deng J, VanMeter AJ, Geho DH, Pastore L, Sennesh J, Petricoin EF 3rd, Liotta LA (2008) A portrait of tissue phosphoprotein stability in the clinical tissue procurement process. Mol Cell Proteomics 7(10):1998–2018. doi:10.1074/mcp.M700596-MCP200
Espina V, Mueller C, Edmiston K, Sciro M, Petricoin EF, Liotta LA (2009) Tissue is alive: new technologies are needed to address the problems of protein biomarker pre-analytical variability. Proteomics Clin Appl 3(8):874–882. doi:10.1002/prca.200800001
Gundisch S, Annaratone L, Beese C, Drecol E, Marchio C, Quaglino E, Sapino A, Becker KF, Bussolati G (2015) Critical roles of specimen type and temperature before and during fixation in the detection of phosphoproteins in breast cancer tissues. Lab Invest 95(5):561–571. doi:10.1038/labinvest.2015.37
Gundisch S, Slotta-Huspenina J, Verderio P, Ciniselli CM, Pizzamiglio S, Schott C, Drecoll E, Viertler C, Zatloukal K, Kap M, Riegman P, Esposito I, Specht K, Babaryka G, Asslaber M, Bodo K, den Bakker M, den Hollander J, Fend F, Neumann J, Reu S, Perren A, Langer R, Lugli A, Becker I, Richter T, Kayser G, May AM, Carneiro F, Lopes JM, Sobin L, Hofler H, Becker KF (2014) Evaluation of colon cancer histomorphology: a comparison between formalin and PAXgene tissue fixation by an international ring trial. Virchows Arch 465(5):509–519. doi:10.1007/s00428-014-1624-4
Lim MD, Dickherber A, Compton CC (2011) Before you analyze a human specimen, think quality, variability, and bias. Anal Chem 83(1):8–13. doi:10.1021/ac1018974
Poste G (2011) Bring on the biomarkers. Nature 469(7329):156–157. doi:10.1038/469156a
Collins FS, Tabak LA (2014) Policy: NIH plans to enhance reproducibility. Nature 505(7485):612–613
Mueller C, Edmiston KH, Carpenter C, Gaffney E, Ryan C, Ward R, White S, Memeo L, Colarossi C, Petricoin EF 3rd, Liotta LA, Espina V (2011) One-step preservation of phosphoproteins and tissue morphology at room temperature for diagnostic and research specimens. PLoS One 6(8):e23780. doi:10.1371/journal.pone.0023780
Suva LJ, Brander BE, Makhoul I (2011) Update on bone-modifying agents in metastatic breast cancer. Nat Rev Endocrinol 7(7):380–381. doi:10.1038/nrendo.2011.80
Croucher PI, McDonald MM, Martin TJ (2016) Bone metastasis: the importance of the neighbourhood. Nat Rev Cancer 16(6):373–386. doi:10.1038/nrc.2016.44
Carter RZ, Micocci KC, Natoli A, Redvers RP, Paquet-Fifield S, Martin AC, Denoyer D, Ling X, Kim SH, Tomasin R, Selistre-de-Araujo H, Anderson RL, Pouliot N (2015) Tumour but not stromal expression of beta3 integrin is essential, and is required early, for spontaneous dissemination of bone-metastatic breast cancer. J Pathol 235(5):760–772. doi:10.1002/path.4490
Brown RS, Edwards J, Dogan A, Payne H, Harland SJ, Bartlett JM, Masters JR (2002) Amplification of the androgen receptor gene in bone metastases from hormone-refractory prostate cancer. J Pathol 198(2):237–244. doi:10.1002/path.1206
Wu AC, He Y, Broomfield A, Paatan NJ, Harrington BS, Tseng HW, Beaven EA, Kiernan DM, Swindle P, Clubb AB, Levesque JP, Winkler IG, Ling MT, Srinivasan B, Hooper JD, Pettit AR (2016) CD169(+) macrophages mediate pathological formation of woven bone in skeletal lesions of prostate cancer. J Pathol 239(2):218–230. doi:10.1002/path.4718
Chiechi A, Novello C, Magagnoli G, Petricoin EF 3rd, Deng J, Benassi MS, Picci P, Vaisman I, Espina V, Liotta LA (2013) Elevated TNFR1 and serotonin in bone metastasis are correlated with poor survival following bone metastasis diagnosis for both carcinoma and sarcoma primary tumors. Clin Cancer Res 19(9):2473–2485. doi:10.1158/1078-0432.CCR-12-3416
Conti A, Espina V, Chiechi A, Magagnoli G, Novello C, Pazzaglia L, Quattrini I, Picci P, Liotta LA, Benassi MS (2014) Mapping protein signal pathway interaction in sarcoma bone metastasis: linkage between rank, metalloproteinases turnover and growth factor signaling pathways. Clin Exp Metastasis 31(1):15–24. doi:10.1007/s10585-013-9605-6
Morris RE Jr, Benton RS (1956) Studies on demineralization of bone. I The basic factors of demineralization. Am J Clin Pathol 26(6):579–595
Morris RE Jr, Benton RS (1956) Studies on demineralization of bone. II The effect of electrolytic technics in demineralization. Am J Clin Pathol 26(6):596–603
Walsh L, Freemont AJ, Hoyland JA (1993) The effect of tissue decalcification on mRNA retention within bone for in-situ hybridization studies. Int J Exp Pathol 74(3):237–241
Alers JC, Krijtenburg PJ, Vissers KJ, van Dekken H (1999) Effect of bone decalcification procedures on DNA in situ hybridization and comparative genomic hybridization. EDTA is highly preferable to a routinely used acid decalcifier. J Histochem Cytochem 47(5):703–710
Bass BP, Engel KB, Greytak SR, Moore HM (2014) A review of preanalytical factors affecting molecular, protein, and morphological analysis of formalin-fixed, paraffin-embedded (FFPE) tissue: how well do you know your FFPE specimen? Arch Pathol Lab Med 138(11):1520–1530. doi:10.5858/arpa.2013-0691-RA
Case NM (1953) The use of a cation exchange resin in decalcification. Stain Technol 28(3):155–158
Morris RE Jr, Benton RS (1956) Studies on demineralization of bone. III The effect of ion exchange resins and versenate in demineralization. Am J Clin Pathol 26(7):771–777
Cleland TP, Vashishth D (2015) Bone protein extraction without demineralization using principles from hydroxyapatite chromatography. Anal Biochem 472:62–66. doi:10.1016/j.ab.2014.12.006
Benton RS, Morris RE Jr (1956) Studies on demineralization of bone. IV Evaluation of morphology and staining characteristics of tissues after demineralization. Am J Clin Pathol 26(8):882–898
Bindhu P, Krishnapillai R, Thomas P, Jayanthi P (2013) Facts in artifacts. J Oral Maxillofac Pathol 17(3):397–401. doi:10.4103/0973-029X.125206
Kiernan JA (2008) Histological and histochemical methods theory and practice, 4th edn. Scion Publishing Ltd., Oxfordshire
MilesLaboratories (1989) Tissue-Tek Vacuum Infiltration Processor Operating Manual V.I.P 1000, 2000, 3000. 2nd edn. Ames, Division of Miles Laboratories, Inc., USA
Acknowledgments
We express our deepest gratitude to Antonella Chiechi, Ph.D., for facilitating experiments for evaluating fixation and decalcification methods with human bone specimens. This work was supported in part by the National Institutes of Health Innovative Molecular Analysis Technologies (IMAT) program through a grant to L. Liotta and V. Espina (1R33CA157403-01).
Author information
Authors and Affiliations
Corresponding author
Editor information
Editors and Affiliations
Rights and permissions
Copyright information
© 2017 Springer Science+Business Media LLC
About this protocol
Cite this protocol
Mueller, C., Harpole, M.G., Espina, V. (2017). One-Step Preservation and Decalcification of Bony Tissue for Molecular Profiling. In: Espina, V. (eds) Molecular Profiling. Methods in Molecular Biology, vol 1606. Humana Press, New York, NY. https://doi.org/10.1007/978-1-4939-6990-6_6
Download citation
DOI: https://doi.org/10.1007/978-1-4939-6990-6_6
Published:
Publisher Name: Humana Press, New York, NY
Print ISBN: 978-1-4939-6989-0
Online ISBN: 978-1-4939-6990-6
eBook Packages: Springer Protocols