
Abstract
In the last years, life-threatening fungal diseases have increased significantly, due to the rising number of human individuals susceptible to fungal infections, which are in part complicated by the emergence of antifungal drug-resistant pathogens. Among yeasts, Candida albicans and Candida glabrata are the most common organisms responsible for invasive fungal diseases. The molecular detection of echinocandin resistance in Candida species may represent a useful means of monitoring the incidence of clinical isolates with antifungal resistance-associated gene alterations. Here, we describe the current methods that enable researchers and/or clinical microbiologists to accurately detect echinocandin-resistant isolates of C. albicans and C. glabrata.
Key words
- Antifungal drug resistance
- Fungal pathogens
- Molecular analysis
- Quantitative real-time RT-PCR
- Gene sequencing
1 Introduction
Echinocandins are inhibitors of the 1,3-β-d-glucan synthase, an enzyme coded by the FKS gene, that is responsible for the fungal cell-wall β-d-glucan synthesis. Occurrence of clinical isolates exhibiting antifungal drug resistance to these agents is considered as a very rare event in C. albicans . By contrast, there is an alarming trend of increased echinocandin resistance in C. glabrata that can also regard azole antifungal agents . The mechanisms of echinocandin resistance involve amino acid changes in “hot-spot” regions of the Fks subunits of the 1,3-β-d-glucan synthase. In C. albicans mutations occur in two highly conserved “hot-spot” regions of the FKS1 gene [1], while in C. glabrata mutations occur in homologous regions of the FKS1 and FKS2 genes [2].
2 Materials
2.1 Polymerase Chain Reaction (PCR ) Reagents
PCR specific primers (Table 1) are usually shipped from the manufacturer as lyophilized powders. Prior to use, centrifuge the primer-containing vials at max speed for 10 min, then suspend the primers in RNase-free water at a 100-μM stock concentration, from which prepare a 10-μM working solution. Store all primer solutions at −20 °C.
2.2 Agarose Gel Electrophoresis Components
-
(a)
Prepare a 1 % agarose gel. Pour 20 mL of 50× TAE (Tris-acetate-EDTA; Thermo Fisher Scientific) buffer in a 2-L graduated cylinder, dilute to 1 L with distilled water, and mix. Weight 1 g of UltraPure™ agarose (Life Technologies), transfer to a screw-cap bottle and add 100 mL of 1× TAE buffer. Place the bottle with the cap loose in the microwave oven, and heat the solution until bubbles appear. Remove the flask carefully, and swirl gently to suspend any agarose particles. Reheat the solution until the solution comes to boil, and all agarose particles are dissolved. Mix gently and cool to 50–60 °C (at room temperature for at least 20 min) before pouring the agarose solution into the gel casting tray.
-
(b)
For visualization of DNA in the gel, add to the agarose solution, just prior to pouring it into the tray, a fluorescent dye, such as SYBR® Green nucleic acid gel stain (Invitrogen). Follow the manufacturer’s instructions to obtain the appropriate fluorescent dye concentration solution and to manipulate it in safety.
2.3 PCR Product Purification Reagents
Prepare a PE buffer by adding 220 mL of ethanol (96–100 %), as indicated on the PE bottle included in the MinElute PCR Purification Kit (Qiagen), to obtain a working solution.
3 Methods
3.1 DNA Extraction
-
1.
Set heating block at 99 °C.
-
2.
With a sterile inoculating loop, put five yeast colonies in 300 μL of ultrapure water, vortex, and centrifuge at max speed for 5 min (see Note 1 ).
Discard supernatant, add to pellet 1 volume of glass beads (0.45–0.55 mm diameter; Sigma-Aldrich) and 2 volumes of ultrapure water (see Note 2 ) and vortex the mixture.
-
3.
Shake the sample using a Mini-Beadbeater at max speed for 10 s, wait 10 s and repeat three times.
-
4.
Incubate the sample at 99 °C for 15 min.
-
5.
Centrifuge at max speed for 5 min, transfer the supernatant in a new tube, and store the DNA solution at 4 °C (see Note 3 ).
3.2 DNA Measurement
-
1.
Measure the DNA concentration on the basis of the optical density (OD), using a spectrophotometer at 260/280 nm wavelength. Calculate the OD260/OD280 ratio to have an indication of nucleic acid purity (pure DNA has an OD260/OD280 ratio of ~1.8). Calculate the amount of total DNA using the following formula:
dsDNA concentration = 50 μg/mL × OD260 × dilution factor.
Example: A sample of dsDNA is diluted 100×. The diluted sample gives a reading of 0.95 on the spectrophotometer at OD260. To determine the concentration of DNA in the original sample, perform the following calculation:
dsDNA concentration = 50 μg/mL × 0.95 × 100;
dsDNA concentration = 4.75 mg/mL.
-
2.
Prepare a working solution of DNA to a 2 ng/μL concentration to be used (an aliquot) as a template in PCR reaction, and store the solution at 4 °C (see Note 3 ).
3.3 Polymerase Chain Reaction (PCR)
-
1.
The PCR primers, previously described by Slater et al. [3] and by Thompson et al. [4], are listed in Table 1.
-
2.
Program your thermal cycler to perform PCR. Use the thermal profile described in Table 2 (see Note 4 ).
Table 2 Thermal profile for PCR amplification -
3.
Prepare a master mix reaction as described in Table 3 (see Note 5 ). If you have more than one sample, prepare a multiple master mix and aliquot 20 μL for each sample.
Table 3 Master mix reaction components for PCR amplification -
4.
Add DNA template as a second component of the mix . To test for genomic DNA contamination of enzyme/primer mixes, for each set of primers include a negative control without DNA template (see Note 6 ).
-
5.
Cap each PCR tube, and gently mix the content. Make sure that all components are at the bottom of the tube; centrifuge briefly if needed.
-
6.
Place reaction tubes in a PCR thermal cycler.
3.4 PCR Products Gel Electrophoresis
-
1.
Check the PCR amplification through a gel electrophoresis. Mix 2.5 μL of the PCR product with 2.5 μL of water, add 1 μL of 6× Mass Ruler DNA Loading dye (Thermo Fisher Scientific), mix by pipetting, and carefully load the sample into a gel well. Finally, load 4 μL of Mass Ruler Low range DNA Ladder (Fermentas, Thermo Fisher Scientific) into a gel control well.
-
2.
Turn on the power supplier and run the gel for 30 min at 80 V.
-
3.
Visualize the gel on the UV light box. It should obtain a picture similar to that shown (Fig. 1).
Fig. 1 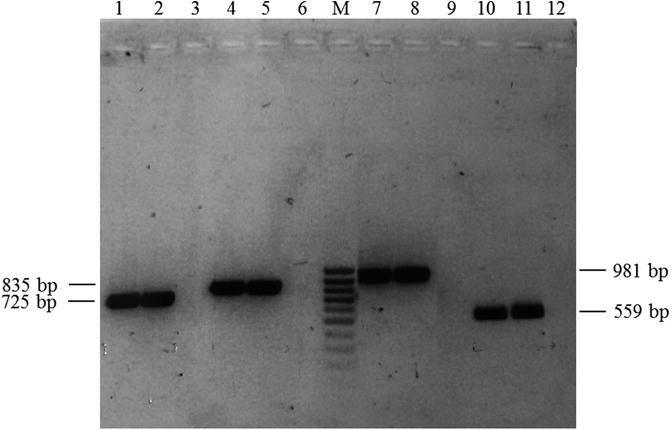
Agarose gel electrophoresis. PCR products obtained with two C. glabrata strains using Cg-fks1 (HS1 and HS2) and Cg-fks2 (HS1 and HS2) primers, as described in Table 1. Lanes 1 and 2: Cg-fks1 HS1 products, lane 3: negative control, lanes 4 and 5: Cg-fks1 HS2 products, lane 6: negative control, M: Mass ruler low range , lanes 7 and 8: Cg-fks2 HS1 products, lane 9: negative control, lanes 10 and 11: Cg-fks2 HS2 products, lane 12: negative control. The expected size of each PCR product is indicated in Table 1

For more information about the agarose electrophoresis procedure, click on https://www.eeb.ucla.edu/Faculty/Barber/Protocols.htm
3.5 PCR Products Purification
To purify the PCR products obtained as above, use the MinElute PCR Purification Kit (Qiagen) (see Note 7 ). Briefly:
-
1.
Add 5 volumes of buffer PBI to 1 volume of the PCR reaction, and mix throughout.
-
2.
Place a MinElute column in a 2-mL collection tube.
-
3.
To bind DNA, apply the sample to the MinElute column, avoiding to touch filter with tip, and centrifuge for 1 min at max speed.
-
4.
Discard flow-through and place the MinElute column back into the same tube.
-
5.
To wash, add 0.75 mL of buffer PE to the MinElute column and centrifuge for 1 min at max speed.
-
6.
Discard flow-through and place the MinElute column back into the same tube.
-
7.
Centrifuge the column for 1 min at max speed to eliminate any ethanol residue.
-
8.
Place the column in a clean 1.5-mL centrifuge tube.
-
9.
To elute DNA, add 10 μL of nuclease-free water to the middle of the column (see Note 8 ), wait for 1 min, and then centrifuge for 1 min at max speed.
-
10.
Measure the DNA concentration as indicated in Subheading 3.2, and dilute in nuclease-free water as to obtain 2 ng/μL DNA concentration, which will be used as a template in sequencing reaction.
3.6 Sequencing Reaction and Sequencing Products Purification
-
1.
Program your thermal cycler to perform PCR amplification . Use the thermal profile described in Table 4.
Table 4 Thermal profile for DNA sequencing -
2.
To perform the sequencing reaction, use ABI PRISM BigDye Terminator v1.1 Cycle Sequencing Kit (Applied Biosystems, Thermo Fisher Scientific). Prepare the reaction mixture as described in Table 5 (see Note 9 ).
Table 5 Master mix reaction components for DNA sequencing -
3.
For more details about the use of ABI PRISM BigDye Terminator v1.1 Cycle Sequencing Kit and the optimization of thermal cycling conditions, read the BigDye® Terminator v1.1 Cycle Sequencing Kit protocol (Applied Biosystems, Thermo Fisher Scientific).
-
4.
For sequencing reaction purification, use the G50 Dye Terminator Removal Kit (RBC Bioscience) (see Note 7 ). Remove the red stopper under the G50 column and centrifuge at 2000 × g for 2 min.
-
5.
Transfer the G50 column to a 1.5-mL microcentrifuge tube and carefully load the sample to the middle of the gel bed surface.
-
6.
Centrifuge at 2000 × g for 3 min.
-
7.
The purified sample will be recovered at the bottom of collection tube.
-
8.
Load the sample onto the ABI PRISM DNA Analyzer or store it at −20 °C avoiding light.
3.7 ABI PRISM DNA Analyzer Electrophoresis
Details on how to perform sample electrophoresis and data analysis can be found in the ABI PRISM DNA Analyzer instrument manual.
3.8 Hot-Spot Mutation Assessment
In Table 6 are listed the mutations most frequently reported in echinocandin-resistant Candida isolates [1, 2]. To assess for the presence of FKS1 mutation(s) in a C. albicans isolate and of FKS1 and/or FKS2 mutation(s) in a C. glabrata isolate, compare the wild-type gene sequences of the C. albicans ATCC MYA-2876 strain (NCBI Reference Sequence: XM_716336.1) or the C. glabrata ATCC 90030 strain (NCBI Reference Sequence: HM366440.1, for FKS1; GenBank: HM366442.1, for FKS2) with those obtained from the test isolates. Select one of charge-free sequence analysis programs available online; for example, the software MEGA version 6 [5] is a nice and simple program to use.
In Fig. 2 is shown an alignment made using the MEGA6 software to detect C. glabrata FKS2 gene mutations.

Sequence alignments. Alignments obtained with the MEGA6 software for C. glabrata FKS2 sequences, showing the presence of different point mutations in the genes from echinocandin-resistant strains, compared with the gene from a wild-type strain . In (a) is shown nucleotide sequences and in (b) the relative amino acid sequences
4 Notes
-
1.
Handle yeast cultures aseptically, possibly near to a Bunsen flame or under a laminar flow cabinet.
-
2.
For Mini-Beadbeater utilization, use screw-cap vials.
-
3.
If you plan using DNA until 1 week, store DNA at 4 °C, otherwise store at −20 °C.
-
4.
For the annealing temperature (Ta) choose the lowest temperature of melting between the two primers and lower it to 5 °C. For more details on the Ta setting, see Rychlik et al. [6].
-
5.
As a Taq polymerase, choose an high-fidelity enzyme with low error rate. Prepare the PCR master mix under a laminar flow cabinet; this cabinet should be exclusively dedicated to mix PCR preparation in order to avoid acid nucleic carryover. Use only pipettes and tube racks dedicated.
-
6.
Set PCR conditions on the basis of the kit chosen for use and of the thermal cycler available in the lab; for suggestions about the experimental condition optimization, see Kramer et al. [7].
-
7.
For PCR product and sequencing reaction purifications, different homemade protocols have been described that have comparable efficiencies to that of commercial kits, but that are more time consuming.
-
8.
Preheating nuclease-free water at 56 °C can be useful to elute efficiently the DNA from MinElute column filter.
-
9.
For the Candida isolate in which an echinocandin resistance mutation has to be detected, plan running two sequencing reactions for each gene under investigation, the one using the primer forward and the other with the primer reverse in order to confirm possible point mutation found.
References
Garcia-Effron G, Park S, Perlin DS (2009) Correlating echinocandin MIC and kinetic inhibition of fks1 mutant glucan synthases for Candida albicans: implications for interpretive breakpoints. Antimicrob Agents Chemother 53:112–122
Garcia-Effron G, Lee S, Park S, Cleary JD, Perlin DS (2009) Effect of Candida glabrata fks1 and fks2 mutations on echinocandin sensitivity and kinetics of 1,3-β-d-glucan synthase: implication for the existing susceptibility breakpoint. Antimicrob Agents Chemother 53:3690–3699
Slater JL, Howard SJ, Sharp A, Goodwin J, Gregson LM, Alastruey-Izquierdo A, Arendrup MC, Warn PA, Perlin DS, Hope WW (2011) Disseminated candidiasis caused by Candida albicans with amino acid substitutions in fks1 at position ser645 cannot be successfully treated with micafungin. Antimicrob Agents Chemother 55:3075–3083
Thompson GR, Wiederhold NP, Vallor AC, Villareal NC, Lewis JS, Patterson TF (2008) Development of caspofungin resistance following prolonged therapy for invasive candidiasis secondary to Candida glabrata infection. Antimicrob Agents Chemother 52:3783–3785
Tamura K, Stecher G, Peterson D, Filipski A, Kumar S (2013) MEGA6: molecular evolutionary genetics analysis version 6.0. Mol Biol Evol 30:2725–2729
Rychlik W, Spencer WJ, Rhoads RE (1990) Optimization of the annealing temperature for DNA amplification in vitro. Nucleic Acids Res 18:6409–6412
Kramer MF, Coen DM (2001) Enzymatic amplification of DNA by PCR: standard procedures and optimization. Curr Protoc Cell Biol A.3F.1–A.3F.14
Author information
Authors and Affiliations
Corresponding author
Editor information
Editors and Affiliations
Rights and permissions
Copyright information
© 2017 Springer Science+Business Media New York
About this protocol
Cite this protocol
Posteraro, B., Vella, A., De Carolis, E., Sanguinetti, M. (2017). Molecular Detection of Resistance to Echinocandins. In: Lion, T. (eds) Human Fungal Pathogen Identification. Methods in Molecular Biology, vol 1508. Humana Press, New York, NY. https://doi.org/10.1007/978-1-4939-6515-1_23
Download citation
DOI: https://doi.org/10.1007/978-1-4939-6515-1_23
Published:
Publisher Name: Humana Press, New York, NY
Print ISBN: 978-1-4939-6513-7
Online ISBN: 978-1-4939-6515-1
eBook Packages: Springer Protocols