
Abstract
Transmission electron microscopy (TEM) is an invaluable technique used for imaging the ultrastructure of samples and it is particularly useful when determining virus–host interactions at a cellular level. The environment inside a TEM is not favorable for biological material (high vacuum and high energy electrons). Also biological samples have little or no intrinsic electron contrast, and rarely do they naturally exist in very thin sheets, as is required for optimum resolution in the TEM. To prepare these samples for imaging in the TEM therefore requires extensive processing which can alter the ultrastructure of the material. Here we describe a method which aims to minimize preparation artifacts by freezing the samples at high pressure to instantaneously preserve ultrastructural detail, then rapidly substituting the ice and infiltrating with resin to provide a firm matrix which can be cut into thin sections for imaging. Thicker sections of this material can also be imaged and reconstructed into 3D volumes using electron tomography.
You have full access to this open access chapter, Download protocol PDF
Key words
- High-pressure freezing
- Freeze substitution
- Transmission electron microscopy
- Sapphire discs
- Electron tomography
1 Introduction
The method of preservation of samples for TEM can influence image interpretation so it is important to stabilize the sample with as little change from the in vivo state as possible. There are two main methods of stabilizing (fixing) samples for TEM: chemical fixation and cryo-fixation. There are advantages and disadvantages to both. Chemical fixation is the most common method and, although time consuming, is an easy, repeatable method that requires very little specialized equipment. Alternatively, cryo-fixation methods seek to preserve samples in as near the in vivo state as possible by stabilizing instantaneously and reducing or eliminating the use of chemicals. Cryo-fixation methods are preferable to chemical fixation methods; however, they have significant technical and financial disadvantages.
Standard chemical fixation protocols are readily available that give reproducible results (for example [1]), with minimal use of specialized equipment. These protocols are relatively quick and easy to do. The main disadvantage of using chemical fixation is that the introduction of toxic chemicals to the sample can have an unknown effect on ultrastructure. Fixative penetrates even soft biological material slowly which allows changes to occur within the sample before it is fully stabilized, for example redistribution and extraction of ions and soluble proteins [2], extraction and rearrangement of phospholipids [3], mismatch in osmotic conditions leading to organelle blooming and non-isotropic shrinkage [4]. There is no such thing as a “universal fixative” and fixatives do not preserve all structures within cells equally. Another important disadvantage of chemical fixation is that at every stage during the process antigens in the sample are destroyed. Therefore, it is not possible to carry out immunogold labelling experiments using chemically fixed and epoxy resin embedded samples.
The only viable alternative to the deleterious effects of chemical fixation and dehydration is to preserve samples by freezing the water present rapidly enough to prevent ice crystals forming. If samples are frozen quickly enough the water inside the sample is vitrified and both soluble and non-soluble structures are held in a glass-like matrix (amorphous ice), stabilizing the sample instantaneously. Amorphous ice is non-destructive, but to achieve full vitrification of cellular water very high cooling rates are required [5]. If these cooling rates are not reached, crystalline ice forms and solutes within the cell are trapped between the crystals forming a network of segregated compartments. When viewed in the microscope, this is known as ice segregation artifact and is particularly obvious in badly frozen nuclei where it appears as a “cracking” pattern (Fig. 1). Once frozen, the sample may be stored in liquid nitrogen (−196 °C) before further processing. The temperature cannot be allowed to climb above the re-vitrification point of water (around −140 °C) or ice crystals will form. The advantage of using freezing techniques to preserve samples is that they are stabilized instantaneously without the need for chemicals. However, the disadvantages are that at atmospheric pressure good freezing only occurs within a few microns of the surface at best, and the techniques involved are difficult and time-consuming requiring dedicated equipment.

Example of ice segregation artifact in a cell culture Vero cell. This appears as a “cracking” pattern and is particularly obvious in the nucleus (N) of badly frozen cells. Scale bar indicates 1 μm
There are many different cryo-fixation methods available for use but the depth of good preservation is limited to 20–40 μm at atmospheric pressure, whichever method is used [6]. An alternative is to freeze the sample at high pressure, an idea first postulated by Moor and Riehle in 1968 [7]. At higher pressures, water expands less during freezing, and hence, less heat of crystallization is produced, so adequate cryo-fixation is achieved at reduced cooling rates [8, 9].
At atmospheric pressure amorphous ice is produced at a freezing rate of several 10,000 °C/s; however, if samples are frozen at 210 MPa, this required freezing rate drops to several 1,000 °C/s [5]. Freezing at high pressure allows vitrification to occur to a depth of 200 μm [6, 10]. For this reason “high-pressure freezing” (HPF) can be used to prepare many different types of sample, ranging from suspensions to small pieces of solid tissue and is widely regarded as the optimal cryo-fixation method for general electron microscopy [6]. For a comprehensive review of high-pressure freezing and freeze substitution, see McDonald [11].
After high-pressure freezing, samples are processed for morphological or immunocytochemical studies by freeze substitution (FS). During FS amorphous ice is replaced by solvent, generally acetone [12], containing one or more chemical additives. The addition of chemicals at this stage does not affect the preservation of tissue as the sample has already been stabilized in the high-pressure freezer. After substitution, samples are infiltrated with acrylic resin, and the resin polymerized. Ultrathin sections can be cut at room temperature and examined in the transmission electron microscope.
There are many published protocols for freeze substitution which vary considerably. One of the greatest variations is the time that samples are kept in substitution medium prior to embedding. It is widely accepted that leaving samples in fixative and/or solvents during room temperature chemical fixation can rearrange cell components, especially lipids [3], and extract soluble cytoplasmic contents [2]. At low temperatures this process slows but does not stop. Therefore, there has to be a balance between sufficient time in substitution media for full replacement of water, and prolonged substitution leading to extraction of cell components. Dedicated freeze substitution units are available which finely control the temperature changes required during substitution, and in some cases can be programmed to control the addition of solvents. These units are expensive to purchase; however, recently a protocol has been developed which negates the need for dedicated freeze substitution units [13].
Here we describe a method for high-pressure freezing and freeze substitution of cells in culture that minimizes mechanical or chemical stress prior to freezing and gives consistent preservation of cellular architecture. The thermal load of the sample is reduced by the use of “naked” sapphires, and by avoiding the use of cryoprotectants or fillers. Reducing the thermal load significantly increases the quality of freezing.
2 Materials
2.1 Chemical Reagents
-
1.
Fetal calf serum.
-
2.
Appropriate cell culture media.
-
3.
Pure methanol.
-
4.
Uranyl acetate (UA) crystals.
-
5.
Analytical grade acetone (99.9 %).
- 6.
-
7.
Freeze substitution (FS) medium: 2 % (v/v) uranyl acetate in analytical grade acetone (see Notes 1 and 2 ).
-
8.
Lowicryl HM20, made to manufacturers specification (see Note 3 ).
-
9.
A plentiful supply of liquid nitrogen.
-
10.
Epoxy resin blocks, previously polymerized in BEEM capsules for mounting samples.
2.2 Hardware
-
1.
Dark glass screw top bottle to store 2 % uranyl acetate solution (at 4 °C).
-
2.
Clear glass screw top bottle for mixing Lowicryl HM20 resin.
-
3.
Ultrafine forceps (long, narrow handles).
-
4.
Cryo forceps for transferring sample tubes to and from the liquid nitrogen dewar.
-
5.
Liquid nitrogen dewar (1 l).
-
6.
Polystyrene liquid nitrogen holder, shallow.
-
7.
Adjustable, illuminated magnifying lamp.
-
8.
High-pressure freezer (e.g., Leica HPM100, or ABRA HPM010) with all necessary associated inserts, spacers, etc.
-
9.
Freeze substitution unit (e.g., Leica AFS2 or equivalent) with all necessary associated containers, embedding molds, etc.
-
10.
Mini hacksaw.
-
11.
Razor blade.
-
12.
Transmission electron microscope, 120 or 200 kV (preferable for tomographical studies).
2.3 Consumables
-
1.
3 mm sapphire coverslips.
-
2.
Appropriate cell culture plates.
-
3.
Nickel single hole TEM grids.
-
4.
1.5 ml Eppendorf tubes, screw top, two holes punched below cap.
-
5.
Filter paper.
-
6.
Plastic Pasteur pipettes.
-
7.
Formvar (or equivalent) coated copper 200 mesh, hexagonal, thin bar grids (for thin sections, morphological imaging).
-
8.
Formvar (or equivalent) coated single slot grids (for thick sections, electron tomographical imaging).
3 Methods
Please make sure to follow local chemical safety procedures and ensure appropriate PPE is used.
3.1 Preparation of Cells
-
1.
Choose sapphire discs appropriate to the sample holder associated with your high-pressure freezer (HPF). We use either 3 mm or 6 mm sapphire discs designed for the Leica HPM100 (Leica Microsystems), or 3 mm sapphire discs designed for the ABRA HPM010 (RMC Products). Discs are supplied in solvent, so rinse discs briefly in culture medium and incubate discs in fetal calf serum for 60 min at 37 °C. This provides a proteinaceous layer for cells to adhere to (see Note 4 ).
-
2.
In a suitable cell culture vessel (24-, 12-, or 6-well plate) place discs on the base of each well and add the appropriate volume of cell suspension. Ensure the discs are flat on the base of each well and are not floating in the media. Incubate at 37 °C for an appropriate amount of time so that the sapphires are coated with an approximately 80 % confluent cell monolayer.
-
3.
Infect the cells as appropriate.
3.2 Fixation of Cells by High-Pressure Freezing
-
1.
One hour before you want to freeze your samples, start cooling down the high-pressure freezer. Make sure you have enough liquid nitrogen available for the entire process. Fill a small (approx. 1 l) dewar with liquid nitrogen for transporting your samples. Fill a small polystyrene box with liquid nitrogen to use to cool down your tools. Ensure these vessels are in close proximity to the freezer, and that you have the means to refill them as needed.
-
2.
Once the HPF is cool and stable do a test freezing run to check it is working correctly.
-
3.
In an MBSC, remove cell culture medium from wells containing the sapphire discs and replace with warmed, fresh medium.
-
4.
Take the cell culture dishes containing the sapphire discs to the HPF and load the sapphires into the appropriate holder as in Fig. 2. There is no need to add fillers/cryoprotectants (see Note 5 ). There is no need to encase in aluminum planchettes (see Note 6 ).
Fig. 2 
Diagram illustrating the method used to load a Bal-tec HPM010 (now sold as ABRA HPM010) HPF holder. The method can be adapted for other manufacturers’ models; however, the basic “sandwich” structure should remain constant. Spacer rings, sapphire discs and nickel grid all 3 mm in diameter. Sapphire discs thickness 100 μm, nickel grid thickness 50 μm. Diagram from [14]
-
5.
Quickly load the sample holder into the HPF and freeze.
-
6.
Remove the frozen “sapphire disc sandwich” from the sample holder under liquid nitrogen in the polystyrene box, remembering to use cooled tools to do so. An illuminated magnifying lamp is useful for this step.
-
7.
Remove the screw top and cool a labelled Eppendorf in liquid nitrogen, making sure it has had two holes punched near the top of the tube.
-
8.
When cold, place the sapphire disc sandwich inside the Eppendorf, replace the screw top, and leave to float in liquid nitrogen until all samples have been frozen and placed in labelled Eppendorf tubes. Quickly transfer these Eppendorf tubes, one by one, to the liquid nitrogen transfer dewar, replace the lid, and transfer to appropriate liquid nitrogen storage. Samples must be stored in the liquid phase, not in the gaseous phase.

3.3 Freeze Substitution
This process is started during the late afternoon and the freeze substitution (FS) unit programmed to start substitution the following morning.
-
1.
One hour before use, cool down the FS unit with liquid nitrogen to its lowest temperature, typically −160 °C. We have an AFS1 and AFS 2 (Leica Microsystems); however, this FS method can be programmed into any other FS unit you may have.
-
2.
Ensure the exhaust of the FS unit chamber is fed into a fume hood, and that you are working in close proximity to the fume hood. It is preferable to place any waste solvent/resin straight into the hood.
-
3.
Place an appropriate number of aluminum cups (supplied with the FS unit) into the cold chamber (one per sample).
-
4.
Using a small liquid nitrogen transfer dewar collect the appropriate samples from the liquid nitrogen store and place the dewar in the fume hood next to the FS unit.
-
5.
Place an Eppendorf containing one sapphire sandwich into each of the cooled aluminum cups. The samples will still be in a small amount of liquid nitrogen. This will boil off as the Eppendorf and chamber equilibrate overnight.
-
6.
Program the FS unit to follow a short FS/short warm up cycle (Fig. 3). For this particular type of sample this protocol was found to be superior to longer protocols (see Note 7 ). Here is an example of timings; adjust as necessary although keep the time intervals consistent with the protocol.
Fig. 3 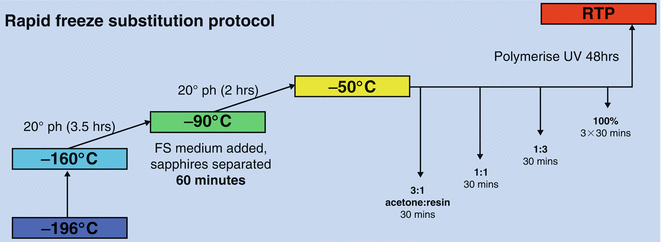
Diagram summarizing short freeze substitution/short warm up cycle protocol [14]
Temperature to rise from −196 °C to −160 °C overnight.
05:30
Temperature to rise from −160 °C to −90 °C at 20° per hour (3.5 h)
09:00
Temperature held at −90 °C, addition of FS medium (see below) (1 h)
10:00
Temperature to rise from −90 °C to −50 °C at 20° per hour (2 h)
12:00
Temperature held at −50 °C during resin infiltration
-
7.
The following morning, before 09:00 ensure you have all the appropriate consumables, tools, solutions, and containers for waste within easy reach of the FS unit.
-
8.
Cool 1–2 ml of FS medium (see Note 1 ) in a clean aluminum cup by placing in FS unit chamber.
-
9.
At 09:00, undo screw top from Eppendorf and empty sapphire sandwich into its aluminum cup.
-
10.
Using a cooled plastic pipette gently place 0.5 ml cold FS medium in each aluminum cup so that the sapphire sandwiches are covered. Sandwiches will probably separate in the liquid; take care to note how the sapphire discs separate, so you know which side the cells cover.
-
11.
Using cooled fine forceps ensure the discs lay in the FS medium, cells facing uppermost (see Note 8 ). Remove aluminum cup containing any unused FS medium and place in fume hood to get to room temperature before disposal.
-
12.
Leave samples in FS medium until program has reached −50 °C (12:00).
-
13.
Before 12:00, place a clean aluminum cup in the FS unit chamber containing 1 ml Lowicryl HM20 (see Note 3 ) and 3 ml acetone. Mix well and leave for a few minutes to cool. Adjust volumes according to the number of samples you have, but keep the ratio the same. The volumes described here assume 4 aluminum cups are present.
-
14.
At 12:00, using a cooled plastic pipette remove the FS medium from each sample aluminum cup and place in a waste aluminum cup also in the chamber.
-
15.
Taking care to note any sapphire movement, gently add 1 ml of cold 1:3 resin–acetone mix to each aluminum cup containing a sample, using a clean cooled pipette. Leave for 30 min.
-
16.
Remove the aluminum cup containing any leftover 1:3 resin mix and place in fume hood.
-
17.
Place a clean aluminum cup into the chamber containing 2 ml Lowicryl HM20 and 2 ml acetone. Mix well and allow to cool.
-
18.
After 30 min, using a cooled plastic pipette remove the 1:3 resin mix from each sample aluminum cup and place in the waste aluminum cup also in the chamber.
-
19.
Taking care to note any sapphire movement, gently add 1 ml of cold 1:1 resin–acetone mix using a clean cooled pipette. Leave for 30 min.
-
20.
Remove the aluminum cup containing any leftover 1:1 resin mix and place in fume hood.
-
21.
Place a clean aluminum cup into the chamber and mix 3 ml Lowicryl HM20 and 1 ml acetone. Allow to cool.
-
22.
After a further 30 min, using a cooled plastic pipette remove the 1:1 resin mix from each sample aluminum cup and place in the waste aluminum cup also in the chamber.
-
23.
Again, taking care to note any sapphire movement, gently add 1 ml of cold 3:1 resin–acetone mix using a clean cooled pipette. Leave for 30 min.
-
24.
Remove the aluminum cup containing any leftover 3:1 resin mix and place in fume hood.
-
25.
Place a clean aluminum cup into the chamber containing 14 ml Lowicryl HM20 resin. Allow to cool.
-
26.
After 30 min, using a cooled plastic pipette remove the 3:1 resin mix from each sample aluminum cup and place in the waste aluminum cup also in the chamber.
-
27.
Taking care to note any sapphire movement, gently add 1 ml of cold resin using a clean cooled pipette. Leave for 30 min.
-
28.
After 30 min, remove the resin and place in the waste aluminum cup in the chamber.
-
29.
Repeat steps 27 and 28 twice.
-
30.
Cool a flat embedding mold (supplied with FS unit) in the chamber during the last infiltration step.
-
31.
Using cooled tools carefully place each sapphire, cells facing uppermost, into a compartment within the embedding mold, ensuring the disc sits on the metal base, and gently cover with cold Lowicryl resin (see Note 9 —handling Lowicryl resin).
-
32.
Cool a UV transparent plastic cup (supplied with FS unit) and place over the embedding mold. Seal with a small amount of Lowicryl resin so that oxygen is excluded during polymerization.
-
33.
Place the UV light (supplied with FS unit) over the chamber, program in the polymerization protocol, and start the program:
-
48 h at −50 °C, with UV
-
Temperature rise from −50 °C to room temperature (20 °C) at 20° per hour (3.5 h), with UV
-
48 h at room temperature, with UV
-
-
34.
Dispose of waste chemicals according to local regulations.
-
35.
After polymerization remove the embedding mold and push out the hardened blocks. Place in to labelled boxes. Blocks can be stored indefinitely (see Note 10 ). When ready to cut sections first prepare some polymerized epoxy resin blocks from BEEM capsules to provide support for the Lowicryl blocks, as follows:
-
Remove the pointed end of the polymerized epoxy resin blocks with a mini hacksaw to provide a flat surface.
-
Carefully trim the Lowicryl resin block to the region containing the sapphire disc using a fresh razor blade.
-
Using epoxy glue, stick the Lowicryl resin block containing the sapphire onto the flat surface of the epoxy resin block, with the sapphire uppermost. Allow to dry.
-
With a razor blade, trim the thin layer of Lowicryl resin from around the edges of the sapphire disc.
-
Immerse the block briefly in liquid nitrogen to dislodge the sapphire disc. Discard the disc, the cells will remain embedded in the Lowicryl resin.
-
-
36.
With an ultramicrotome, section the Lowicryl block en face to produce sections containing longitudinal views of cells in the monolayer, all in the same orientation and plane (see Note 11 ).
-
37.
Collect sections on Formvar-coated grids (see Note 12 ). When using the 2 % uranyl acetate freeze substitution medium it is not necessary to add any further contrast.
-
38.
Collect images using a transmission electron microscope (see Note 13 ). See [1, 14] for examples of cells prepared using this method.
-
39.
For immunogold labelling studies the procedure above is very similar; however, use a FS medium containing a lower concentration of uranyl acetate, for example 0.2 % [14].

4 Notes
-
1.
FS medium: first, prepare 20 % (w/v) solution of UA in methanol. This will need to be kept on a stirrer in a fume hood for over an hour in order for all the UA crystals to dissolve. Then, prepare 2 % (v/v) uranyl acetate by adding 0.5 ml 20 % UA in methanol to 4.5 ml 99.9 % analytical grade acetone. Mix well. Store in dark glass bottle at 4 °C.
-
2.
It is not necessary to store 99.9 % analytical grade acetone under a molecular sieve to keep water-free (as recommended in some older protocols). During storage under a molecular sieve the acetone discolors over time, so it is possible the sieve adds some form of contaminant. We have never recorded any deleterious effects of using analytical grade acetone which has not been stored under a molecular sieve.
-
3.
Place each resin component into a screw top glass jar and mix the resin by bubbling dry nitrogen gas through the mixture, while holding the lid close to the neck of the jar. This eliminates oxygen from the jar which is important as Lowicryl HM20 does not polymerize effectively in the presence of oxygen.
-
4.
Preliminary experiments using “naked” sapphire discs indicated that cell adhesion was a potential weakness as cells were lost during processing. Collagen IV, fetal calf serum (FCS), Matrigel Basement Membrane Matrix (BD Biosciences), and carbon were tested as substrate pretreatments to aid cell adhesion. Discs were incubated at 37 °C for 60 min in neat FCS, Matrigel or collagen IV solution (made to manufacturers specification), or discs were coated with 10 nm carbon using a high vacuum carbon coater (Agar Scientific). Most retention of cells was seen using FCS as the substrate pretreatment.
-
5.
To remove intercellular air pockets within samples protocols in the past have included inert, non-penetrating “fillers,” for example 1-hexadecene. To reduce the possibility of artifact, cryoprotectant/fillers were not used during this protocol. We did not see any detrimental effect of omitting this step, indeed it could be considered advantageous as the fillers act as a heat sink and reduce the cooling rate of the sample and prevent penetration of FS medium.
-
6.
Many protocols protect the sapphire discs during freezing using aluminum planchettes (supplied with the high-pressure freezer). These planchettes act as a barrier between liquid nitrogen and sapphire discs and act as a heat sink, reducing the cooling rate of the sample. In our protocol liquid nitrogen jets directly onto the sapphires producing excellent freezing across the whole sapphire disc.
-
7.
Protocols with long FS times and/or long warm up times were investigated but the short FS and short warm up protocol described here was found to produce consistently good freezing across large areas of the sapphire, provide good ultrastructural detail, allow minimal visible extraction of cytoplasmic contents and have the practical benefit of a shortened procedure.
-
8.
It is possible to see the cells on the sapphire discs down the FS unit binocular eyepieces by picking the disc up, above the liquid surface and slightly angling it towards the light. Cells will appear rough on the glass; if cells are not present the disc will have a smooth, reflective surface.
-
9.
Lowicryl HM20 resin can be difficult to work with at first. It has low surface tension and will creep along surfaces if drops escape from pipettes. It has a very strong odor so keep in the fume hood when possible. When filling the embedding mold, allow resin to settle and then top up to make sure the volume has been filled correctly. Wipe away any drips from the FS unit chamber with paper towel or else the embedding mold will become stuck to the chamber during polymerization.
-
10.
The resin should have a pink hue which demonstrates total polymerization. However, if the resin is colorless but hard, this indicates sufficient polymerization for cutting.
-
11.
Collect all the sections (even if incomplete) as the material will be close to the surface of the block face. Cells in culture can be very thin so it is easy to cut through the whole cell sheet while waiting to collect a complete section.
-
12.
If collecting thick sections for electron tomography, use Formvar (or equivalent) coated single slot grids. Also collect some thin sections (on Formvar, or equivalent, coated 200 mesh grids) for orientation.
-
13.
Lowicryl HM20 is not as beam stable in the TEM as epoxy resins. The Formvar support will help with this, but avoid long beam exposures at high intensities.
References
Maier HJ, Hawes PC, Cottam EM et al (2013) Infectious bronchitis virus generates spherules from zippered endoplasmic reticulum membranes. MBio 4(5)
Zierold K (1991) Cryofixation methods for ion localisation in cells by electron probe microanalysis: a review. J Microsc 161:357–366
Maneta-Peyret L, Compere P, Moreau P et al (1999) Immunocytochemistry of lipids: chemical fixatives have dramatic effects on the preservation of tissue lipids. Histochem J 31:541–547
Lee RMKW (1984) A critical appraisal of the effects of fixation, dehydration and embedding on cell volume. In: Revel JP, Barnard T et al (eds) The science of biological specimen preparation, Scanning Electron microscopy, Inc., AMF O’Hare, Chicago, IL, pp p61–p70
Studer D, Humbel BM, Chiquet M (2008) Electron microscopy of high pressure frozen samples: bridging the gap between cellular ultrastructure and atomic resolution. Histochem Cell Biol 130:877–889
Studer D, Michel M, Muller M (1989) High pressure freezing comes of age. Scanning Microsc Suppl 3:253–268
Moor H, Riehle U (1968) Snap-freezing under high pressure: a new fixation technique for freeze-etching. Proc 4th Eur Reg Conf Electron Microsc 2: 33–34
Studer D, Graber W, Al-Amoudi A et al (2001) A new approach for cryofixation by high-pressure freezing. J Microsc 203:285–294
Vanhecke D, Graber W, Studer D (2008) Close-to-native ultrastructural preservation by high pressure freezing. Methods Cell Biol 88:151–164
Sartori N, Richter K, Dubochet J (1993) Vitrification depth can be increased more than 10-fold by high pressure freezing. J Microsc 172:55–61.11
McDonald KL (2014) Out with the old and in with the new: rapid specimen preparation procedures for electron microscopy of sectioned biological material. Protoplasma 251:429–448
Studer D, Chiquet M, Hunzkier EB (1996) Evidence for a distinct water-rich layer surrounding collagen fibrils in articular cartilage extracellular matrix. J Struct Biol 117:81–85
McDonald KL, Webb RI (2011) Freeze substitution in 3 hours or less. J Microsc 243: 227–233
Hawes PC, Netherton CL, Mueller M et al (2007) Rapid freeze-substitution preserves membranes in high-pressure frozen tissue culture cells. J Microsc 226:182–189
Author information
Authors and Affiliations
Corresponding author
Editor information
Editors and Affiliations
Rights and permissions
Copyright information
© 2015 Springer Science+Business Media New York
About this protocol
Cite this protocol
Hawes, P.C. (2015). Preparation of Cultured Cells Using High-Pressure Freezing and Freeze Substitution for Subsequent 2D or 3D Visualization in the Transmission Electron Microscope. In: Maier, H., Bickerton, E., Britton, P. (eds) Coronaviruses. Methods in Molecular Biology, vol 1282. Humana Press, New York, NY. https://doi.org/10.1007/978-1-4939-2438-7_23
Download citation
DOI: https://doi.org/10.1007/978-1-4939-2438-7_23
Published:
Publisher Name: Humana Press, New York, NY
Print ISBN: 978-1-4939-2437-0
Online ISBN: 978-1-4939-2438-7
eBook Packages: Springer Protocols