
Abstract
To understand the molecular mechanisms of viral replication and pathogenesis, it is necessary to establish the virus–host protein interaction networks. The yeast two-hybrid system is a powerful proteomic approach to study protein–protein interactions. After the identification of specific cellular factors interacting with the target viral protein using the yeast two-hybrid screening system, co-immunoprecipitation and confocal microscopy analyses are often used to verify the virus–host protein interactions in cells. Identification of the cellular factors required for viral survival or eliminating virus infected cells could help scientists develop more effective antiviral drugs. Here we summarize a standard protocol used in our lab to study the coronavirus–host protein interactions, including yeast two-hybrid screening, co-immunoprecipitation, and immunofluorescence microscopy analyses.
You have full access to this open access chapter, Download protocol PDF
Key words
- Protein–protein interactions
- Virus–host interactions
- Human coronavirus
- Yeast two-hybrid (Y2H)
- Co-immunoprecipitation
- Confocal microscopy analysis
1 Introduction
Virus–host interactions have long been studied since the first discovery of Tobacco Mosaic Virus in 1898. However, due to the limitation of experimental tools to investigate the mass interacting networks was not always simple. The investigation became more productive upon the technical development of protein biochemistry, nucleic acid sequencing, and several high-throughput screening systems. Three common methods used for high-throughput protein interaction analysis are yeast two-hybrid (Y2H) system, affinity purification, and protein chip [1]. Y2H was first described in 1989 for identifying and analyzing various protein–protein interactions in the yeast model [2]. The GAL4 based Y2H system relies on the GAL4 transcription activator, which consists of a DNA binding domain (BD) and a transcription activating domain (AD). The yeast strain used in this system contains several nutrient gene mutations and without adding these nutrients into the culturing media, these yeast cells will not grow. Successful introduction of separate bait and prey plasmids into the mutant yeast strain will provide the lacking nutrients hence the yeast cells will survive. One or more reporter genes will be cloned under the control of the UAS-GAL4 promoter. If the BD-bait fusion protein interacts with the AD-prey fusion protein, the GAL4 activator becomes functional and binds to the GAL UAS promoter region, then activates the reporter gene(s). The expression of one or more reporter genes thus indicates that there are protein–protein interactions between the target protein (bait) and the others (prey). The activation of reporter genes provides a platform to select the yeast clones that have protein–protein interactions. Most reporter genes used in this system are the complements of the mutated nutrient genes, e.g., Histidine, or an enzyme that catalyzes a color change reaction, e.g., LacZ. Figure 1 gives a schematic view of the yeast two-hybrid system. High-throughput screening of cDNA library by Y2H system provides a fast and comprehensive way to identify the possible proteins in the library that could interact with the bait protein. The yeast clones containing the interacting proteins will survive in a nutrient lacking medium due to the activation of the reporter gene.

A schematic view of yeast two-hybrid system. The bait protein fused to the DNA binding domain (BD) of GAL4 protein will bind to the GAL4 UAS. If the GAL4 activating domain (AD)-fused prey protein can interact with the bait protein, then the reporter genes (e.g., LacZ or His3) will be activated
The identification of virus–host interactions could facilitate the understanding of viral strategy to manipulate cellular functions for its survival or to know how the host controls and eliminates the pathogens. Several studies have used Y2H techniques to study the protein–protein interactions between viruses and host cells [3–6]. A list of the interacting cellular proteins can be established after screening using a viral protein as the bait, providing a framework for further study on the relationship between the virus and the host. However, there are several limitations in this strategy that must be considered. First, due to the modular nature, the fusion proteins are sometimes not folded in a native form; second, the posttranslational modifications of some proteins in mammalian cells are not present in the yeast system, if the interactions between proteins are dependent on these modifications, false-negative results would be observed. In Y2H systems, both the BD-fused and AD-fused proteins must be targeted to the nucleus; therefore, extracellular proteins or organelle targeted proteins may not work in this system. The protocol written in this chapter is used to study protein–protein interactions of cytosolic proteins. Protocols used to study interactions between membrane proteins were depicted previously [7, 8]. We have used the protocol to identify many cellular factors interacting with different viral proteins [9–11], including SARS-CoV nucleocapsid protein [12].
To obtain a more reliable result of the protein–protein interactions, further experiments should be carried out to verify these interactions, e.g., co-immunoprecipitation and confocal microscopy analyses. After Y2H screening, co-immunoprecipitation is a biochemical method often used to verify whether the identified prey protein physically interacts with the bait protein in cells. Figure 2 shows a schematic summary of the co-immunoprecipitation assay. Specific antibodies against X protein or tag 1 peptide will first be coupled to Protein A/G beads, if the X protein is immunoprecipitated, then the Y protein which interacts with the X protein should be precipitated along with it. If the paired proteins of interest (X-Y) are indeed interacting with each other in cells, then these two proteins should also be co-localized in cells. Confocal microscopy analysis is used to verify the co-localization of the two interacting proteins. The co-immunoprecipitation and confocal microscopy analysis protocols written in this chapter have been used in our lab to study several protein–protein interactions [9, 11–16].

A schematic summary of co-immunoprecipitation assay. (a) 16–24 h after viral infection, lysates derived from virus-infected cells will be immunoprecipitated by the antibody against viral protein X. If the cellular protein Y interacts with protein X, it will be co-immunoprecipitated by the anti-X antibody in the presence but not absence of protein X. (b) 48 h after transfection of two plasmids encoding the viral X-tag 1 and the cellular Y-tag 2 fusion proteins separately, lysates derived from transfected cells will be immunoprecipitated by the antibody against tag 1. If the cellular protein Y interacts with viral protein X, Y-tag 2 fusion protein will be co-immunoprecipitated by the anti-tag 1 antibody in the presence but not absence of the X-tag 1 fusion protein
2 Materials
2.1 Yeast Strain and Vectors
-
1.
Saccharomyces cerevisiae YRG-2 strain, Mata ura3-52 his3-200 ade2-101 lys2-801 trp1-901 leu2-3 112 gal4-542 gal80-538 LYS2::UASGAL1-TATA GAL1-HIS3 URA3::UASGAL4 17mers(x3)-TATACYC1-lacZ.
-
2.
pBD-GAL4 Cam phagemid vector (Agilent technology).
-
3.
pAD-GAL4-2.1 Amp phagemid vector (Agilent technology).
-
4.
pACT2 (Clontech).
-
5.
For library-based screening, tissues-specific cDNA libraries cloned into prey vector pACT2 (Clontech).
2.2 Media and Stock Solutions
All the media are prepared with ddH2O. All reagents are autoclaved and stored at room temperature.
-
1.
YEPD liquid medium for general yeast growth: 20 g/L peptone, 10 g/L yeast extract, 0.64 g/L l-tryptophan, add glucose to 2 % (50 ml of a sterile 40 % stock solution).
-
2.
YEPD agar for general yeast growth: 20 g/L peptone, 10 g/L yeast extract, 0.64 g/L l-tryptophan, 2 % agar, add glucose to 2 % (50 ml of a sterile 40 % stock solution).
-
3.
YNP- selection medium (minimal medium necessary for the selection of nutritional mutants): 3 g/L yeast nitrogen base without amino acids and ammonium sulfate, 10 g/L ammonium sulfate, and 0.043 g/L inositol to a volume of 1 L. Prepare different selection media or agar plates by adding different amino acids or 3AT as listed in Table 1. The final concentrations of amino acids added to the selection medium are 0.4 mM uracil, 3.34 mM leucine, 2 mM lysine, 0.26 mM histidine, 0.6 mM adenine, and 50 or 100 mM 3AT.
Table 1 Preparation of different selection media and agar plates -
4.
40 % glucose.
-
5.
200 mM inositol.
-
6.
100 mM lysine.
-
7.
100 mM leucine.
-
8.
20 mM uracil.
-
9.
40 mM tryptophan.
-
10.
40 mM histidine.
-
11.
40 mM adenine.
-
12.
1 M 3AT: 3-amino-1,2,4-triazole used as a competitive inhibitor of the His3-gene product.
2.3 Yeast Transformation
-
1.
2 mg/ml salmon-sperm carrier DNA denatured by boiling for 10 min and placed on ice before transformation.
-
2.
50 % PEG 3350. Autoclave to sterilize.
-
3.
10× LiOAc: 1 M lithium acetate, adjust to pH 7.5 with HCl and filter-sterilize. 10× TE buffer: 0.1 M Tris–HCl (pH 7.5), 10 mM EDTA and autoclave.
-
4.
1× TE/LiOAc: To prepare 10 ml of solution, add 1 ml of 10× LiOAc, 1 ml of 10× TE, and 8 ml of ddH2O dilute to the final concentration of 1×.
-
5.
1× PEG/LiOAc: To prepare 10 ml of solution, add 1 ml of 10× LiOAc, 1 ml of 10× TE, and 8 ml of 50 % PEG (final concentration, 40 %) dilute to the final concentration of 1×.
2.4 Protein Extraction
-
1.
2 M lithium acetate (LiAc).
-
2.
0.5 M NaOH.
-
3.
5× Laemmli sample buffer: 60 mM Tris–HCl pH 6.8, 10 % glycerol, 2 % SDS, 5 % β-mercaptoethanol, 0.01 % bromophenol blue.
2.5 X-gal Filter Lift Assay
-
1.
Z buffer: 60 mM Na2HPO4, 40 mM NaH2PO4·H2O, 10 mM KCl, 1 mM MgSO4·7H2O, adjust to pH 7 with HCl, autoclave and store at room temperature.
-
2.
X-GAL stock solution: 20 mg/ml 5-bromo-4-chloro-3-indolyl-b-d-galactopyranoside in N,N-dimethylformamide, stored in dark at −20 °C.
-
3.
X-GAL working solution: Dilute the X-GAL stock solution to 0.2 mg/ml with Z buffer.
-
4.
Sterile filter paper.
-
5.
Liquid nitrogen in suitable container.
-
6.
Hybond-N nylon membrane.
2.6 Plasmid DNA Extraction
-
1.
Solution I: 25 mM Tris–HCl (pH 8), 10 mM EDTA.
-
2.
Solution II: 1 % SDS and 0.2 N NaOH.
-
3.
Solution III: 5 M potassium acetate, adjust to pH 5.5 with Glacial acetic acid.
-
4.
Isopropanol.
-
5.
75 % ethanol.
-
6.
Competent Escherichia coli.
-
7.
LB Amp agar: 10 g/L tryptone, 5 g/L yeast extract, and 10 g/L sodium chloride. Autoclave and allow solution to cool to 55 °C, add ampicillin to final concentration of 100 μg/ml.
2.7 Cell Culture and Plasmid Transfection
-
1.
Vero E6 cells.
-
2.
RPMI 1640 with 10 % FBS, 2 mM l-glutamine, 100 units/ml penicillin, and 0.1 mg/ml streptomycin.
-
3.
Trypsin–EDTA (0.25 %), phenol-red.
-
4.
1× PBS: Dilute 10× PBS pH 7.4 to 1× with ddH2O.
-
5.
Transfection reagent: 1 mg/ml PEI (Polyethylenimine 25 kDa linear from Polysciences).
2.8 Co-immunoprecipitation (Co-IP)
-
1.
Modified RIPA buffer: 10 mM Tris–HCl (pH 7.4), 10 mM EDTA, 1 % NP-40, 0.1 % SDS, 150 mM NaCl, and 0.5 % sodium deoxychloride in ddH2O.
-
2.
Protein A magnetic sepharose.
-
3.
Co-IP binding buffer (1× TBS): 50 mM Tris–HCl (pH 7.5), 150 mM NaCl.
-
4.
Co-IP elution buffer: 0.1 M glycine-HCl (pH 2.5)
-
5.
5× Laemmli sample buffer: 60 mM Tris–HCl pH 6.8, 10 % glycerol, 2 % SDS, 5 % β-mercaptoethanol, 0.01 % bromophenol blue.
-
6.
Antibody recognizing protein X or tag 1 (Fig. 2)
-
7.
20× TBS: 500 mM Tris, 3 mM NaCl, adjust to pH 7.0 with HCl, add ddH2O to a total volume of 1 L.
-
8.
Magnetic rack.
2.9 Immunofluorescence Analysis
-
1.
Fixing solution: acetone–methanol (1:1).
-
2.
Blocking solution: 1 % skimmed milk, 0.02 % saponin, 0.05 % NaN3 in 1× TBS.
-
3.
Phosphate buffered saline (PBS).
-
4.
Primary antibodies recognizing proteins X and Y or tags 1 and 2 (Fig. 2)
-
5.
Secondary antibodies recognizing Fc region of primary antibodies, conjugated with fluorescent dyes.
-
6.
4,6′-diamidino-2-phenylindole (DAPI): 1,000× DAPI stock: dissolve 0.2 mg DAPI in 1 ml ddH2O. Use 1× DAPI for staining (dilute by ddH2O).
-
7.
Mounting solution: 50 % glycerol in ddH2O.
-
8.
Glass coverslips.
-
9.
Glass slides.
-
10.
Nail polish or glue.
-
11.
Confocal microscope.
3 Methods
3.1 Growth of Yeast Cells
-
1.
Inoculate YEPD or selection medium with yeast in a test tube (see Note 1 ).
-
2.
Incubate at 150–180 rpm at 30 °C for 16–18 h.
3.2 Transformation of BD-Bait Plasmids into Yeast
-
1.
Inoculate the yeast cells from a frozen stock on a YEPD plate and incubate at 30 °C until colonies appear after 3 days. The plates of yeast colonies can be stored at 4 °C for 1 month.
-
2.
Pick one or a few colonies from the plate to 3 ml YEPD liquid medium and incubate them with rotation overnight (16–18 h) at 30 °C (see Note 2 ).
-
3.
Centrifuge at 300 × g for 5 min. Discard the supernatant and resuspend the cell pellet in 1 ml H2O by vortexing.
-
4.
Centrifuge at 300 × g for 5 min and remove the supernatant and resuspend the cell pellet in 1 ml H2O by vortexing.
-
5.
Centrifuge at 300 × g for 5 min. Discard the supernatant and resuspend the cell pellet with 0.2 ml 1× TE/LiOAc.
-
6.
Add 8 μl plasmid DNA expressing the BD-prey fusion gene and 10 μl carrier DNA to the resuspended cells and mix (see Note 3 ).
-
7.
Add 600 μl 1× PEG/LiOAc to the mixture.
-
8.
Mix the contents on a rotator for 30 min at room temperature.
-
9.
Add 10 % DMSO (see Note 4 ).
-
10.
Heat-shock the cells at 42 °C for 2 min followed by incubation on ice for 5 min.
-
11.
Centrifuge at 15,000 × g for 30 s. Discard the supernatant and resuspend the cells in 200 μl 1× TE buffer.
-
12.
Plate 100 μl onto a −W+G selection plate and 100 μl onto a −W−L+G selection plate.
-
13.
Incubate the plates at 30 °C for 4–5 days.
3.3 Detection of the Expression of the BD-Bait Fusion Protein
-
1.
Incubate the yeast cells with BD-bait fusion protein in −W+G medium at 30 °C until OD600:1.
-
2.
Centrifuge at 15,000 × g for 1 min. Discard the supernatant and resuspend in 0.2 ml 2 M LiAc.
-
3.
Incubate for 5 min on ice.
-
4.
Centrifuge at 15,000 × g for 1 min. Discard the supernatant and resuspend in 0.2 ml 0.5 M NaOH.
-
5.
Incubate for 5 min on ice.
-
6.
Centrifuge at 15,000 × g for 1 min. Discard the supernatant and resuspend in 100 μl 5× Laemmli sample buffer.
-
7.
Boil the sample at 95 °C for 5 min and centrifuge at 15,000 × g for 2 min to remove the cell debris.
-
8.
Transfer the supernatant into a new tube and store the sample at −80 °C (see Note 5 ).
-
9.
Analyze expression of BD-bait fusion protein by standard SDS-PAGE and Western blot using an anti-Gal-BD antibody.
3.4 Self-activation Test for the Bait Protein
Before the library screen, it is important to confirm that the bait protein does not activate the reporter genes without the presence of any prey protein (see Note 6 ).
-
1.
Pick a colony of yeast cells with BD-bait fusion protein and transfer the cells to a selection plate with −W−H+G. −W−H+G plates do not contain tryptophan and histidine for the screening of self-activation of bait protein.
-
2.
Incubate the plates at 30 °C for 4–5 days.
-
3.
If BD-bait fusion proteins do not have self-activation activities, the yeast cells will not grow on −W−H+G selection plates. On the other hand, yeast cells will grow if BD-bait fusion proteins have the self-activation activities. Transfer these yeast cells grown on −W−H+G selection plates to a −W−H+G+3AT plate to confirm the BD-bait fusion proteins do have self-activation activities.
-
4.
BD-bait fusion proteins with self-activation activities are not recommended for further library screening. Deletion mapping analysis should be conducted to remove the domain with the self-activation activity.
3.5 Library Screening with Yeast Transformation
-
1.
Pick one or a few yeast colonies transformed with a plasmid expressing the BD-bait fusion protein. Transfer to 3 ml −W+G medium and incubate the cells with rotation overnight (16–18 h) at 30 °C.
-
2.
Centrifuge at 300 × g for 5 min. Discard the supernatant and resuspend the cell pellet in 1 ml H2O by vortexing.
-
3.
Centrifuge at 300 × g for 5 min and remove the supernatant and resuspend the cell pellet in 1 ml H2O by vortexing.
-
4.
Centrifuge at 300 × g for 5 min. Discard the supernatant and resuspend the cell pellet with 200 μl 1× TE/LiOAc.
-
5.
Add 8 μl plasmid DNA expressing the BD-prey fusion gene and 10 μl carrier DNA to the resuspended cells and mix.
-
6.
Add 600 μl 1× PEG/LiOAc to the mixture.
-
7.
Mix the contents on a rotator for 30 min at room temperature.
-
8.
Heat-shock the cells at 42 °C for 2 min followed by incubation on ice for 5 min.
-
9.
Centrifuge at 15,000 ×g for 30 s. Discard the supernatant and resuspend the cells in 200 μl 1× TE buffer.
-
10.
Plate 100 μl onto a −W−L+G selection plate and 100 μl onto a −W−L−H+G selection plate.
-
11.
Incubate the plates at 30 °C for 4–5 days.
3.6 Validation of Positive Two-Hybrid Clones Using 3AT-Selection Plates
-
1.
Prepare the −W−L−H+G based plates by adjusting the 3AT concentration to 50 mM or 100 mM as selection plates.
-
2.
Transfer the presumably positive yeast clones to plates of −W−L−H+G50 mM 3AT or −W−L−H+G+100 mM 3AT.
-
3.
Incubate the cells at 30 °C, observe the growth of yeast colonies after 3 days (Fig. 3).
Fig. 3 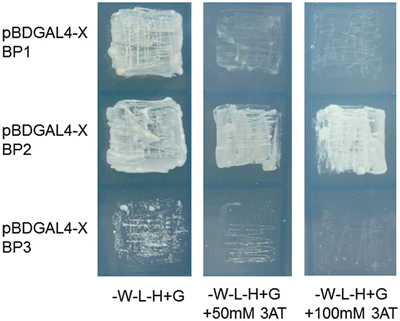
Yeast growth on selection plates with different concentrations of 3AT. Three different colonies picked from the −W−L−H+G plate while screening for pBDGAL4-X binding proteins (BP) using cDNA library were then seeded onto selection plates with different concentrations of 3AT (50 or 100 mM). On the plate with 50 mM 3AT, yeast with BP1 and BP2 but not with BP3 survived. Therefore, BP1 and BP2 showed stronger interaction with protein X than that of BP3. In the plate with 100 mM 3AT, BP2 showed stronger interaction with protein X than that of BP1. BP3 was identified as a false positive by this selection system
-
4.
Only the positive clones will produce histidine and allow the yeast cells to grow on −W−L−H+G selection plates. 3AT acts as a competitive inhibitor of the product of His3 gene, Imidazoleglycerol-phosphate dehydratase, which is an enzyme catalyzing the production of histidine. Higher expression of histidine in yeast cells will allow the cells survive in the media that contain higher concentration of 3AT (see Note 7 ).

3.7 Validation of Positive Two-Hybrid Clones Using X-gal Filter Lift Assay
-
1.
Place a sterile nylon membrane on top of yeast colonies.
-
2.
Remove the nylon membrane and place it on a container with the colony side up.
-
3.
Put the nylon membrane with yeast cells into liquid nitrogen for 15 s and then allow it to thaw at room temperature
-
4.
Repeat the freezing-thawing step three times.
-
5.
Wet the filter paper with 4 ml X-gal working solution and place the nylon membrane on top of the wetted filter paper (prevent bubble in between).
-
6.
Incubate the filter paper at 37 °C for 2.5 h, until colonies turn blue, but no more than 5 h.
3.8 Rescue the Plasmid Encoding AD-Prey Fusion Protein
-
1.
Pick one yeast colony into 3 ml −W−L−H+G medium, incubate the cells with rotation overnight (16–18 h) at 30 °C.
-
2.
Centrifuge at 15,000 × g for 1 min and then remove the supernatant.
-
3.
Resuspend the pellet in 200 μl solution I.
-
4.
Add 100 μl Solution II and mix gently by inverting the tube ten times
-
5.
Incubate at room temperature for 3 min.
-
6.
Add 150 μl solution III and mix gently by inverting the tube ten times.
-
7.
Centrifuge at 15,000 × g for 10 min and transfer the supernatant into a new microtube
-
8.
Add 400 μl isopropanol to precipitate DNA and incubate at −20 °C for 30 min.
-
9.
Centrifuge at 15,000 × g for 10 min, remove the supernatant, and add 1 ml 75 % ethanol.
-
10.
Centrifuge for 10 min at 15,000 × g and discard the supernatant.
-
11.
Air-dry the pellet and add 50 μl pre-warmed ddH20 to 60 °C to dissolve the plasmid DNA.
-
12.
Transform the plasmid DNA into competent E. coli, according to manufacturer’s instructions, and plate the bacteria on LB-Amp plates.
-
13.
Using standard techniques, isolate plasmid DNA and sequence over region of insert to identify interacting protein.
3.9 Co-immunoprecipitation Assay
-
1.
-
(A)
Infect the cells with viruses (M.O.I. >3) and incubate for 16–24 h.
-
i.
Plate 7 × 10⁵ cells in 60 mm culture dish with 3 ml culture medium. Cell density should reach 60–80 % confluent before viral infection (usually, it takes 16–24 h).
-
ii.
Remove culture medium and wash three times with 1× PBS.
-
iii.
Add 3 ml serum-free medium containing virus to the plates. More than 2.1 × 10⁶ pfu (plaque forming unit) of virus (M.O.I. >3) should be used to infect the cells. Mix gently by rocking the plates and incubate at 37 °C incubator.
-
iv.
After 2 h, add serum to the medium to a final concentration of 10 %.
-
v.
Incubate cells for 16–24 h for further analysis.
-
i.
-
(B)
Transfect protein expression plasmids into the cells and incubate for 2 days.
-
i.
Plate 7 × 10⁵ cells in 60 mm culture dish with 3 ml culture medium. Cell density should reach 60–80 % confluent before DNA transfection (usually, it takes 16–24 h).
-
ii.
Dilute 4 μg plasmid with 300 μl serum-free medium in an eppendorf.
-
iii.
Add 10 μl of 1 mg/ml PEI. Vortex to mix and incubate at room temperature for 15 min.
-
iv.
Remove medium from cells and wash three times with 1× PBS.
-
v.
Add 3 ml serum-free medium and premixed DNA-PEI (step ii) to the cells. Mix gently by rocking and incubate at 37 °C.
-
vi.
After 2 h, add serum to the medium to a final concentration of 10 %.
-
vii.
Incubate cells for 30–48 h for further analysis.
-
i.
-
(A)
-
2.
Cells (from A or B), after the removal of culture medium, were washed with 1× PBS three times at room temperature. Then, add 50 μl modified RIPA buffer to the cells and incubate on ice for 5 min.
-
3.
Scrape cells into buffer and centrifuge at 15,000 ×g for 10 min.
-
4.
Remove supernatant to a new tube.
-
5.
Add 80 μl of Protein A magnetic beads into a 1.5 ml microtube, place the microtube into the magnetic rack and remove the storage buffer.
-
6.
Add 0.5 ml Co-IP binding buffer to equilibrate the magnetic beads, resuspend and remove the buffer with the magnetic rack.
-
7.
After the equilibration, add 0.6 ml of Co-IP binding buffer to resuspend the beads.
-
8.
Add suitable amount of antibody diluted following the manufacturer’s instructions (anti-X or anti-tag 1 in Fig. 2) to the magnetic beads and mix them with end-over-end rotation for 1 h at room temperature.
-
9.
Place the microtube to the magnetic rack and remove the supernatant.
-
10.
Wash the magnetic beads three times with 1 ml Co-IP binding buffer. After adding the buffer, fully mix the buffer with beads by inverting ten times at room temperature, using the magnetic rack to allow removal of buffer.
-
11.
Add the protein samples from the step 4 to the beads and dilute with Co-IP binding buffer to a total volume of 0.6 ml (see Note 9 ).
-
12.
Incubate the protein samples with magnetic beads by end-over-end rotation overnight at 4 °C.
-
13.
Wash the magnetic beads three times with 1 ml modified RIPA buffer. After adding the buffer, fully mix the buffer with beads by inverting ten times at room temperature, then use the magnetic rack to allow removal of buffer.
-
14.
Remove the supernatant using the magnetic rack and elute the proteins from the magnetic beads by using 30 μl Co-IP elution buffer.
-
15.
Add 6 μl of 5× Laemmli sample buffer to the eluted sample protein.
-
16.
Boil the sample at 95 °C for 5 min and centrifuge at 15,000 × g for 2 min.
-
17.
Collect the samples and perform SDS-PAGE followed by Western blotting using standard procedures. Western blotting should be performed using antibodies specific for protein Y or tag 2 shown in Fig. 2 (see Notes 8 and 10 ).
3.10 Immunofluorescence Analysis
-
1.
-
(A)
Infect the cells with viruses (M.O.I. = 0.01) and incubate for 16–24 h.
-
i.
Plate 5 × 10⁵ cells into 35 mm tissue culture plates containing glass coverslips. Cell density should reach 60–80 % confluent before viral infection (usually, it takes 16–24 h).
-
ii.
Remove cell culture medium and wash cells three times with 1× PBS.
-
iii.
Add 3 ml serum-free medium containing virus to the plates. About 5 × 10³ pfu of viruses (M.O.I. = 0.01) should be used to infect the cells. Mixed gently by rocking and incubate at 37 °C incubator.
-
iv.
After 2 h, add serum to the medium to a final concentration of 10 %.
-
v.
Incubate at 37 °C for 16–24 h for further analysis.
-
i.
-
(B)
Transfect protein expression plasmids into the cells and incubate the cells for 2 days.
-
i.
Plate 5 × 10⁵ cells into 35 mm tissue culture plates containing glass coverslips. Cell density should reach 60–80 % confluent before DNA transfection (usually, it takes 16–24 h).
-
ii.
Dilute 3 μg plasmid in 200 μl serum-free medium in an eppendorf.
-
iii.
Add 7 μl of 1 mg/ml PEI, vortex, and incubate at room temperature for 15 min.
-
iv.
Remove medium from cells and was three times with 1× PBS.
-
v.
Add 3 ml serum-free medium and premixed DNA-PEI (step ii) to the plates. Mix gently by rocking and incubate at 37 °C.
-
vi.
After 2 h, add serum to the medium to a final concentration of 10 %.
-
vii.
Incubate cells at 37 °C for 30–48 h for further analysis.
-
i.
-
(A)
-
2.
Aspirate the culture medium and gently rinse the cells twice in ice-cold 1× PBS.
-
3.
Fix the cells by incubating them in the fixing solution for 10 min at −20 °C.
-
4.
Remove the fixing solution and add 1 ml blocking solution to the coverslips. Incubate for 15 min.
-
5.
Remove the blocking solution.
-
6.
Dilute the primary antibodies (anti-X and anti-Y or anti-tag 1 and anti-tag 2 shown in Fig. 2) in the blocking solution following the manufacturers’ instructions. The final volume should be sufficient to cover each coverslip (100 μl in a 24-well plate) (see Note 11 ).
-
7.
Cover the plates with Parafilm and incubate the cells with antibodies at 37 °C for 30 min.
-
8.
Wash the coverslips three times with 1 ml 1× PBS at room temperature.
-
9.
Dilute the secondary antibodies conjugated with different fluorescent dyes in blocking solution, following the manufacturers’ instructions. Secondary antibodies should recognize the Fc region of the primary antibodies. The final volume should be sufficient to cover each coverslip (100 μl in a 24-well plate).
-
10.
Cover the plates with Parafilm and incubate the cells with antibodies at 37 °C for 30 min.
-
11.
Wash the coverslips three times 1 ml 1× PBS at room temperature.
-
12.
Dilute DAPI in blocking solution, following the manufacturer’s instructions and add to the coverslips to stain the nucleus of the cells. The final volume should be sufficient to cover each coverslip (100 μl in a 24-well plate).
-
13.
Cover the plates with Parafilm and incubate the cells with DAPI solution at room temperature for 15 min.
-
14.
Prepare a microscope slide for each coverslip. Add a drop of mounting solution to each slide.
-
15.
Pick up each coverslip with forceps and place it on the mounting solution with the cell-side facing down.
-
16.
Apply nail polish or glue along the edges of the coverslips to seal them to the slides.
-
17.
Observe under a confocal microscope.
4 Notes
-
1.
Saccharomyces cerevisiae is a single-cell eukaryote frequently used in scientific research. The laboratory yeast strains usually carry several nutrient gene mutations; therefore, complementation of exogenous amino acids could provide the nutrients for yeast cells to survive. Two most common media used in the Y2H system are the full medium (YEPD) which contains all the nutrients for yeast, and the selection medium which contains only several selective amino acids added to the minimal medium.
-
2.
Yeast cells used for transformation should be in log phase. Transformation efficiency in this phase is better than that in stationary phase.
-
3.
Positive and negative controls should be included in all tests.
-
4.
Addition of 10 % DMSO will increase the transformation efficiency.
-
5.
Whenever Western blotting analysis was conducted to verify protein expression, adding protease inhibitors in the samples could prevent the degradation of protein samples.
-
6.
Self-activation should be tested before using the bait proteins for library screening to avoid false-positive clones. It is not necessary to test the self-activation of prey proteins.
-
7.
In the GAL4 based two-hybrid system, LacZ and His3 genes are usually used as reporter systems to verify the protein–protein interactions. In our lab, 3-Amino-1,2,4-triazole (3AT) is added to the selection plate as a competitive inhibitor of the His3-gene product. Results of yeast growth in plates with different concentrations of 3AT are shown in Fig. 3. X-Gal filter lift assay is also serves as a double confirmation test to avoid false-positive clones [10].
-
8.
If Y protein interacts physically with X protein, Y protein will be immunoprecipitated by anti-X antibody in the presence but not absence of X protein. To avoid the cross-reaction of anti-X, a negative control should be included, i.e., Y protein in the cell lysate without X protein would not be precipitated by the anti-X antibody.
-
9.
When co-IP is performed (Subheading 3.9), add 9/10 of the protein samples for the immunoprecipitation assay (the 12th step). 1/10 of the protein samples serve as an input control for Western blotting analysis.
-
10.
It is annoying to have the heavy and light chains of immunoglobulins in the background of Western blotting analysis following immunoprecipitation, especially when the size of the target protein is close to that of the heavy chain or light chain. Cross-linking of the antibody to protein A/G beads using a cross-linker, e.g., disuccinmidyl suberate, should prevent the co-elution of heavy and light chains of immunoglobulins. Alternatively, a commercial immunoprecipitation kit, like EasyBlot (Genetex), provides a secondary antibody which specifically reacts with the native, non-reduced form of IgG. This will decrease the interference of heavy chain and light chain of IgG.
-
11.
If the primary antibodies against two proteins (or peptide tags) are derived from the same animal species, it is necessary to conjugate a fluorescent dye directly to one primary antibody. Incubate the other primary antibody without a conjugated fluorescent dye first, followed by the secondary antibody against this primary antibody. Then, add the primary antibody with a conjugated fluorescent dye to the sample for incubation.
References
Cho S, Park SG, Lee DH et al (2004) Protein-protein interaction networks: from interactions to networks. J Biochem Mol Biol 37:45–52
Fields S, Song O (1989) A novel genetic system to detect protein-protein interactions. Nature 340:245–246
McCraith S, Holtzman T, Moss B et al (2000) Genome-wide analysis of vaccinia virus protein-protein interactions. Proc Natl Acad Sci U S A 97:4879–4884
de Chassey B, Navratil V, Tafforeau L et al (2008) Hepatitis C virus infection protein network. Mol Syst Biol 4:230
Calderwood MA, Venkatesan K, Xing L et al (2007) Epstein-Barr virus and virus human protein interaction maps. Proc Natl Acad Sci U S A 104:7606–7611
Konig R, Zhou Y, Elleder D et al (2008) Global analysis of host-pathogen interactions that regulate early-stage HIV-1 replication. Cell 135:49–60
Snider J, Kittanakom S, Damjanovic D et al (2010) Detecting interactions with membrane proteins using a membrane two-hybrid assay in yeast. Nat Protoc 5:1281–1293
Lentze N, Auerbach D (2008) Membrane-based yeast two-hybrid system to detect protein interactions. Curr Protoc Protein Sci. Chapter 19, Unit 19.17 (editorial board, John E Coligan et al)
Fang CP, Li ZC, Yang CH et al (2013) Hepatitis C virus non-structural protein 3 interacts with cytosolic 5′(3′)-deoxyribonucleotidase and partially inhibits its activity. PLoS One 8:e68736
Yang CH, Li HC, Jiang JG et al (2010) Enterovirus type 71 2A protease functions as a transcriptional activator in yeast. J Biomed Sci 17:65
Ma HC, Lin TW, Li H et al (2008) Hepatitis C virus ARFP/F protein interacts with cellular MM-1 protein and enhances the gene trans-activation activity of c-Myc. J Biomed Sci 15:417–425
Wei WY, Li HC, Chen CY et al (2012) SARS-CoV nucleocapsid protein interacts with cellular pyruvate kinase protein and inhibits its activity. Arch Virol 157:635–645
Chen SC, Lo SY, Ma HC et al (2009) Expression and membrane integration of SARS-CoV E protein and its interaction with M protein. Virus Genes 38:365–371
Hsieh YC, Li HC, Chen SC et al (2008) Interactions between M protein and other structural proteins of severe, acute respiratory syndrome-associated coronavirus. J Biomed Sci 15:707–717
Ma HC, Ku YY, Hsieh YC et al (2007) Characterization of the cleavage of signal peptide at the C-terminus of hepatitis C virus core protein by signal peptide peptidase. J Biomed Sci 14:31–41
Ma HC, Ke CH, Hsieh TY et al (2002) The first hydrophobic domain of the hepatitis C virus E1 protein is important for interaction with the capsid protein. J Gen Virol 83:3085–3092
Author information
Authors and Affiliations
Corresponding author
Editor information
Editors and Affiliations
Rights and permissions
Copyright information
© 2015 Springer Science+Business Media New York
About this protocol
Cite this protocol
Yang, CH., Li, HC., Hung, CH., Lo, SY. (2015). Studying Coronavirus–Host Protein Interactions. In: Maier, H., Bickerton, E., Britton, P. (eds) Coronaviruses. Methods in Molecular Biology, vol 1282. Humana Press, New York, NY. https://doi.org/10.1007/978-1-4939-2438-7_17
Download citation
DOI: https://doi.org/10.1007/978-1-4939-2438-7_17
Published:
Publisher Name: Humana Press, New York, NY
Print ISBN: 978-1-4939-2437-0
Online ISBN: 978-1-4939-2438-7
eBook Packages: Springer Protocols