
Abstract
Time-of-flight secondary ion mass spectrometry (ToF-SIMS) is an emerging technique for the characterization of biological systems. With the development of novel ion sources such as cluster ion beams, ionization efficiency has been increased, allowing for greater amounts of information to be obtained from the sample of interest. This enables the plotting of the distribution of chemical compounds against position with submicrometer resolution, yielding a chemical map of the material. In addition, by combining imaging with molecular depth profiling, a complete 3-dimensional rendering of the object is possible. The study of single biological cells presents significant challenges due to the fundamental complexity associated with any biological material. Sample preparation is of critical importance in controlling this complexity, owing to the fragile nature of biological cells and to the need to characterize them in their native state, free of chemical or physical changes. Here, we describe the four most widely used sample preparation methods for cellular imaging using ToF-SIMS, and provide guidance for data collection and analysis procedures.
1 Introduction
Chemical imaging on the cellular level is now feasible with time-of-flight secondary ion mass spectrometry (ToF-SIMS). The ability to map the distribution of small biologically relevant molecules (<1,000 Da) is now possible due to the submicron spatial resolution, high chemical specificity, and high surface sensitivity of ToF-SIMS [1, 2]. In brief, a pulsed high-energy primary ion beam is used to bombard the surface. As the beam rasters across a sample surface, material is ablated in the form of neutrals and ions; these are the secondary ions that will be analyzed in the mass spectrometer. These secondary ions are extracted into a ToF analyzer from which a mass spectrum is created. Each pixel contains a full mass spectrum corresponding to a specific position of the beam. Hence, a 2D image can be created by selecting a specific mass and plotting its intensity pixel by pixel [3].
Due to the ultrahigh-vacuum conditions typically required for a ToF-SIMS experiment, special precautions must be taken to conserve sample integrity when analyzing cells. In order to obtain mass spectral data with sufficient quality, a surface must be chosen on which cells will successfully grow, any interfering chemicals or components must be removed, and the shape and distribution of chemical components in the cell must be maintained [4, 5]. Generally, cells must be fixed either cryogenically or chemically, and so commonly used sample preparation methods include chemical fixation, freeze fracturing, frozen hydration, and freeze-drying. We outline these four sample preparation protocols, with brief descriptions given below.
Chemical fixation preserves the internal cellular structures by physically changing the chemistry of the cell using reagents. Several chemical compounds are commonly used, the most common of which are glutaraldehyde (GA), paraformalin/formaldehyde, and trehalose [6–8]. A major advantage of this technique is that samples can be analyzed at room temperature, rather than using a cryogenically cooled stage, as is the case with many other cell preparation methods. This approach preserves the integrity of the cellular compartments containing the chemical information that is generally of interest; however, the integrity of the cellular membrane is often compromised and the distribution of diffusible ions is not retained during chemical fixation [6–9].
For sample preparation techniques utilizing freezing, the sample is generally flash-frozen in liquid nitrogen-cooled propane prior to freezing in liquid nitrogen. This ensures that the cellular and tissue structures sustain little or no damage due to water crystallization, subsequently, maintaining cellular integrity [10].
Freeze-drying involves quickly freezing the sample in order to preserve the chemistry, followed by slow warming under vacuum to remove residual water [3]. Cell rupturing is often a major concern, due to the sublimation of water if temperatures of the sample are increased too quickly. It has also been shown that freeze-drying can cause rearrangement of molecules within the cell, sometimes even causing certain components to be lost completely [4, 6, 11]. This makes freeze-drying less than ideal when it is the exact location and distribution of chemicals and components in the cell that are of interest [1, 6, 11, 12].
In freeze fracturing, the cell suspension is trapped between two shards of substrate in a sandwich format and subsequently plunge frozen in liquid propane (88 K). Cells prepared in this way are stored in liquid nitrogen until analysis can be performed. Moderate force is then applied and the ice matrix within the sample plates is fractured, exposing the cells contained within. Freeze fracturing has been shown to maintain chemical heterogeneity in the cell, allowing for accurate chemical analysis, but causes a fracture plane that is not always reproducible, making intact cellular characterization, particularly on the surface, difficult [11–13].
Frozen hydration is believed to be best suited to preserving the integrity of the cell and has been shown to increase ion yields for some species [14, 15]. Here, cells remain in their native hydrated state, thus minimizing the risk of chemical movement or dissipation while still cryogenically fixing cells to prevent problems associated with analysis in vacuum. However, it poses the greatest challenge in terms of sample handling. The sample must remain at cryogenic temperatures after flash-freezing in order to remain in the frozen hydrated state, meaning that instrumentation must be equipped with cold-stage capabilities [1, 7, 11, 12].
In addition to various fixing methods, thought must be given to extraneous compounds that may be in contact with the cell. A major problem occurs with the salt residue remaining on the cells after culturing, as this can be detrimental to the SIMS signal. Berman et al. were able to determine that washes in ammonium formate remove these residual salt peaks from the buffer solution without physically damaging or chemically altering the cell [4, 6, 12].
When determining which cellular sample preparation protocol to follow, it is up to the researcher to determine which method is best suited to the experiment, as each of the preparation methods described above highlights a slightly different type of information. A protocol for each of these approaches is outlined in Subheading 3. These protocols have been optimized to ensure compatibility with the SIMS experiment.
2 Materials
The various sample preparation methods utilized various cell types and cell culture protocols. The reader is asked to consult the specific references for more information regarding cell culturing. Sample preparation processes will be described beginning with the grown cells unless otherwise noted.
2.1 Freeze Fracture [5]
-
1.
HeLa cells, an immortalized cervical cancer cell line, were used in this experimental protocol.
-
2.
Poly-l-lysine: 0.01 % solution.
-
3.
Steel shards.
-
4.
Ammonium formate: 0.15 M.
-
5.
Deionized water.
-
6.
Propane gas.
-
7.
Liquid nitrogen.
-
8.
Instrumentation: J105-3D Chemical Imager (Ionoptika Ltd., UK) equipped with a 40 keV C60 + primary ion source.
2.2 Frozen Hydrate [13]
-
1.
HeLa cells, an immortalized cervical cancer cell line, were used in this experimental protocol.
-
2.
HPLC-grade hexane.
-
3.
Ethane gas (99 %).
-
4.
Liquid nitrogen.
-
5.
Ammonium formate: 0.15 M.
-
6.
Deionized water.
-
7.
5 × 5 mm silicon shards (Ted Pella, Redding, CA, USA).
-
8.
Instrumentation: Bio-ToF (Ionoptika Ltd., UK) equipped with 40 keV C60 + primary ion source [16].
2.3 Chemical Fixation with Glutaraldehyde [6]
-
1.
Infinity telomerase-immortalized primary human fibroblasts (hTERT-BJ1) (Clontech Laboratories, Inc., Mountain View, CA) were used in this protocol.
-
2.
Polished silicon wafers, 1 mm × 1 mm.
-
3.
Phosphate-buffered saline (PBS; 0.02 M NaH2PO4, 0.02 M, Na2HPO4, 0.15 M NaCl, 5.4 mM KCL, pH 7.2).
-
4.
Glutaraldehyde in PBS: 2.5 % solution.
-
5.
Instrumentation: TOF-SIMS IV (ION-TOF GmbH, Germany) equipped with 25 keV Bi3 + primary ion source.
2.4 Chemical Fixation with Paraformalin/Formaldehyde [7]
-
1.
HeLa M cells, an immortalized cell line derived from cervical cancer, were used in this protocol.
-
2.
Poly-l-lysine: 0.01 % solution.
-
3.
Silicon shards.
-
4.
Dulbecco’s modified Eagle medium.
-
5.
Phosphate-buffered saline.
-
6.
Formalin: 4 % solution.
-
7.
Millipore water.
-
8.
Ammonium formate: 0.15 M.
-
9.
Instrumentation: J105 3D Chemical Imager (Ionoptika, Ltd., Southampton, UK, and SAI Ltd., Manchester, UK) equipped with 40 keV C60 + primary ion beam.
2.5 Chemical Fixation with Trehalose [8]
-
1.
J774, murine, peritoneal macrophages from 4-week-old CBA/J male mice and glial cells from 1-day-old Sprague-Dawley rat pups were used for this protocol.
-
2.
Glass shards: Shards are coated with <100 Å Cr and <100 Å Au, followed by soaking in poly-l-lysine (1.2 mg/mL solution) and collagen (0.1 mg/mL solution), rinsing in deionized water, and air-drying.
-
3.
α-α (d) trehalose: 50 mM solution.
-
4.
Phosphate-buffered saline (PBS) washing solution: PBS containing 50 mM trehalose and 10–15 wt% glycerol.
-
5.
200-mesh finder grids (Electron Microscopy Sciences).
-
6.
Instrumentation: Described previously [16] equipped with 5–25 kV Au primary ion source (Ionoptika).
2.6 Freeze-Dry [17]
-
1.
Xenopus oocytes (Professor Mark Boyett, University of Manchester) were used for this experimental protocol.
-
2.
Propane gas.
-
3.
Liquid nitrogen.
-
4.
Ammonium acetate: 0.15 M.
-
5.
Deionized water.
-
6.
5 × 5 mm silicon shards (Ted Pella, Redding, CA, USA).
-
7.
Instrumentation: BioToF-SIMS (Ionoptika Ltd. UK) equipped with a 40 keV C60 + primary ion source and a 25 keV liquid metal ion gun (LMIG) fitted with Au:Ge eutectic source (Ionoptika Ltd.) providing Au+ and Au3 + ions.
3 Methods
As described in Subheading 1, the methods for freeze fracture, frozen hydrate, freeze-dry, and chemical fixation cellular sample preparation will be outlined here. While these methods may not be the only possible cellular sample preparation methods, they have been found to be the most successful in maintaining the chemical integrity of the cell for analysis. The protocols described have been utilized with specific cell types; however, analysis is not limited to these particular cell types. It is assumed that the reader has some familiarity with ToF-SIMS analysis.
3.1 Cell Culture
-
1.
Culture the cells of choice in the manner described by the protocol for each specific type.
-
2.
Prior to growing cells, shards must be cleaned. The process for silicon shards includes placing the desired number of shards in a glass scintillation vial and covering with nanopure water. The water is removed and methanol is added until the shards are covered. Shards are sonicated uncovered for 5–10 min. The methanol is removed and the shards are dried with a gentle stream of nitrogen gas. This process is repeated with heptane and acetone. Store the shards in methanol (see Notes 1 and 2 ).
3.2 Freeze Fracture [5]
-
1.
Grow cells on poly-l-lysine-coated steel, a hinged two-plate substrate specifically designed to fracture biological samples in mousetrap device (see Note 3 ).
-
2.
Aspirate culture media.
-
3.
Wash substrate in 0.15 M ammonium formate for 1 min (see Note 4 ).
-
4.
Sandwich cells between two metal plates connected by a hinge and rapidly freeze in liquid nitrogen-cooled propane (see Fig. 1).
Fig. 1 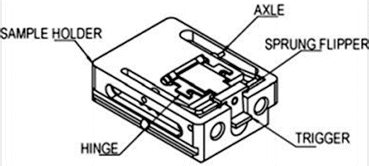
Mousetrap design used for the freeze fracture system. The sample is trapped between two metal plates connected by a hinge, which is sprung open when triggered. Reproduced from [5] with permission from John Wiley and Sons
-
5.
Transfer sample to a liquid nitrogen flask containing the mousetrap device where the sample is mechanically fixed in place.
-
6.
Transfer the sample to the instrument through the use of a glove box purged with argon gas to prevent frosting.
-
7.
Sample is mounted directly onto a precooled sample insertion stage and transferred into the preparatory chamber.
-
8.
Sample is fractured in the instrument at 168 K to minimize deposition of water. The trap is sprung by a transfer arm revealing cryogenically preserved cells (see Note 5 ).
-
9.
Sample is transferred to a cold stage in the analysis chamber and held below 150 K throughout analysis (see Note 6 ).

3.3 Frozen Hydrate [13]
-
1.
To prepare cells for analysis, add the desired amount of cells to a petri dish containing clean and dry silicon shards and allow growth in incubator until optimal coverage is obtained, usually about 24 h (see Note 7 ).
-
2.
Warm 0.15 M ammonium formate solution (pH ~7.3) to 37 °C.
-
3.
Cool the sample holder in liquid nitrogen after blowing it dry with nitrogen gas. Allow the holder to cool in the liquid nitrogen and do not add the sample until the boiling has stopped. Keep the holder submerged in liquid nitrogen for the duration of the sample preparation (see Note 8 ).
-
4.
Wash the cells three times for ~5 s, in three beakers of the 0.15 M ammonium formate solution, to remove residual salts present from the cell media for a total of nine washes (see Note 4 ).
-
5.
Dry the shards with a very gentle stream of nitrogen. If the nitrogen pressure is too great, streaking of the cells will occur. Also, be sure to dry the tweezers prior to freezing the sample (see Note 9 ).
-
6.
Quickly plunge freeze the shard with cell growth into liquid propane for about 3–4 s before transferring to the liquid nitrogen-covered sample holder. If transfer times are too slow, the sample will warm above ~165 K and the cells will rupture.
-
7.
Transfer into instrument for analysis, again, minimizing the amount of time that the cells are exposed to room temperature. The instrument should be operated with a precooled stage.
3.4 Chemical Fixation with Glutaraldehyde [6]
-
1.
Seed the hTERT-BJ1 onto the clean silicon shards and allow growth in an incubator to occur for up to 2 days.
-
2.
Wash the cells with phosphate-buffered saline (PBS).
-
3.
Fix the cells with 2.5 % glutaraldehyde for 15 min in 37 °C.
-
4.
Wash away excess GA with PBS.
-
5.
Gently dry with nitrogen.
-
6.
Plunge freeze in liquid propane and isopentane (3:1). This allows for a high cooling rate, reducing water crystallization.
-
7.
Allow to freeze-dry overnight at −80 °C and 10−6 mbar.
-
8.
Allow to warm by 10 °C/h to 30 °C.
-
9.
If freeze-drying did not occur in the SIMS instrument, transfer sample into the instrument and complete analysis.
3.5 Chemical Fixation with Paraformalin/Formaldehyde [7]
-
1.
To prepare cells for analysis, add the desired amount of cells to a 24-well plate containing clean and dry poly-l-lysine-coated silicon shards and allow growth in incubator for 24 h until optimal coverage is obtained (see Note 3 ).
-
2.
Aspirate the media.
-
3.
Wash with phosphate-buffered saline (PBS) three times.
-
4.
Incubate the cells with 4 % formalin for 15 min at 4 °C.
-
5.
Wash with PBS five times and then wash with water three times.
-
6.
Return to PBS for storage for several hours.
-
7.
Wash with 0.15 M ammonium formate for 1 min and allow to dry.
-
8.
Transfer into the SIMS instrument and begin analysis.
3.6 Chemical Fixation with Trehalose [16]
-
1.
Cells were allowed to grow for several days prior to fixation.
-
2.
Incubate cells in 50 mM trehalose for several hours.
-
3.
Rinse for ~5 s with PBS buffer containing 50 mM trehalose and 10–15 % glycerol by weight. The addition of glycerol ensures stronger adhesion of the cells to the substrate.
-
4.
Place a 200-mesh grid, followed by a thin substrate on top of the sample, creating a sandwich, and freeze in liquid nitrogen. Since trehalose acts similarly to a cryopreservant, flash freezing is not necessary in this protocol.
-
5.
Place samples under vacuum and leave at 10−2–10−7 mbar overnight (at least 15 h) to allow freeze-drying to occur.
-
6.
Fracture the sample by removing the upper substrate and quickly load into the instrument for analysis. Long delays after fracturing can result in ambient hydration of the sample.
3.7 Freeze-Dry [17]
-
1.
To prepare cells for analysis, add the desired amount of cells to a petri dish containing clean and dry shards and allow growth in incubator until optimal coverage is obtained.
-
2.
Remove cells grown on the desired substrate from the incubator.
-
3.
Wash the cells three times each in three beakers of the ammonium formate solution to remove residual salts from the cell media (see Note 4 ).
-
4.
Allow the shards to dry slightly in air.
-
5.
Plunge freeze the shard in liquid propane.
-
6.
Store under liquid nitrogen until freeze-drying procedure begins.
-
7.
Place cryofixed sample into a vacuum chamber with pressures of 10−3–10−6 mbar overnight or 24 h to remove water by sublimation. This is done at room temperature; however, the water should sublime before any melting can occur.
-
8.
Transfer into ToF-SIMS for analysis.
3.8 Collecting Images
-
1.
In all sample preparation methods using cryofixation (frozen hydrate and freeze fracture), ToF-SIMS analysis must be performed using a cold stage (<150 K). This ensures that frozen samples do not warm prior to their analysis, preventing the dissipation of volatile compounds and the rearrangement or disruption of chemicals and organelles in the cells. A cold stage also helps to minimize water deposition onto the sample.
-
2.
In order to ensure that an unaltered surface is being analyzed, it is important to operate the SIMS experiment under the static limit (1 × 10¹³ ions/cm2). The factors contributing to the ion dose are spot size, primary ion current, and pixel size. Each will be discussed below.
-
(a)
Spot size is the diameter of the primary ion beam at its focal point and is what limits the spatial resolution in SIMS analysis. It can be changed through adjusting the beam alignment, but it is important to note that smaller spot sizes generally result in lower primary ion currents.
-
(b)
A high primary ion current allows for more rapid image collection, as the static limit is reached more quickly. However, in order for a high primary ion current to be possible, a larger spot size is created, thus decreasing the spatial resolution.
-
(c)
The pixel size can be determined by dividing the field of view by the amount of pixels in the acquired image. A smaller number of pixels results in fast acquisition times, but limits the spatial resolution.
-
(a)
-
3.
Mass range is also an important factor in SIMS analysis. The mass range over which a SIMS analysis is acquired is dependent on the goals of the researcher, with a standard range beginning at 10 amu and going to 1,000 amu.
-
4.
As lateral resolution is often a problem in cellular SIMS analysis, it is helpful to match the pixel size to the spot size. After the spectrum has been obtained, it is possible to combine adjacent pixels and their mass spectra to increase signal intensity.
3.9 Data Analysis
-
1.
One of the many factors that makes SIMS so suited to single-cell analysis is its ability to create a chemical map of compounds of interest, thus showing the distributions of specific chemicals. It is possible to produce an image of a specific component by selecting the mass of interest and plotting its intensity against the spatial position. The intensity is, generally, shown using a false-color scale.
-
2.
The success of sample preparation methods in maintaining the integrity of the cells can be verified using the localization of certain compounds and their fragments known to exist within a cell. Compounds including phosphocholine head group (PC, m/z 184), cholesterol (m/z 369), and sphingomyelin (SM) should only be found in the cellular region. The distribution of sodium and potassium ions also provides a good indication of the integrity of the cell. Sodium should only be found outside of the area of the cell, while potassium should be found in the cell regions [18]. If co-localization of sodium and potassium is seen, this is evidence for a ruptured cell membrane that may have resulted from inadequate sample preparation.
-
3.
Adequate signal intensity is crucial for creating usable chemical maps. Signal intensity depends on a number of factors including the concentration of compound on the sample surface, the topography of the sample, the matrix surrounding the sample, and the stability of the primary ion beam. For these reasons, quantitative analysis is difficult.
4 Notes
-
1.
It is crucial to work with only clean shards, as any contaminants can compromise SIMS results.
-
2.
Handle shards with acetone-rinsed tweezers to minimize any contamination risk.
-
3.
Poly-l-lysine improves the adherence of cells to the substrate surface with cells that do not normally adhere to solid surfaces.
-
4.
The residual salts from the cell culture media obscure the SIMS signal from components of interest. Washing with a hypo-osmotic solution such as water will cause cells to rupture and so an iso-osmotic wash is necessary. Washing with ammonium formate or ammonium acetate has been found to remove these interfering salts without damaging the cell. These solutions also leave very little or no interfering residue on the cells after washing [4].
-
5.
The fracture temperature is important in obtaining a good sample analysis. If the fracture temperature is too low, the ice signal will dominate the spectra, as condensation dominates and layers of ice accumulate on the surface. If the fracture temperature is too high, no ice will be present; however, chemical compounds, particularly lipids, will appear smeared, because sublimation dominates in this process.
-
6.
As the sample has already been precooled in LN2 prior to insertion in the instrument and precautions have been taken to prevent exposure to a damp atmosphere, cooling times will be reduced and sample degradation minimalized.
-
7.
Analysis has been shown to be more successful when only 30–40 % of the silicon shard is covered with cells [13].
-
8.
This sample block preparation minimizes the water deposition on the surface of the sample block after cooling, and thus on the sample. Ensure that the sample block is completely covered with LN2 to prevent collection of ice on all exposed parts.
-
9.
Having dry tweezers prior to plunge-freezing minimizes the amount of water that may deposit on the sample surface.
References
Roddy TP, Cannon DM, Meserole CA, Winograd N, Ewing AG (2002) Imaging of freeze-fractured cells with in situ fluorescence and time-of-flight secondary ion mass spectrometry. Anal Chem 74(16):4011–4019
Piehowski PD, Kurczy ME, Willingham D, Parry S, Heien ML, Winograd N, Ewing AG (2008) Freeze-etching and vapor matrix deposition for ToF-SIMS imaging of single cells. Langmuir 24(15):7906–7911
Vickerman JC (2011) Molecular imaging and depth profiling by mass spectrometry-SIMS, MALDI or DESI? Analyst 136(11):2199–2217
Berman ESF, Fortson SL, Checchi KD, Wu L, Felton JS, Wu KJJ, Kulp KS (2008) Preparation of single cells for imaging/profiling mass spectrometry. J Am Soc Mass Spectrom 19(8):1230–1236
Fletcher JS, Rabbani S, Henderson A, Lockyer NP, Vickerman JC (2011) Three-dimensional mass spectral imaging of HeLa-M cells: sample preparation, data interpretation and visualisation. Rapid Commun Mass Spectrom 25(7):925–932
Malm J, Giannaras D, Riehle MO, Gadegaard N, Sjovall P (2009) Fixation and drying protocols for the preparation of cell samples for time-of-flight secondary Ion mass spectrometry analysis. Anal Chem 81(17):7197–7205
Rabbani S, Fletcher JS, Lockyer NP, Vickerman JC (2011) Exploring subcellular imaging on the buncher-ToF J105 3D chemical imager. Surf Interface Anal 43(1–2):380–384
Parry S, Winograd N (2005) High-resolution TOF-SIMS imaging of eukaryotic cells preserved in a trehalose matrix. Anal Chem 77(24):7950–7957
Hoppert M, Holzenburg A (1998) Electron microscopy in microbiology. BIOS Scientific Publishers, Oxford
Severs NJ, Newman TM, Shotton DM (1995) A practical introduction to rapid freezing techniques. In: Severs NJ, Shotton DM (eds) Rapid freezing, freeze fracture and deep etching. Wiley-Liss, New York, NY
Lanekoff I, Kurczy ME, Adams KL, Malm J, Karlsson R, Sjovall P, Ewing AG (2011) An in situ fracture device to image lipids in single cells using ToF-SIMS. Surf Interface Anal 43(1–2):257–260
Brison J, Benoit DSW, Muramoto S, Robinson M, Stayton PS, Castner DG (2011) ToF-SIMS imaging and depth profiling of HeLa cells treated with bromodeoxyuridine. Surf Interface Anal 43(1–2):354–357
Piwowar AM, Keskin S, Delgado MO, Shen K, Hue JJ, Lanekoff I, Ewing AG, Winograd N (2013) C60-ToF SIMS imaging of frozen hydrated HeLa cells. Surf Interface Anal 45(1):302–304
Piwowar AM, Fletcher JS, Kordys J, Lockyer NP, Winograd N, Vickerman JC (2010) Effects of cryogenic sample analysis on molecular depth profiles with TOF-secondary ion mass spectrometry. Anal Chem 82(19):8291–8299
Roddy TP, Cannon DM, Ostrowski SG, Ewing AG, Winograd N (2003) Proton transfer in time-of-flight secondary ion mass spectrometry studies of frozen-hydrated dipalmitoylphosphatidylcholine. Anal Chem 75(16):4087–4094
Braun RM, Blenkinsopp P, Mullock SJ, Corlett C, Willey KF, Vickerman JC, Winograd N (1998) Performance characteristics of a chemical imaging time-of-flight mass spectrometer. Rapid Commun Mass Spectrom 12(18):1246–1252
Fletcher JS, Lockyer NP, Vaidyanathan S, Vickerman JC (2007) TOF-SIMS 3D biomolecular imaging of Xenopus laevis oocytes using buckminsterfullerene (C-60) primary ions. Anal Chem 79(6):2199–2206
Stryer L (1981) Biochemistry, 2nd edn. W. H. Freeman and Company, San Francisco, CA
Acknowledgments
This project was supported by grants from the National Center for Research Resources (5P41RR031461) and the National Institute of General Medical Sciences (8 P41 GM103391) from the National Institutes of Health. In addition, infrastructure support from the National Science Foundation under grant number CHE-0908226 and by the Division of Chemical Sciences at the Department of Energy grant number DE-FG02-06ER15803 is acknowledged.
Author information
Authors and Affiliations
Corresponding author
Editor information
Editors and Affiliations
Rights and permissions
Copyright information
© 2015 Springer Science+Business Media New York
About this protocol
Cite this protocol
Winograd, N., Bloom, A. (2015). Sample Preparation for 3D SIMS Chemical Imaging of Cells. In: He, L. (eds) Mass Spectrometry Imaging of Small Molecules. Methods in Molecular Biology, vol 1203. Humana Press, New York, NY. https://doi.org/10.1007/978-1-4939-1357-2_2
Download citation
DOI: https://doi.org/10.1007/978-1-4939-1357-2_2
Published:
Publisher Name: Humana Press, New York, NY
Print ISBN: 978-1-4939-1356-5
Online ISBN: 978-1-4939-1357-2
eBook Packages: Springer Protocols