
Abstract
Can secondary rhinoplasty be taught? Three inescapable facts say no: (1) the highly variable normal nasal anatomy is often destroyed by the earlier surgery and distorted by scar contracture, (2) operative plans must be changed radically when intraoperative findings dif-fer markedly from preoperative expectations, and (3) the diversity of cases makes learning surgical cause and effect difficult. Ultimately, secondary rhinoplasty must be based on the fundamental principles of primary rhinoplasty. One simply cannot provide a formula for dealing with the complexities of secondary rhinoplasty. Just as there is a progression from medical school through residency to fellowship, most surgeons should progress from primary rhinoplasty through their own revisions to secondary rhinoplasty over a 3–5-year period. Note: a secondary rhinoplasty is defined as a case where the primary rhinoplasty was per-formed by another surgeon; a revision is when you reoperate on your own primary case.
Introduction
Can secondary rhinoplasty be taught? Three inescapable facts say no: (1) the highly variable normal nasal anatomy is often destroyed by the earlier surgery and distorted by scar contracture, (2) operative plans must be changed radically when intraoperative findings dif-fer markedly from preoperative expectations, and (3) the diversity of cases makes learning surgical cause and effect difficult. Ultimately, secondary rhinoplasty must be based on the fundamental principles of primary rhinoplasty. One simply cannot provide a formula for dealing with the complexities of secondary rhinoplasty. Just as there is a progression from medical school through residency to fellowship, most surgeons should progress from primary rhinoplasty through their own revisions to secondary rhinoplasty over a 3–5-year period. Note: a secondary rhinoplasty is defined as a case where the primary rhinoplasty was per-formed by another surgeon; a revision is when you reoperate on your own primary case.
In this chapter, I have emphasized how secondary rhinoplasty differs from primary cases and the advanced surgical techniques that are required. In Chapter 11, I have reviewed the decision-making process and how one selects the appropriate technique. I cannot overemphasize it enough — there are no Level 1 or 2 secondary cases. One must be a competent rhinoplasty surgeon with significant experience in primary cases before taking on secondary cases. The surgeon must be comfortable harvesting and using rib grafts as many patients will not have sufficient septal cartilage available and concha is not structurally adequate. As detailed in Chapter 12, aesthetic reconstructive rhinoplasty has emerged as a separate entity. These latter cases are extraordinarily complex and require even greater surgical skills than secondary rhinoplasty.
Overview
What makes secondary rhinoplasty so hard? While writing this book, I tried to devise a pre-operative “score sheet” for determining the degree of difficulty for secondary cases. Certain factors were obvious — number of prior operations, number of different surgeons, availability of septum, skin thickness, etc. I was becoming convinced that a female patient with an ear-lier single closed rhinoplasty with a palpable septum would be an easy secondary case. Of course, I then operated on such a patient only to discover that her entire alar cartilages had been excised from the footplates upward thus forcing a total tip reconstruction. The critical issue is that you have no idea of what was done or is available in a secondary case until you open them up. Thus, all secondary rhinoplasties are complex and you must be prepared for any eventuality (Fig. 10.1).

Range of secondary cases, (a) completing the primary, (b) eliminating the negatives, (c) surgical to natural look, (d) aesthetic reconstructive rhinoplasty
Completing the Primary. From the surgeon’s perspective, these are the easiest of secondaries. The patient often complains that the tip does not have enough definition, the bridge looks pinched, the nostrils are too big, and they do not breathe well. If the primary was done closed, then one usually has symmetrical rim strips to work with and a tip suture technique can be done via the open approach. A columellar strut and spreader grafts are often necessary.
Eliminating the Negatives. Many of these patients have a higher degree of nasal complex-ity and have frequently had a revision by the original surgeon. It is important for the new surgeon to take a “fresh look” while the patient must be able to articulate what they want changed. Most of my patients feel that their nose is still too big and not sufficiently feminine. Often they consider the nose to be a smaller version of the original and not a significant improvement. Technically, one has to be prepared for virtually any problem.
Converting from Operative Look to Natural Nose. Often, these patients feel that their nose looks “done” due to an over-resected bridge, an upwardly rotated tip, retracted nostril, or a tip bossa. The challenge is to create a solid foundation for the nose and improve respiration. Numerous grafts ranging from septal to fascia to concha to composite and even unanticipated rib grafts will be required. Tip surgery can range from tip suture to tip reconstruction, one simply does not know until the nose is opened. All of these cases are done open as one has the option of utilizing the various cartilage remnants and direct observation permits a wide range of techniques. Unfortunately, skin coverage is often a consideration and fascial grafts are used liberally in thin-skin patients. One must be comfortable with dorsal augmentation and the various types of diced cartilage grafts. Nostril retraction or vestibular valve scarring can be so severe that composite conchal grafts have to be utilized. There are no short cuts in managing these cases.
Aesthetic Reconstructive Rhinoplasty. By definition, these are the most difficult of secondar-ies and require numerous grafts often including rib grafts. The goal is to achieve a natural attractive nose without any indication of prior surgery. One is doing an “aesthetic reconstruc-tive rhinoplasty” to salvage the nose. These cases will be discussed in depth in Chapter 12.
Case Study:Secondary Rhinoplasty
Analysis
A 22-year-old girl had a rhinoplasty 2 years earlier and hated the result (Fig 10.2). She especially disliked her minimally improved wide bulbous tip and pinched bridge. She had had multiple consultations on the “nose circuit” and been told that she needed a major rib reconstruction. Yet, her goal was still the same small cute nose that had led her to have a rhinoplasty in the first place. I advised her that the donor site progression would be septum to concha to rib. Fortunately, septum proved sufficient and her nose was made more refined and the tip smaller. Her final result is more the “naturally cute nose” that primary patients seek and not a “reconstructed nose” that complex secondary cases often have to accept.


(a–l)
Operative Technique
-
1)
Harvest of temporal fascia. Transfixion incision with confirmation of intact septum.
-
2)
Open exposure revealed alar rim strips following prior transcartilaginous excision.
-
3)
Cartilaginous dorsum lowered 1.5 mm. Bony dorsum smoothed with a rasp.
-
4)
Septoplasty — harvest of the septal body. Caudal septum relocation R to L.
-
5)
Insertion of bilateral spreader grafts.
-
6)
Alar transposition.
-
7)
Insertion of columellar strut plus tip suturing: CS, DC, ID, DE, TP. Add-on graft of excised alar cartilage.
-
8)
Lateral crural strut grafts sutured to lateral crura.
-
9)
Insertion of “fascial blanket” over the dorsum and tip.
-
10)
Lateral crural strut grafts placed into the alar bases (T2), not on nostril margin (T3).
Consultation
Why do patients seek secondary rhinoplasty? I believe they do so for three reasons: (1) there is an obvious visible and/or functional problem; (2) the result is poor because a good operation was done on the wrong anatomy; or (3) it is not what the patient wanted or had in mind. The result is a patient who is disappointed or unhappy, but rarely litigious. In general, the first part of the consultation for a secondary rhinoplasty patient is quite similar to that of a primary case. I hand the patient a mirror and ask them to show me what three things they do not like about their nose. Often, the patient will want to give me an operation-by-operation account of how the nose got that way complete with sequential photographs and op reports. I explain that I will want to look at that information later, but first “tell me what you don’t like about your nose and, more importantly, what do you want.” I am trying to get the patient to commit to a specific set of aesthetic objectives. Then I examine the nose thoroughly and decide whether the tissues and my expertise will allow me to achieve their goal. I do not impose my aesthetic objectives nor hide behind tissue limitations. Either, I can achieve what the patient wants, or it is not worth doing the surgery. Concurrently, I am evaluating the patient’s personality and psychological stability. Eventually, I ask myself two critical questions: Is this patient a good surgical candidate psychologically and would I have done this patient’s primary rhinoplasty? If the answer to either question is no, then I will not operate on the patient under any condition. I continue to turn down 25% of secondary patients for psychological reasons. The two most common factors are patient instability and obsessiveness. Many patients, males in particular, become fixated on their noses and pursue every small imperfection.
Without question, the best method of measuring the patient’s concern for their defor-mity is Gorney’s diagram (Fig. 10.3). I frequently sketch this diagram in the patient’s chart. If I decide not to operate on the patient, then I tell them that the risk/reward ratio is not in their favor and explain why in technical details. If the patient continues to push, then I will show the patient my diagram of deformity versus concern. If the patient still pushes, then I conclude by saying “I simply do not have the skills to solve your problem.” That usually works. On a more cheerful note, secondary rhinoplasty is often easier than primary because the patient is more realistic and more willing to accept improvement rather than perfection.

The Gorney Diagram. Plotting the patient’s objective concern about the defor-mity against the surgeon’s objective assess-ment of the deformity. The worst candidate has minimal deformity but maximum concern (upper left corner), while the best candidate has major deformity with little concern (lower right corner). Anyone who falls above the line should be reevaluated at a second consultation
Operative Planning
For the experienced surgeon, analysis is probably more important in secondary cases for three reasons: (1) the range of variables is not within “normal” limits but rather includes the abnormal, (2) deficiencies are juxtaposed to excesses with few ideals, and (3) one often has to create a desired look rather than eliminate the excesses. One uses the same sequence learned in primary rhinoplasty: (1) detail history followed by external and internal nasal exam, (2) regional exam including radix, dorsum, tip, base, and skin, (3) repeat internal exam of septum, turbinates, and four valves following decongestants, (4) initial operative plan, (5) photographic analysis, and (6) complete reassessment at the pre-op visit.
Initial Examination. For major secondaries, the key questions are what is wrong with this nose, why does it look “done,” and what do I need to do to make it look more natural. One is constantly asking which surgical maneuvers will be necessary and how to reconcile the operative plan with the available tissues. Functional assessment is critical as you inherit these limitations once you operate. Distinguishing between true anatomical obstruction and mucosal disease is important. Also, one must be constantly determining the risk/reward ratio both for the patient and for your self.
Examination and Analysis. The skin envelope is a much more limiting factor in secondary cases than in primary cases. The surgeon must evaluate its thickness, size, compliance, com-position, and prior surgical compromise including scars, furrows, and steroidal changes. The three critical dorsal factors are height, straightness, and integration. From the lateral view, dorsal height and inclination relative to the tip and radix influence the nasal appearance. Surprisingly, the most common problem is excess height of the cartilaginous vault which is relatively easy to correct. From the anterior view, dorsal deviation is obvious to the patient and is usually due to persistent septal deviation. Osteotomies are often necessary to correct asymmetries and narrow the nose. As regards the tip, one has to add distortion, deformity, and deficiency to the usual concerns of definition, width, and projection. Essentially, one evaluates the available structures and the need for grafts, and tries to determine what can be achieved. Patients rarely make specific complaints about the base, although they are quick to note columellar crookedness, nostril asymmetry, and excess alar width. Often, one can classify these problems as to preexisting anatomical asymmetry, errors of omission (excess alar width, caudal septal deviation), or errors of commission (retracted columella, notched alar rims). On anterior view, it is often the combination of the “seagull-in-flight” and interalar width which denotes problems. Overall examination of the base requires assessment in static and dynamic poses as well as palpation.
Photographic Analysis
Many surgeons are reluctant to do photographic analysis as they feel it diminishes their artis-tic reputation — what nonsense. The following summary will be sufficient for most readers with more in depth elsewhere (Daniel, 1993). The three steps are: (1) analyze the deformity, (2) superimpose the ideal, and (3) evaluate alternative operative plans before finally selecting the optimal one to fit the individual patient. How is it done? Usually, I use a simplified set of angles and lines drawn on a lateral view.
Reference Points. The three key components are: three points (nasion, tip, subnasle), three angles (nasofacial, tip, columella inclination), and three lengths (radix height, dorsum, tip projection). Mark the following points: nasion (N), tip (T), subnasale (SN) and alar crease (AC). Draw the following reference lines: (1) Frankfort horizontal, and (2) a vertical line through the alar crease. Draw and measure the following angles: nasofacial, tip, and columella inclination. Measure the following lengths: radix projection (C-N), dorsal length (N-T), and tip projection (AC-T). Once the references are drawn then the ideal is superimposed.
Superimpose the Ideal. Every artist from Leonardo to Wyeth has used grids and canons to define facial relationships. Nasal length is related to midfacial height. A red pencil is used to draw the ideal which in turn defines the patient’s deformity. The nasion (N) is the deep-est point in the nasofrontal angle. Its level is between eyelashes and alar crease, while its height is 0.28 × midfacial height (MFH). Alternatively, N should be 4–6 mm posterior to the glabellar. The tip (T) is the most projecting point on the lobule as seen on lateral view. The subnasale (SN) is the deepest point in the columella labial angle uniting the columella and the upper lip. The nasofacial angle (NFA) is the intersection between a vertical reference line through the nasion and a straight line drawn from the nasion to the tip (N-T measures dorsal length) with the ideal being 34° for females and 36° for males. The tip angle (TA) is the intersection between a vertical reference line through the alar crease and a straight line from alar crease to tip (AC-T measures tip projection) with the ideal 105° for females and 100° for males. The columella inclination (CIA) is measured between the vertical reference line through the alar crease and a line tangent to the columella with identical ideal values to the tip angle. This inclination has replaced the classic columella labial angle and nasolabial angle in importance. The dorsal length (N-T) is measured from nasion to tip transecting any intervening hump with the ideal being N-Ti = 0.67 × MFH. The tip projection (AC-T) is measured from a vertical reference line through the alar crease to the tip with the ideal being AC-Ti = 0.67 N-Ti. The nasion height (C-N) is measured from a vertical reference line tangent to the cornea out to the ideal being C-Ni = 0.28 × N-Ti, (see Table 2.3, p50).
Operative Alternatives. In most cases, the discrepancy between actual and ideal is quite obvious. However, surgical reality may require acceptance of more limited changes and that is where alternative surgical solutions are best utilized. For example, a major radix augmentation may not be acceptable to the patient and one must determine the impact it will have on planning both dorsal reduction and tip projection. Equally, an obtuse columella labial angle may be soft tissue in origin precluding caudal septal resection. It is this opportunity to evaluate different operative treatments that is of great value.
Operative Planning
Obviously, Operative Plan #1 is made by integrating the patient’s desires and the surgeon’s opinion (Fig. 10.4). Once the examination is completed, one should have a good idea as to the goals, the requisite approach, the necessary changes to each of the four areas, the available graft material, and the functional factors. Photographs, as well as surface measurements, are taken. Then the in-depth study is done working through the progression of actual to ideal to realistic changes finally reaching Operative Plan #2. At the next office visit, I examine the patient asking myself these questions — what is wrong with the nose, what needs to be corrected, and what is possible? I am essentially setting an overall goal (Operative Plan #3) before going through the final step-by-step planning. I ask the patient for input and review any photographs that the patient may have brought. Then, I do yet another internal exam to confirm the functional requirements and check it against the initial evaluation. Each region of the nose is assessed again and one arrives at Operative Plan #4 which will be taken to the operating room. One must consider this as only a plan — one that can change dramatically depending on the actual tissues available. In secondary rhinoplasty, the conversion from “operative plan” to “operation” is often a painful lesson in surgical reality.

(a–c) Secondary analysis 
Skin Envelope
The skin envelope is a major factor in secondary rhinoplasty and determines not only the dissection plane, but often the type of tip surgery.
Thick Skin. The thick-skin envelope has always been considered a major limiting factor for achieving both tip definition and the desired profile line. One must distinguish three char-acteristics for the skin sleeve: thickness, size, and compliance. The fundamental concept is that, rather than fearing skin contracture, one uses it to reveal the strong structured tip and dorsum which are created during a secondary surgery.
When the supratip area is heavily scarred, I tend to dissect in the subcutaneous subdermal plane rather than in intimate contact with the alar cartilages (Fig. 10.5). The advantage is that it allows me to excise or sculpt the supratip scar while setting the correct thickness of the skin envelope. In most cases, one can resect the soft tissue on top of the alar cartilage without resorting to debulking the undersurface of the skin envelope — a maneuver that risks thinning, distortion, and even slough of the tip skin. In severe cases with minimal alar rem-nants, the supratip scar is sculpted and a tip graft is sutured directly to the scar tissue. In most cases, the nasal skin is widely undermined over the cartilaginous vault which allows the skin to redrape laterally, avoiding the bunched supratip which occurs with a closed approach. One can even undermine onto the anterior surface of each maxilla for extremely wide undermin-ing. In severe cases, I will insert a 7Fr drain under the skin envelope to evacuate blood and to suction the skin down to the underlying aesthetic structures for 3–5 days.

(a–d) Thick skin: (a, b) defatting and (c, d) redraping
Thin Skin. Although thick skin receives greater discussion, it is really scarred thin skin that strikes fear in the heart of the secondary rhinoplasty surgeon. The reason is quite simple: every imperfection shows, nothing is hidden. The basic progression is plane of dissection followed by padding. In thin-skin patients, it is critical to dissect in intimate contact with the underlying cartilage (Fig. 10.6). One should see white glistening cartilage if possible. The dissection must be done slowly and meticulously to avoid any skin perforation. I do not hesitate to inject repeatedly with local anesthesia to foster hydrodissection. If a significant skin perforation occurs, close it carefully with skin sutures to get the best possible repair. Do not pretend that it did not happen and allow it to heal secondarily with a terrible scar.

(a–d) Thin skin: Fascial graft coverage
Frequently, one will want additional soft tissue padding and deep temporal fascia is the material of choice, in either single or double layer. For the dorsum, the fascia is folded, sutured along its free edge, and placed underneath the dorsal skin using percutaneous sutures in the radix and direct suturing caudally. When the tip is extremely thin, then a “fascial blanket” is placed beneath the dorsum and over the entire tip lobule. In certain very scarred tips, a dermis graft is sutured over the tip or in areas where a previous skin slough has occurred.
Open Approach and Septal Exposure
For the vast majority of complex secondaries, an open approach is the only reasonable method. (Table 10.1). If a prior open approach was done, then the preexisting transcolumellar incision is used, otherwise the inverted-V at the midcolumellar point is preferred. Reopen-ing a prior open rhinoplasty is not a major concern (Daniel, 1995). A bigger problem is skin damage from either steroid injections or too superficial a dissection. The standard infracar-tilaginous incision is used irrespective of prior incisions. The nasal lobule is injected heavily with local anesthesia to facilitate dissection. The skin is elevated from the incision upward using three point traction with extreme care over the domal points. Careful dissection in intimate contact over the lateral crura is done except in thick-skin patients. The dissection continues up over the dorsum with liberal addition of local anesthesia as necessary.
The septum is exposed through a complete unilateral transfixion incision, with addition of the opposite transfixion as necessary. In most cases, the caudal septum can be exposed “cleanly” and then continue into the dorsum under direct vision. The classic “top down” dis-section from the dorsum can be extremely difficult in secondary cases due to scarring from the prior dorsal resection. Using the available “bidirectional approach,” the entire septum is exposed. One then determines where and how severely deviated is the septum, how much septum remains for graft material, and how much can the dorsum be safely reduced.
Septal Considerations
-
1)
During injection of local anesthesia, one can assess the resistance and probe for prior septal resections. An endoscope can be of value to document prior septal perforations.
-
2)
It is important to assess the status of the septum prior to dorsal reduction. If the previous surgeon left a 7–8 mm L-shape strut and one is planning to reduce the cartilaginous vault by 3–4 mm, then the risk of septal collapse is very real.
-
3)
The dissection plane may change dramatically as one goes from easy elevation caudally into scarred areas, especially if prior morselization was done. Equally, one can encounter areas of septal overlap with fused layers of perichondrium.
-
4)
In areas of prior resection, one must separate the two mucosal leaflets without tearing them apart. On occasion, there will be a scar layer or even a pseudocartilaginous regrowth of the septum.
-
5)
Harvesting cartilage after prior resections is most often successful in the lower vomerine area as well as superiorly under the dorsal strut near the perpendicular plate (Fig. 10.7).
Fig. 10.7 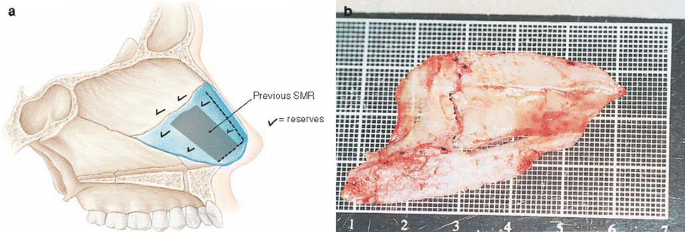
(a, b) Secondary septal harvest when prior SMR was done

-
6)
Obviously, one must be able to correct every primary septal deformity which was not treated previously. Also, one may encounter complete disruptions in both the caudal and dorsal portions of the L-shape strut, but often without the advantage of usable septal grafts. Ultimately, the surgeon must be able to fashion both a columella strut and a dorsal graft from either conchal or rib cartilage!

Tip Analysis
Secondary tip surgery ranges widely from simple to complex. In about 15% of cases, the intrinsic tip was considered ideal and changes were mere enhancement. Once these cases are eliminated, secondary tip surgery becomes extremely difficult.
Analysis. In contrast to primary cases which begin with the shape of the alar cartilage, most difficult secondary cases start from the base upward and the skin downward before finishing with the alar cartilages. A good example is a dependent tip following previous surgery. The problem is a combination of prior caudal septal resection, division of the domal segment, and a thick-skin envelope. The solution is often a major columella strut to support the alar cartilages, a rigid tip graft to show through the thick skin, and a columellar sutures for rotation. The alar cartilages and “intrinsic tip” are relegated to a supporting roll. Once the nose is opened, the critical step is to reconcile the operative plan with the exposed anatomical realities. Major changes in the operative plan are often necessary.
Resection/Repositioning. The classic resection technique is essentially a “volume reduction” by excising either alar cartilage or scar tissue to setoff the intrinsic tip. The line is drawn on the tip, transferred with the mucosal marker, and then resected via an intracartilaginous inci-sion. An interesting variation is done via the open approach where one resects the redundant tissue and may even shape the underlying “scar ball” into a defined tip.
Tip Sutures. The ability to suture the alar remnants (45%) plus the use of add-on grafts (25%) means that 70% of the secondary tips can be done with essentially a primary rhinoplasty technique (Fig. 10.8a). Obviously, the ability to suture implies that a volume reduction or other excisional method was used primarily. Divided domes can be repaired and shaped with sutures, Domal “knuckles” or bossa are excised and sutured in a “gothic arch” formation. Then a shield shape or transverse add-on graft is added which has two benefits: conceals the repaired division of the crura while creating a distinct tip.


Secondary tip surgery (a) secondary tip: add-on grafts (b) secondary tip: structured tip graft (c) secondary tip: isolated tip graft
Structural Tip Grafts. Structural tip grafts are extraordinarily variable in composition (septum, concha, or rib), edge shape (round, sharp), and position (projected, integrated) (Fig. 10.8b). The indications ranged from wanting additional definition beneath a thick-skin envelope to concealment of deformed domes.
Total Tip Replacement. In certain cases, the domes have been excised and one has to do a total tip replacements usually consisting of an isolated tip grafts with alar support grafts (Fig. 10.8c). In contrast to primary surgery where the difficulty is executing a specific tech-nique, the surgeon is now forced into a corner by the remaining anatomy. Choices are di-minished, alternatives are few, but the goal remains the same — an attractive unoperated tip appearance.
Dorsal Modification
When planning secondary surgery of the dorsum, one must add straightening, smoothing, and camouflage of the dorsum, to the primary choices of reduction, augmentation, or balance. Frequently, analysis is more complex in secondary cases as none of the cardinal landmarks is ideal and setting each one creates interrelated challenges. Equally, the skin envelope over the dorsum becomes a critical issue, usually revealing thinness over the rhinion or a non-compliant thickness in the supratip area. Further complicating the issue is the number of previous osteotomies with their variable locations and effectiveness. In addition, the prior use of both autogenous grafts and allografts can produce some very difficult intraoperative surprises. The lack of adequate septal material can cause a major problem in dorsal grafting. Fortunately, most cases require dorsal refinement and appropriate osteotomies with dorsal grafting an infrequent necessity.
Secondary Osseocartilaginous Vault Surgery. Based on a review of 100 secondary rhino-plasties, there have been significant changes in the last 8 years (Table 10.2). Excluded from this group are the aesthetic reconstructive rhinoplasties which require rib grafts as well as ethnic noses. The radix area was grafted in 6% of the cases, either as a pure fascia graft or a ball-and-apron fascial graft. The overall approach to the dorsum was reduction (75%), augmentation (21%), and minimal changes (4%). Reduction was divided equally between cartilage-only and combined bone and cartilage. Osteotomies consisted of low-to-high (42%), low-to-low (21%), asymmetric (12%), microoseotomies (6%), double level (3%), and none (16%). Spreader grafts were used quite frequently with bilateral (45%), unilateral (39%), and none (16%). Augmentation was either DC−F or DC+F. Importantly, the choice of augmentation indicated that neither lateral osteotomies nor spreader grafts would be required. Perhaps the most startling change has been the use of fascia. Fascia was used in 81% of the cases in the following ways: dorsal fascia dorsal graft (36%), DC+F (15%), DC−F (6%), and a fascial blanket (24%) interposed between nasal structure and overying skin.
Dorsal Refinement. Many secondary dorsums are a triad of reduction, correction of asym-metries, and spreader grafts (Fig. 10.9). Generalized reduction was done with a rasp for the bony vault and a #11 blade for cartilage vault. The majority of these reductions were in the 1–3 mm range with emphasis on smoothing irregularities. An interesting observation is that a “cartilaginous dorsum only” reduction was done in 42% of the reduction cases. This find-ing indicates that the bony reduction was done correctly at the initial operation. The critical finding was the use of fascia to pad a thin-skin envelope in 65% of cases. Dorsal fascial grafts could be a isolated dorsal graft or extended over the tip as a “fascial blanket” or combined with a radix graft as a “ball-and-apron graft.” When the dorsum was not touched, it obvi-ously indicated that the original surgeon had achieved the ideal dorsal line and the goal was to modify the tip and correct nostril deformities.

(a–d) Dorsal modification
Secondary Septoplasty and Vestibular Valve
Secondary septal surgery is more difficult than primary surgery for three reasons: (1) the structures are often distorted and scarred from previous manipulation, (2) prior resections may have weakened the critical L-shape strut, and (3) the maximum amount of graft material is needed. The actual indications for septal surgery are somewhat constant: correction of anatomical obstruction and/or harvest of graft material, but with the additional possibility of prior surgical failure and distortion. I did septal surgery in 85% of the secondary cases with 33% of these done solely for harvesting graft material and 67% for the functional rea-sons with concomitant harvest of graft material. Of tremendous importance, 75% of these secondary cases had a prior septoplasty including some resection! Elevation of the mucosal flaps ranged from simple to nightmarish. In addition, 18% or almost one out of five required a total septoplasty to correct the septal deformity. Any thought that one can do secondary rhinoplasty without managing difficult septums is completely naive. As always, one must be prepared to deal with all types of septal deformities including the caudal septum, dorsal deviations, and total septoplasty. Obviously, the prior errors of commission (excessive exci-sion, destabilizing incisions, weakening morselizations) cannot be overestimated. Long-term structural support must be restored.
Caudal Septum. Frequently, the caudal septum will have to be replaced or reinforced due to prior incisions or excisions (Fig. 10.10a). Whenever possible, the replacement graft is sutured into position prior to excising the deformed caudal septum. This allows an accurate replace-ment without loss of support.

(a) Caudal septal replacement (b) dorsal septal deviation (c) vestibular valve scarring and collapses
Dorsal Septal Deviation. As always, one straightens the septum first and then uses asym-metric spreader grafts as required (Fig. 10.10b). Rarely, one will need to support the dorsum with a unilateral spreader graft, then divide the dorsal portion of the L-shape strut, and splint it again with a spreader graft on the other side.
Vestibular Valve. These problems are often subdivided into attic and lateral vestibular col-lapse with careful assessment of mucosal and structural loss (Fig. 10.10c). Vestibular attic webs are classified as thin, which can be treated with Z-plasties or thick, which require composite grafts. In the lateral vestibule, one must answer three questions: (1) Is the lining deficient thereby requiring a composite graft? (2) Does the lateral crura accessory cartilage junction protrude into the airway, thereby necessitating resection?, and (3) How thin and structurally weak is the lateral vestibule? Most often, it comes down to a simple question: Do I have to replace lining with a composite graft or is a conchal cartilage graft sufficient for support?
Osteotomies and Spreader Grafts
Osteotomies. I find that the majority of secondary cases require osteotomies despite the fact that they were done during the primary rhinoplasty. The need for osteotomies is due to the following: (1) excessive bony width, (2) asymmetries, and (3) bony deformities. Although the usual problem is a wide asymmetric bony vault, standard paired low-to-high or low-to-low osteotomies will usually solve most problems. It is tempting to speculate that the primary osteotomies failed due to a lack of adequate mobilization. When an exceptionally wide dorsum is encountered, then medial oblique, transverse, and low-to-low osteotomies are used (Fig. 10.11a). Small bony asymmetries localized to the keystone area are treated with microosteotomies (Fig. 10.11b). Convex lateral walls can be converted to straight by using double-level osteotomies.


(a) Medial oblique osteotomies, (b) microosteotomies (c, d) correcting collapsed lateral bony wall, (e–h) spreader grafts in secondary cases
One of the major challenges in secondary cases is the nose with a pinched bony vault. To solve this problem, I have devised a new operation in which the nasal bone is totally mobilized and then stabilized in its normal location (Fig. d). Usually, a combination of medial oblique and low-to-low osteotomies is done. Then using a Boyes elevator the lateral wall is mobilized outward which both moves the wall laterally and converts a vertical wall to an angled wall. Then extra-long spreader grafts are placed as high as possible to stabilize the bone in an outward position. Doyle splints, with the flat superior portion cut off, are sutured high in the airway. The splints force the lateral wall out and are removed at 2 weeks.
Spreader Grafts. I find that less than 5% of secondaries had prior spreader grafts (Fig. h). This omission results in an internal valve that is collapsed and a midvault which is either pinched or asymmetric. In secondary cases, it is essential first to complete the dorsal modification followed by a septoplasty and septal harvest whenever the latter is possible. Also, all osteotomies and mobilization of the lateral walls must be completed prior to graft insertion. Asymmetric spreader grafts are used in almost all secondaries. Rigid septal grafts are only essential when dorsal deviations must be excised and repaired. If graft material is scarce, concha material makes excellent spreader grafts. In primary cases, spreader grafts are directed at opening the internal valve and avoiding a pinched midvault. In secondary cases, spreaders tend to be longer, wider, and inserted higher within the bony vault. These grafts must overcome the deformity and contracture which has occurred following the primary rhinoplasty. In a high percentage of cases, one is actually supporting and aligning the lateral bony wall with these grafts. If the failure to use spreader grafts results in such an obvious form and function liability why do surgeons continue not to use them in primary cases? My conclusion is that most surgeons want to avoid any additional step they can and rationalize that spreader grafts are really not necessary — what a false assumption.
Tip Surgery
Tip surgery can vary enormously in secondary cases from literally nothing to total reconstruction. However, the biggest surprise of the last decade has been that 75% of the tips can be sutured with or without add-on grafts. This approach has replaced solid or mul-tilayer tip grafts as the technique of choice. Thus, secondary tip surgery is now closer to the primary operation. Tip surgery will be discussed in the order of tip techniques actually used in 100 secondary rhinoplasties (Table 10.3). It is important to note that this series does not include aesthetic reconstructive rhinoplasty cases which often have the most complex tips and require a higher percentage of open structure tip grafts and total tip reconstructions.
Columellar Strut
Columellar struts are an essential part of all secondary tip surgery — there are no exceptions (Fig 10.12a). The alar cartilages are often highly scarred or distorted and often need to be reinforced. Alternatively, they may be persistently over-projected requiring direct excision, but with a strut insertion prior to destabilization. Whenever possible, septal cartilage is the donor material of choice with optional inclusion of ethmoid bone. Rigidity and structural support is essential. The second decision is the dimension of the graft, both length and shape. Structured columellar struts are more frequently required with the struts being longer and often wider near the base to push down the columellar labial angle. Insertion is comparable to primary cases, but excessive length must be avoided to prevent rocking across the ante-rior nasal spine (ANS). For short columellars, double-suture fixation above and below the columellar breakpoint is a consideration. Once tip surgery is completed, columellar shaping sutures using clear 4–0 polydioxanone suture (PDS) are often inserted to narrow the colu-mellar and rotate it more cephalically.


(a) Columellar struts, (b) Release of scar tissue contracture in the tip
Preparation of the Alar Cartilages
In contrast to primary cases with their pristine crura, the alar cartilages in secondary cases are frequently distorted, incised, excised, and encased in scar tissue. Instead of the simple step of creating symmetrical rim strips, preparation of the alars for suturing is much more complex and requires numerous decisions.
Release of Scar Tissue
Significant scar tissue always occurs in secondary tips in the dead space (Fig 10.12b) between the remaining alar rim strips and the caudal end of the upper lateral cartilages. Scar contrac-ture is also present in the supratip area and extending downward between the domes and the anterior septal angle. This scar tissue is released using sharp scissors and downward traction on the alars. Next, the middle crura are separated. This amount of release is typical following a closed primary procedure. What if the primary procedure was an open tip suture? I have seen virtually every combination of sutures. Release of midline narrowing sutures is done by dividing the columellar sutures and releasing any interdomal and lateral crural spanning sutures. Domal creation sutures are removed, but only with limited effectiveness.
Incisions, Divisions, and Bossa
Incisions of lateral crura and domes to weaken their convexity remain an integral part of closed rhinoplasty despite their inevitable tendency to form bossa and distortions. The weaken lateral crura will often require an underlying lateral crural strut to stabilize and reshape them. For some reason, domal division remains popular for narrowing the wide tip among endonasal surgeons despite its ineffectiveness, especially under thick or thin skin. Fortunately, these divisions can be repaired after insertion of a columellar strut and the domal segments sutured. Sharp pointed bossa or prominences are usually excised and the edges sutured with 5–0 PDS. Coverage with a concealer grafts is frequently necessary to insure a smooth tip.
Tip Sutures
Suturing a secondary tip is somewhat similar to the techniques used in primary tips (Fig. c). The first step is to release the scar contracture and then analyze the remain-ing alar remnants. Symmetrical rim strips are created by appropriate excision of any excesses or asymmetries. I delay any repair of previous transections or excision of deformed segments until the columellar strut is in place. After columellar strut insertion, the domal creation sutures are done. Usually, the cartilages remain sufficiently malleable, and one can create a tight domal convexity with adjacent lateral crura concavity. An interdomal suture is inserted to narrow tip width and to equilibrate domal height. The skin is redraped and the tip evalu-ated. Frequently in secondary cases, it will be necessary to add a tip position suture to achieve the desired supratip break. The addition of lateral crural convexity sutures is essential for minimizing lateral convexities or excessive tip width.


(a) Prior tip graft with thin skin, (b) alars sutured, (c) fascia coverage
(d) Prior delivery procedure, (e) alars sutured, (f) diamond shaped add-on TRG graft
(g) Persistant over projection of tip, (h) 6 mm domal segmant excision, (i) rigid structure tip graft
Tip Sutures Plus Add-On TRG Grafts
Once tip suturing is completed, add-on TRG grafts are used liberally to increase definition and projection (Fig. f). Excised lateral crura are the material of choice. Skin thickness will dictate the number of layers while aesthetic goals will dictate graft placement. Single infralobular concealer grafts are necessary under thin skin, whereas double-layer onlay domal grafts are common under thicker skin.
Lateral Crural Deformities
Deformities of the lateral crura are very real in secondary cases. They may require either excision, sutures, or grafts with transpositions an occasional necessity. Surprisingly, decisions regarding the lateral crura are just as complex as the domes and the role of lateral crural strut grafts cannot be over emphasized.
Structured Tip Grafts
In most secondary cases, a structured tip graft is not done for subtle changes of definition or projection (Fig. i). Rather, the grafts are designed to show a distinct change in the tip and to overcome a scarred or thick-skin envelope. A strong solid shield-shape tip graft is the graft of choice. The tip graft is fixed in a higher position of projection with a cap graft behind it. The first step is to prepare the alar cartilages for the structured tip graft. A combination of excisions of fixed deformities and balancing sutures is necessary to produce the requisite domal configuration. In some cases, the configuration of the domal segment becomes irrelevant as it serves as a hidden foundation for a tip graft that will create the intrinsic tip.
Major differences exist in all aspects of the tip graft: composition, shape, and placement. In primary cases, the tip graft can always be made from septal cartilage, whereas in secondary cases conchal or rib cartilage may be necessary. The dorsal domal edge varies with the skin thickness: smooth round (thin skin), angled edges (normal), and sharp corners (thick skin). The graft is tapered to fit within the divergence of the crura. Graft placement can vary from integration to high projection depending upon the desired tip definition. As the graft rises above the alar domes, a solid “backstop” or cap graft must be added.
Total Tip
All too frequently, one encounters cases where the domal segment has been excised or, even worse, the entire alar cartilages excised beyond the footplates. Thus, total tip reconstruc-tion becomes a necessity. Essentially, there are three possible methods of reconstruction: isolated tip graft, lobular tip graft, and total alar replacement graft. Many of these concepts are modifications of Juri’s (1993) surgical approach to the crucified tip.
Isolated Tip Graft
In secondary cases, the domes and lateral crura may be totally absent from prior excision. Quite surprisingly, it is often not necessary to replace the lateral crura. In some cases, a crural strut is placed in between the medial crura through a midline split (Fig. 10.14a). A long rigid tapered tip graft is sutured to the stabilized columellar. After the tip is closed, then the alar rims are supported often with ARS grafts or alar battens. Obviously, this “tent pole” concept works best under thicker skin. In more unstable case, the entire lateral crura need to be replaced.


(a) Isolated tip graft
(b) Total tip graft reconstruction
Total Alar Replacement
If the patient has severe external valve collapse or alar rim retraction, then total lateral crura replacement is indicated (Fig. 10.14b). The simplest method of reconstruction is to harvest the entire conchal bowl. The cartilage is then transected diagonally on its long axis creating two reciprocal grafts. The graft is not designed to be an anatomical replacement of a lateral crura, but rather a graft that will go from the dome along the alar rim down into the substance of the alar base. The purpose is to support the alar rim and the vestibule.
Bossas and Bumps
Many secondary patients complain of small bumps on their tip ranging from slight promi-nences to sharp points. Most patients want a simple solution — the bossa shaved down. On rare occasions it can be done. Unfortunately, the more common result is swapping one deformity for another with the patient remaining disappointed — the bump is gone, but now that dome is flattened in contrast to the opposite side. A formal secondary tip rhinoplasty via an open approach is usually the right choice.
Nostrils and Alar Base
Secondary base surgery can range from simple to complex and from isolated to combined. The most common problem is the isolated alar base/nostril sill deformity which is compa-rable to that of the primary nose. Ye t it is the retracted nostril and the retracted nose that require detail analysis and precise surgical correction.
Alar Base/Nostril Sill. The isolated alar base/nostril sill problem can be similar to a primary case or quite challenging due to prior excisions. The best situation occurs when the requisite excisions were not done at the original operation, the indications remain, and routine exci-sions are done. Frequently, one encounters previous excisions done too timidly or the scars misplaced. If possible, prior scars are incorporated into the planned excision, but with the caveat to be conservative. When distortions are present it is best to incise the old scar, recre-ate the defect, and reassess. Although, diagrams of composite grafts and transposition flaps are shown for correcting nostril sill contracture, results are limited at best.
Retracted Nostril. Many secondary cases present with a “retracted look” due to a combined alar rim/nostril/columella deformity (ARNC) (Fig. 10.15a). This triad consists of retracted alar rims and allows one to look into the person’s nostril aperture which is accentuated by the hanging columella. It is essential to analyze the four inclinations on lateral view (tip, alar rim, nostril, columella) and assess the nostril by bisecting its aperture and assigning the etiology to alar rim and/or columella. Of the three possibilities, the most common is a combined deformity corrected by excision of the caudal septum, lowering of the alar rim by either alar rim grafts or composite grafts, and appropriate alar base/nostril sill excisions. The columellar deformity is due to excessive length of the caudal septum and/or intrinsic deformity of the medial crura. It is critical to assess upper lip length and inclination before excising caudal septum. In secondary cases, the nostril rim deformity implies rim retraction which is treated progressively from alar rim graft (ARG) to alar rim structure graft (ARS), and ultimately composite grafts. The tapered composite “strip” graft measuring 2–4 mm in width and 8–10 mm in length is highly effective in lowering the rim.


(a) Columellar/nostril relationship and deformities, (b1) lengthening with either a pennant or a septocolumellar graft, (b2,3) lengthening with a pennant graft
Retracted Nose. These complex cases are often short upwardly rotated noses which were over-resected followed by severe scar contracture (Fig. 10.15b). Essentially one must be able to force the tip and columellar downward with a major septocolumellar graft. The critical deci-sion is to decide whether the lobule should be downwardly rotated and lengthened or whether the entire nose should be lengthened. The distinction is made at the SN point — rotation downward versus lengthening. If SN is kept as is, then the tip can be rotated downward usu-ally with a pennant graft. Stretching rather than contracture of the membranous septum is crucial. When scar contracture is severe or SN needs to be lower, then a large septocolumellar graft is placed between the alars to force down the tip followed by infralobular tip grafts. Vestibular scarring often mandates major composite grafts to lengthen the nasal lining.
Reading List
Constantian M. Four common anatomic variants that predispose to unfavorable rhinoplasty results. Plast Reconstr Surg 105:316, 2000
Constantian MB, Clardy RB. The relative importance of septal and nasal valvular surgery in correcting airway obstruction in primary and secondary rhinoplasty. Plast Reconstr Surg 98:38, 1996
Daniel RK. Rhinoplasty:Creating an aesthetic tip. Plast Reconstr Surg 80:775, 1987. Follow-up:Daniel RK. Rhinoplasty:A simplified, three-stitch, open tip suture technique. Part I:Primary rhinoplasty, Part II:Secondary rhinoplasty. Plast Reconstr Surg 103:1491, 1999
Daniel RK (ed). Aesthetic Plastic Surgery:Rhinoplasty. Boston:Little, Brown, 1993
Daniel RK. Rhinoplasty and rib grafts:Evolving a flexible operative technique. Plast Reconstr Surg 94:597, 1994
Daniel RK. Secondary rhinoplasty following open rhinoplasty. Plast Reconstr Surg 96:1539, 1995
Daniel RK. Rhinoplasty:Septal saddle nose deformity and composite reconstruction. Plast Reconstr Surg 119:1029, 2007
Daniel RK. Diced cartilage grafts in rhinoplasty surgery:current techniques and applications. Plast Reconstr Surg 122:1883, 2008
DeRosa J, Watson D, Toriumi D. Structural grafting in secondary rhinoplasty. In Gunter JP, Rohrich RJ, Adams WP (eds) Dallas Rhinoplasty:Nasal Surgery by the Masters. QMP, 719–740
Gunter JP. Secondary rhinoplasty:The open approach. In:Daniel RK (ed) Aesthetics Plastic Surgery:Rhinoplasty. Boston:Little, Brown, 1993
Gunter, JP, Rohrich, RJ. The external approach for secondary rhinoplasty. Plast Reconstr Surg 80:161, 1987
Gunter JP, Rohrich RJ, Friedman RM. Classification and correction of alar-columellar dis-crepancies in rhinoplasty. Plast Reconstr Surg 97:643, 1996
Juri J. Salvage techniques for secondary rhinoplasty. In:Daniel RK (ed) Aesthetic Plastic Surgery:Rhinoplasty, Boston:Little, Brown, 1993
Kim DW, Toriumi DM. Nasal analysis for secondary rhinoplasty. Facial Plast Surg Clin North Amer 11:399, 2003
Kridel RW, Konior RJ. Controlled nasal tip rotation via the lateral crural overlay technique. Arch Otolaryngol 117:441, 1991
Meyer R. Secondary and Functional Rhinoplasty — The Difficult Nose. Orlando:Grune and Stratton, 1988
Peck GC. Techniques in Aesthetic Rhinoplasty. (2nd ed.) Philadelphia:JB Lippincott, 1990
Rohrich RJ, Sheen JH. Secondary rhinoplasty. In:Grotting J (ed) Reoperative Plastic Surgery. St. Louis:Quality Medical Publishing, 1994
Rohrich RJ, Sheen JH, Burget O. Secondary Rhinoplasty. St. Louis:Quality Medical Publishing, 1995
Sheen JH. Achieving more nasal tip projection by the use of a small autogenous vomer or septal cartilage graft. A preliminary report. Plast Reconstr Surg 56:35, 1975
Sheen JH. A new look at supratip deformity. Ann Plast Surg 3:498, 1979
Sheen JH, Sheen AP. Aesthetic Rhinoplasty (2nd ed.) St. Louis:Mosby, 1987
Sheen JH. Tip graft:A 20-year retrospective. Plast Reconstr Surg 91:48, 1993a
Sheen JH. Balanced rhinoplasty. In:Daniel RK (ed) Aesthetic Plastic Surgery:Rhinoplasty. Boston:Little, Brown, 1993b
Tabbal N. The alar sliding graft for correcting alar collapse and expanding the nasal tip. Aesth Surg J 20:244, 2000
Toriumi DM. New concepts in nasal tip contouring. Arch Facial Plast Surg 8:156, 2006
Toriumi DM. Augmentation rhinoplasty with autologous cartilage grafting. In Park JL, ed. Asian Facial Cosmetic Surgery, Philadelphia:Elsevier, 2007, pp. 229–252
Toriumi DM, Johnson CM. Open structure rhinoplasty:featured technical points and long-term follow-up. Facial Plast Clin North Am 1:1, 1993
Toriumi DM, Hecht D. Skeletal modification in rhinoplasty. Facial Plast Surg Clin North Am 4:413, 2000
Author information
Authors and Affiliations
Corresponding author
Rights and permissions
Copyright information
© 2010 Springer-Verlag Berlin Heidelberg
About this chapter
Cite this chapter
Daniel, R.K. (2010). Secondary Rhinoplasty:Surgical Techniques. In: Mastering Rhinoplasty. Springer, Berlin, Heidelberg. https://doi.org/10.1007/978-3-642-01402-4_10
Download citation
DOI: https://doi.org/10.1007/978-3-642-01402-4_10
Publisher Name: Springer, Berlin, Heidelberg
Print ISBN: 978-3-642-01401-7
Online ISBN: 978-3-642-01402-4
eBook Packages: MedicineMedicine (R0)