
Abstract
Aseptic technique is a method that involves target-specific practices and procedures under suitably controlled conditions to reduce the contamination from microbes. It is a compulsory laboratory skill to conduct research related in the field of microbiology. Mycologist/microbiologists must follow aseptic techniques for multiplicity procedures such as screening of isolates/strains, pure cultures, slant cultures, single spore cultures, microbes transferring cultures, inoculating media, and conducting several microbiological experiments. Proper aseptic technique has prevented the cultures contamination from inborn and outborn microbes in the environment. As example, airborne microbes (e.g., fungi) handpicked from the surveyor’s health, the lab benchtop, unsterilized glassware and equipment, dust, and other areas, thus interfering to get proper experiment results. Using the proper aseptic technique can significantly reduce/minimize the risk of contamination.
You have full access to this open access chapter, Download chapter PDF
1.1 Aseptic Technique and Safety
Aseptic technique is a method that involves target-specific practices and procedures under suitably controlled conditions to reduce the contamination from microbes. It is a compulsory laboratory skill to conduct research related in the field of microbiology. Mycologist/microbiologists must follow aseptic techniques for multiplicity procedures such as screening of isolates/strains, pure cultures, slant cultures, single spore cultures, microbes transferring cultures, inoculating media, and conducting several microbiological experiments. Proper aseptic technique has prevented the cultures contamination from inborn and outborn microbes in the environment. As example, airborne microbes (e.g., fungi) handpicked from the surveyor’s health, the lab benchtop, unsterilized glassware and equipment, dust, and other areas, thus interfering to get proper experiment results. Using the proper aseptic technique can significantly reduce/minimize the risk of contamination. Aseptic technique commonly maintains pure stock cultures and single spore culture while transferring cultures into fresh media. Appropriate aseptic techniques prevent microbes from unintentionally released into the environment and/or contaminating lab user in the laboratory. Aseptic techniques have the following objectives: (1) to acquire the knowledge of aseptic technique in the field of microbes, (2) to avoid the contamination of cultures from undesirable microbes in the laboratory, (3) to subculture (transfer cultures from one media by inoculating into another media), (4) to isolate pure culture from mixed culture, and (5) to inhibit lab microbes from being distributed in the environment and/or contaminating the investigator (vlab.amrita.edu, 2011).
Biosafety comprises addressing of the safe handling and containment of transferable microorganisms and unwarranted biomaterials. The basics of containments are safety equipment, microbiological practices, and skill safeguards that defend lab workers, environment, and examiners/public from exposure to transferable microbes that are properly handled and kept in the laboratory. Personnel working with transferable agents are acquainted with hazards that require the proper training and skillful practices for handling such materials. All laboratories are required to develop a biosafety or operations manual that categorizes the hazards that may be met, and that specifies the proper practices and techniques to reduce/or minimize the hazard exposures. A microbiologist/scientist, and knowledgeable laboratory techniques, safety procedures, and hazards associated with handling transferrable agents will accountable for the comportment of research with infectious agents or materials. The proper design and work structures, safety equipment, and controlling practices should enhance the laboratory personnel and safety practices.
Cliffe (2016) has mentioned that many biosafety levels (BSLs) have been developed for laboratories to enhance the protection levels of environment and staff. BSLs have standard guidelines that described the proper containment equipment, services, and procedures for apply by laboratory researchers/scientists/technicians/students. The BSLs are categorized into BSL 1 to BSL 4, and the risk associated with every BSL increases with the infectious microbes encountered. BSL 2 practices are mostly followed by clinical microbiology laboratories. When conducting works with high transmissible agents, the risk of aerosol transmission is so high, so microbiology laboratories must follow BSL 3 practices.
Hint
Risk group | Pathogenicity features |
BSL 1 (low individual and community risk) | Implausible to cause significantly human disease or animal disease of veterinary. E. coli, Pseudomonas, Baculovirus of insects, Aspergillus |
BSL 2 (moderate individual risk, limited community, livestock or environment risk) | Causing human or animal disease but noncontaminant to laboratory researchers, technicians, communities, livestock, or environment. Infectious risk is via direct contact, ingestion, or inhalation. Effective treatment, preventive and control measures, are readily available. Bacillus cereus, Salmonella, Shigella, Hepatitis A, B, C, Rubella, Chikungunya |
BSL 3 (high individual, low community risk) | Exotic or indigenous agent—potentially transmit disease mainly via aerosols. Disease caused is severe and can kill. Low risk to community—effective treatment, preventive available: SARS, Yellow fever virus, H5N1, Rabies virus, BSE, Bacillus anthracis, TB, Rickettsia |
BSL 4 (high individual and community risk) | Causing life-threatening human disease. Disease transmissible—one individual organism to another organisms—via aerosol or unknown. No available effective treatment, preventive and control measures. Ebola virus, Herpes B virus, Smallpox virus |
In Biosafety Level 1 (BSL-1) denotes a fundamental level of containment that be contingent on standard microbiology practices with never requiring any special primary or secondary barriers recommendation, other than washing hand. BSL-2 practices are appropriate to teaching, diagnostic, clinical, and other laboratories in which work has conducted wide-range of indigenous moderate-risk agents that are available in the community and allied with human disease.
The objective of this chapter is to provide the proper hand-on practices in microbiology laboratory to teachers, students, researchers, scientists, and technicians and also ensure the studies proceed safely and succeed the successfully of educational standard.
1.2 Good Microbiological Laboratory Practices (GMLP)
Good microbiological laboratory practices (e.g., aseptic technique) when handling microorganisms have prevented contamination of the workplace from other microorganisms or nontarget microorganisms. They supplement the containment facilities, procedures and processes to reduce the spread of microorganism contamination and prevent the exposure of people and the environment to the microorganisms that are being deliberately manipulated either by accident or once work has finished.
The principles of GMLP summarized below should be adopted when working with microorganisms, so it should be declaim in conjunction with the guidance on containment.
Principles of Good Microbiological Practices (Chosewood and Wilson 2009)
-
1.
Never uses any pipette substance by mouth. In laboratory always avoid contact hand to mouth or hand to eye. In the laboratory, never drink, eat, apply cosmetics, lip balm, handle contact lenses and taken medication.
-
2.
Aseptic techniques properly use. Right way wash your hand after removing gloves, other personnel protective equipment (PPE), handling potentially infectious agents or materials and exiting of laboratory.
-
3.
Centers for Disease Control and Prevention (CDC)/National Institutes of Health (NIH) Biosafety in Microbiological and Biomedical Laboratories (BMBL) have recommends that laboratory personnel must be protected their streetwear clothing from contamination by wearing appropriate attire (e.g., gloves, lab shoes or use shoe covers) when conducting works in BSL-2 laboratory. Streetwear clothing and street shoes are not permitted for use in BSL-3 laboratory; in the lab always preferred to change of streetwear clothes and shoe covers or shoes keen for uses. In BSL-4 is mandatory changed from streetwear clothes/shoes to use the permitted laboratory attires and footwear.
-
4.
Once removing the hazardous material in the laboratory, personnel must be followed Occupational Safety and Health Act (OSHA). When infectious agents are handled in laboratories; syringes, and needles or other sharp instruments should be restricted. A used needle never repetited. Dispose of syringe–needle assemblies in properly labeled, lesion resistant, autoclavable sharps containers.
-
5.
Knob infectious materials as determined by a risk assessment. Airborne infectious agents should be controlled by a certified biosafety cabinet (BSC) appropriate to the BSLs and risks for the agent.
-
6.
Make sure that engineering controls (e.g., eyewash, BSCs, safety showers, and sinks) are properly maintained and inspected.
-
7.
The contaminated lab ware or materials never leave open to the outside of BSC. All biohazardous materials steadily stored with proper labeled, and sealed containers.
-
8.
Must be displayed all laboratories doors with the recognized biohazard symbol, a list of the infectious agents, access requirements (e.g., PPE) and emergency contact information.
-
9.
Avoid the use of aerosol-producing techniques when working with infectious materials. Pipette mixing, needle clipping, centrifugation, and sonication can generate considerable aerosols.
-
10.
Antiseptic traps and inline filters on vacuum lines are used to defend vacuum lines from contamination.
-
11.
Follow the laboratory biosafety design for the infectious materials that are conducting with the accurate decontamination methods to decontaminate the infectious materials. Always keep spill kits available in the lab for managing an accidental spill of pathogenic materials.
-
12.
Clean the worktable area with an appropriate disinfectant after conducting work with infectious materials in the laboratory. M ust not be cluttered the laboratory containment in order to authorize suitable floor and disinfect work area.
-
13.
Without decontaminated or sterilized or autoclaved (temperature (121 °C), pressure (15 psi), and time (15–20 min)), never allow to leave unwanted infectious materials or contaminated agents in the laboratory or to be put in the sanitary sewer.
-
14.
When transferring or shipping infectious materials to other laboratory, always use Postal or Department of Transportation (DOT) approved, leak-proof sealed and properly packed containers (primary and secondary containers). Be sure the lid is on tight and avoiding the container contamination from the outside. Before transporting infectious materials, make sure that the outside of container is decontaminated. Ship infectious materials in accordance with Federal and local necessities.
-
15.
All accidents, occurrences, and unexplained illnesses must be reported to lab technician/supervisor and the Occupational Health Physician.
-
16.
Always think safety first priority during laboratory operations. Evoke, if you are not clearly apprehend the proper handling and safety procedures or how properly use safety equipment; avoid conducting work with the infectious materials until you get proper instruction or consult the CDC/NIH BMBL for further information.
(Note: Remember, the abovesaid principles of good microbiological practices will help and protect you, your fellow worker and the public from the infectious agents you use.)
1.3 Risk Assessment
Teachers, researchers, scientists, and lab technicians may make practical amendments to the risk assessments model according to their professional judgment based on their proficiencies. The legislation governing Hazardous Substances and Dangerous Goods entails that entire procedures and experiments involving hazardous materials must have documentation and minimize exposure. The risk management approach always apply for safety in the laboratory before starting any new research projects or experiments work. Conducting risk assessment it should detect potential hazards and control the actions to reduce any risks of personnel health.
Factors to be considered in risk assessments (Source: ASE 2001).
Factor | Relevance |
|---|---|
Good microbiological laboratory practice (GMLP) | Protection of operators (teachers, researchers, scientists, students, and lab technicians) |
Levels of practical works (levels 1, 2, 3, and 4) | Degree of risk of microorganisms culture; well-trained of teacher and technician; student age and discipline |
Select the microorganisms (ACDP hazard group 1) | Cultures must present minimum risk when GMLP are followed |
Source of cultures | Reliable and professional supplier or permitted environment samples |
Type of investigations/activities | Ample containment of cultures; hands-on work |
Composition of culture media | The uses of some culture media are planned for selecting the growth of pathogens, i.e., not in ACDP hazard group 1 |
Volume of cultures | Increased risk with increase in volume of liquid culture |
Laboratory facilities | Suitable level of containment for hands-on microbiological work |
Equipment | Adequate for purposes |
Incubation conditions | Proper selecting for the growth of pathogens |
Disposal of contaminated materials | Ensures the elimination of risk to others |
Proficiency of lab technicians, researchers and teachers | Skill and proper training in practices and procedures applicable to the level of practical work (levels 1, 2, 3, and 4) |
Student age and discipline | Suitable level of practical work; self-confidence in class discipline |
Sources of competent advice | ASE*, CLEAPSS*, MISAC, NCBE, SSERC* (*members only) |
Useful check list | CLEAPSS Laboratory Handbook, ASE Topics in Safety, 2nd edition (ASE 1988), pp. 34–37 |
Essential reference | ASE Topics in Safety, 3rd edition (ASE 2001) |
Key to abbreviations: ACDP Advisory Committee on Dangerous Pathogens, ASE Association for Science Education, CLEAPSS Consortium of Local Education Authorities for the Provision of Science Services, MISAC Microbiology in Schools Advisory Committee, NCBE National Centre for Biotechnology Education, SSERC Scottish Schools Equipment Research Centre
1.4 Spillage Management
1.4.1 Spills
The spillages cultures are immediately reported to the teacher/researchers or lab technicians for dealt with quickly. Spilled cultures and adjacent debris (glass, cotton wool plugs, etc.) must not be touched with unprotected hands/open-handed. Must wear disposable gloves and cover the disinfect spill area with several layers of cloth/towel drenched in a proper disinfectant and leave for at least 15–30 min. Immediately spill debris cleaned into a container/dustpan using towels. Transferring all disposable materials (e.g., roasting bag) into suitable container for autoclaving and disposal. A container must be sterilized or decontaminated by autoclaving or by soaking (at least 24 h) in hypochlorite (sodium chlorate I).
1.4.2 Broken Glass
The broken glass must be cleaned prudently into proper container, autoclaved and disposed of in a lesion-proof container.
1.4.3 Splashes on Clothing and the Skin
The contaminant clothes should be waterlogged in disinfectant. Splashes on the skin should be cured as quickly; hot water and soap may be sufficient for washing; if necessary the skin can be disinfected.
Hint
It is more useful to use spillage kit always ready at hand. The components are suggested in below:
-
Beaker for making fresh disinfectant
-
Disposable gloves
-
Container/Dustpan and brush
-
Towel/cloth
-
Autoclave/roasting bag
1.5 Resources
1.5.1 Equipment (Source: ASE 2001)
Equipment | Use |
|---|---|
Loops or needles | Routinely inoculate of agar slopes/deeps and lesser volumes of liquid media (up to ca 10 cm3) |
Straight wire | Inoculation from very small colonies; transfer of small inocula from liquid media |
Spreader (glass/plastic) | Making lawn/spread plates |
Forceps (metal/plastic) | Transfer of sterile paper/antibiotic discs; also plant material, e.g., short lengths of root with nodules |
Pipette | Transfer appropriate volumes/drops of culture/sterile solutions |
Teat | Filling and tipping pipettes safely (never pipette by mouth) |
Test tube | Small volumes of liquid media/agar slants/sterile solutions for inoculation (held in test tube rack; dry nonabsorbent cotton wool plug or plastic cap prevents contamination) |
Universal bottle (wide neck); McCartney bottle (narrow neck) | Volumes of liquid media and agar media/sterile solutions for inoculation or storing sterile media or stock cultures on agar slants (keep upright on bench; plastic screw cap thwarts contamination and reduces aerosol during long storage) |
Conical flask | Medium or large volumes of liquid media for inoculation and liquid/media for short-term storage (nonabsorbent cotton wool plug prevents contamination but never reduce evaporation during long storage) |
Petri dish (plastic/glass) | Plastic: Presterilized for streak/spread/lawn/pour plates; Glass: Only materials for sterilization by hot air oven, e.g., paper discs |
Marker pen | Labeling petri dishes, test tubes, flasks, bottles, and microscopic slides |
Personal protective equipment (level 2, level 3, Topics in Safety, 3rd edition (ASE 2001) | Clean laboratory coat/apron: Protection of clothing, containment of dust on clothing; Safety spectacles: Not considered essential when dealing with suitable cultures and observing GMLP but may be required by local regulations and for dealing with chemicals. |
1.5.2 Apparatus (Source: ASE 2001)
Apparatus | Use |
|---|---|
Bunsen burner | Disinfection of needle/wire loops, metallic forceps and glass spreaders |
Waterproof sheet or tray | Provides each student working area if the bench surface is not properly sealed |
Autoclave/pressure cooker | Sterilization of all media, solutions, and equipment before use |
Gas ring/hot plate | Steam generation in autoclave |
Autoclavable/roasting bag | Holds contaminated items in autoclave to contain spillages |
Hot air oven | Sterilization of glass petri dishes, pipettes, and paper discs |
Discard containers containing disinfectant | Disposal of the used pipettes and slides of nonstained microscopically preparations |
Microwave oven | Melting solidified agar media for use |
Incubator | To incubate the cultures |
Water bath | Meet the specific temperature for keeping agar media molten for use; exact temperature control |
Thermometer | Checking incubator/water bath/laboratory temperatures |
pH meter | Checking and adjusting pH values of media and solution |
Cupboard | Storage of culture media and stock cultures |
Refrigerator | Storage of heat-labile materials |
Microscope, slides, cover slips, stains, staining rack, immersion oil | For microscopically examination |
1.5.3 Materials (Source: ASE 2001)
Materials | Use |
|---|---|
Culture media ingredients | Stock wide range of culture media in dehydrated form (powder/tablets) |
Disinfectants | Decontaminant the surface of workbenches before and after use and spillages; always disposal of the used pipettes and slides. In soap use for hand washing |
Ethanol (70% industrial methylated spirit) | Sterilization of metal forceps and glass spreaders by explosion |
Autoclave indicator tape | Changes color in response to heat to distinguish those items that have received heat treatment (although it is not effective sterilization) |
Steriliser control tube/strip | Changes color when accurate temperature applied and held for the obligatory length of time to effect sterilization |
Non absorbent cotton wool | Plugs for test tubes, flasks, and pipettes |
Spillage kit | Dealing with spilled cultures |
1.6 Flaming the Needle/Loop
-
1.
For sterilization of needle/loop, first hold the needle/loop in the flame of the Bunsen burner to kill all infecting substances/organisms.
-
2.
The needle/loop can be made red-hot for a few seconds (Fig. 1.1).
Fig. 1.1 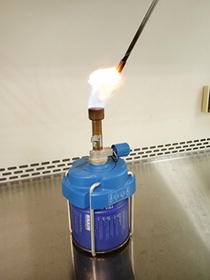
Demonstration of the flaming the needle/loop
-
3.
After flaming, make sure that the needle/loop is slightly cool before taking sample from the inoculum culture (for transferring culture).
-
4.
When transferring the fungal colony from cultural plate, need to cool the needle/loop by touching on the edge of agar. Again when fungal colony transferred from broth media, the red-hot loop/needle can create a sizzling noise.
-
5.
Subsequently the needle/loop can spontaneously be cooled once it touch with the broth culture, wait for 1 or 2 s before take away the needle/loop of inoculum from the bottle/tube (avoid dipping hot needle/loop into media because this always creates aerosols).

1.7 Flaming the Neck of Bottles/Test Tubes
The neck of bottle/tube is passed through the flame of Bunsen burner to create a convection current which forces air out of the bottle/tube. Avoid the airborne contaminations from the bottle/tube. Heat of the Bunsen burner causes the air near by work area to increase, reducing the accidental airborne microbes contaminating cultures.
-
1.
Loosen the cover/cap of the bottles/tubes so it can be removed easily (Fig. 1.2).
Fig. 1.2 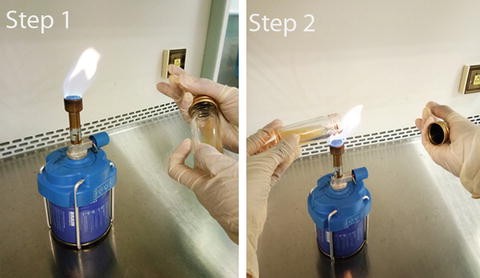
Flaming the neck of bottles/test tubes
-
2.
Hold the bottle/test tube with left hand.
-
3.
Take out the cover/cap of the bottle/cotton wool plug with little finger of the right hand.
-
4.
Don’t put down the cover/cap or cotton wool plug.
-
5.
Flame the bottle/test tube neck (forward and back) through a hot Bunsen flame.
-
6.
The mandatory procedures are always followed, e.g., removing culture, replace the cover/cap on the bottle/cotton wool plug using the little finger (turn the bottle, not the cap).

Hints
-
Label the tubes/bottles in a place that cannot clean off in handling. Use marker pens or self-adhesive labels.
-
Cotton wool plugs may accidentally catch fire. If so, immediate cover with lid or dry cloth, avoid blowing or soaking in water.
1.8 Media
1.8.1 Preparation of Culture Media
The prepareation of agar media is followed according to manufacturer’s instructions. Before sterilization, make sure all elements are entirely melted by using microwave oven heat if further required. Avoid wastage by preparing only sufficient for either immediately use or use in the near future. Usually authorize about 15–20 cm3 medium/petri dish. Agar slopes are prepared with universal bottles allowing sterile molten media to solidify in a sloped position.
1.8.2 Pouring a Petri Plate
-
1.
Sterile molten agar bottle is used from the incubator at 45 °C.
-
2.
Hold the bottle in the left hand and remove the lid using the right hand little finger.
-
3.
Flame the bottle neck by passing through back and forward of neck.
-
4.
Remove the lid/cover of the petri dish using the right hand and pour around 15 mL of the sterile molten agar into petri dish and replace the lid/cover of the petri dish (Fig. 1.3).
Fig. 1.3 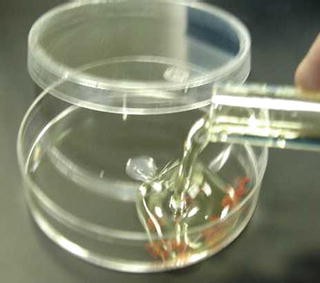
Pouring PDA onto petri plate
-
5.
After that, flame the bottle neck and cover with the lid.
-
6.
Smoothly rotate the petri dish to make sure that the whole media is equally dispersed in the plate.
-
7.
Keep the petri dish for few minutes for solidification.
-
8.
Properly seal the petri dish using Parafilm, and incubate in an inverted position.

1.8.3 Agar Slants
The growth of fungal colonies are transferred into agar slants, in addition, uncertainty found any excess broth in the bottle/tube and agar plates, it should be removed. Univerial bottle/tube containing agar should be solid formed that call a agar slant. A needle/loop can be used to inoculate an agar slant by stabbing the needle containing inoculum into the agar (Fig. 1.4).

Example of agar slants
1.8.4 Storage of Prepared Media
Blue screw-capped bottles of agar and broth should be kept at temperatures of 12–l6 °C for 6 months. When reuse the kept agar media, it should be remelt again using hot water or streaming bath or microwave oven or pressure cooker. After completely melted, the molten agar can be kept in incubator at least 50 °C for ready to use or further uses. All stored media should be kept away from light. After pouring agar in the plates, the plate should be sealed with parafilm and put in well-sealed plastic bags, then kept at 3–8 °C for further reuse.
Freshly prepared media are always better than stored media. It is very important to avoid prolong storage times. Labile beta-lactam selective agents have very short active lives and the media containing some elements that needed within a few days of preparation. A good laboratory practice always supports the shelf-lives of all media preparations and also postmarks the containers or boxes accordingly. Otherwise poor fungal growth results from loss of moisture from agar plates.
Make sure that all agar plates are incubated in a moist environment. Look through the contamination symptom, color changes, irregular filling or bubbles on surface of agar, hemolysis, and symbols of dryness such as cracking, shrinking, and loss of volume. Any defective plates or tubes should be removed.
1.9 Disinfectants
Specific disinfectants are used for the specific purposes of working strengths. Disinfection is defined as the destruction, inhibition, or removal of microorganisms that may cause disease or other difficulties, e.g., spoilage. The use of chemicals also disinfectants occurred.
The available disinfectants and their uses are listed here (Source: ASE 2001).
Disinfectant | Use | Working strength |
|---|---|---|
VirKon | Worktable, discard pots for pipettes and slides, skin disinfection Spillages | 1% (v/v) Powder |
Hypochlorite (sodium chlorate I) | Discard pots for pipettes and slides | 2500 ppm (0.25%, v/v) available chlorine |
Ethanol | Skin disinfection | 70% (v/v) industrial methylated spirit |
-
When making the strength of working solutions from stock with dealing powder form, wear eye protection and gloves to avoid irritant or harmful effects.
-
The uses of disinfectants at working strength newly made from powder form or stock strength.
-
The activity of VirKon solution may obtain until 1 week or less, e.g., 1 day, after use. The working strength of hypochlorite is prepared on the day.
1.10 Incubation
-
1.
The lid and agar plate can be taped together with 2–4 short strips of Parafilm as protection from accidently (or unauthorized) opening during incubation.
-
2.
Agar plates should be seeded with uppermost if not the molten agar can be dripped on the lid and the culture. Fungal colonies may cause and spread to each other and the risk of spillage of the contaminated liquid.
-
3.
Incubators are set up at the specific temperatures and avoid the cultures being interfered with or accidentally discarded. Many fungal cultures grow optimally at room temperature 28 ± 2 °C.
1.11 Accidents
-
1.
Researchers/scientists/technicians must evacuate from the contamined work area, e.g., breakage of culture tubes, etc., the workplace area should be completely decontaminated.
-
2.
You should follow several steps if a culture tube/plate is broken.
-
(a)
All staffs should immediately evacuate the workplace..
-
(b)
Proper PPE must be worn from the decontaminated room.
-
(c)
The room and cover spill is removed using paper towels properly soaking with 2% Amphyl solution (as disinfectant). Before cleaning up the spill, the towels should be left for at least 1 h; after that keep the wet area with Amphyl to protect dried particles becoming airborne.
-
(d)
Leave from worktable area and do not reenter the laboratory or workplace for at least 1 h.
-
(e)
Contaminated clothing should be autoclaved for 1 h at 121 °C.
-
(a)
-
3.
The laboratory technician or administrator must be informed if any accident happens and at the same time complete the incident report.
-
4.
If accidents happen to the eye,
-
(a)
Go immediately to the eye wash station and call for assistants.
-
(b)
Thoroughly wash eyes for at least 20 min to remove all chemical particles.
-
(c)
Look for medical assistance.
-
(a)
1.12 Emergency Preparation and Response
Emergencies such as explores, hurricanes, and other disasters, its happen normal working environment. The realistic disruptions are commonly occurred as exposures, injuries, spills, equipment failure, electricity power, fire, water loss, or flooding. Handling each of these emergencies and disturptions can follow each institutional guidelines. However, keep a written emergency and evacuation guilde line in workplace and talk to all personnel for such circumstances to avoid worker injury or contamination via infectious agents.
The microbiology laboratory should take the following steps for emergency:
-
1.
All doors should be made of wood.
-
2.
All hitech equipment, refrigerators, and freezers should be provided with emergency electrical outlets or red sockets.
-
3.
Incubators should be locked to prevent breakage.
-
4.
Disconnected computer and electronic equipment are covered with plastic and transferred to one room.
-
5.
Log books and other paperworks should also be covered with plastic andkept in one room.
References
ASE (2001) Topics in safety. The association for science education: promoting excellence in science teaching and learnin. 3rd edn.
Chosewood LC, Wilson DE (2009) Biosafety in microbiological and biomedical laboratories 5th edn. U.S. Department of Health and Human Services, Public Health Service, Centers for Disease Control and Prevention, National Institutes of Health. HHS Publication No. (CDC) p 21–1112
Cliffe FE (2016) Safety norms and regulations in handling fungal specimens. In: Gupta VK, Tuohy MG (eds) Laboratory protocols in fungal biology: current methods in fungal biology. Springer Publisher, New York, pp 1–7
Grainger J, Hurst J, Burdass D (2001) Basic practical microbiology: a manual. The Society for General Microbiology, Marlborough House, Basingstoke Road, Spencers Wood, Reading RG7 1AG, UK, p 1–26
vlab.amrita.edu,. (2011). Aseptic technique and the transfer of microorganisms. Retrieved 15 April 2017, from vlab.amrita.edu/?sub=3&brch=73&sim=212&cnt=1
Author information
Authors and Affiliations
Rights and permissions
Copyright information
© 2017 Springer International Publishing AG
About this chapter
Cite this chapter
Siddiquee, S. (2017). The Basic Concept of Microbiology. In: Practical Handbook of the Biology and Molecular Diversity of Trichoderma Species from Tropical Regions. Fungal Biology. Springer, Cham. https://doi.org/10.1007/978-3-319-64946-7_1
Download citation
DOI: https://doi.org/10.1007/978-3-319-64946-7_1
Published:
Publisher Name: Springer, Cham
Print ISBN: 978-3-319-64945-0
Online ISBN: 978-3-319-64946-7
eBook Packages: Biomedical and Life SciencesBiomedical and Life Sciences (R0)